# Matej Bačo - Portfolio Site (Full Content)
I am impact-driven software engineer from Czech Republic in love with everything open source.
URL: https://matejbaco.eu
## Navigation
- Home: /
- Projects: /projects
- Blog: /blog
- About: /about
## Tech Stack
### Frontend
- Svelte
- Astro
- Next.js
- Remix
- Nuxt
- Angular
- HTMX
- Alpine.js
- TailwindCSS
### Backend
- PHP
- Go
- Bun
- Node
- Python
### Database
- SQL
- Redis
- MongoDB
- Appwrite
### Platform
- Docker
- Kubernetes
- RabbitMQ
- Traefik
- Cloudflare
### Entertainment
- Jamstack
- Unity
- Lua
- Arduino
## Work Experience
- Software lead at Appwrite (Oct 2024 - Present)
Website: https://appwrite.io/
- Software engineer at Appwrite (Aug 2021 - Oct 2024)
Website: https://appwrite.io/
- Fullstack developer at Freelance (Jun 2020 - Aug 2021)
Website: https://github.com/meldiron
## Connect
- Discord: https://discord.com/channels/@me/287294735054274560/
- GitHub: https://github.com/meldiron
- LinkedIn: https://www.linkedin.com/in/matejbaco/
- E-mail: mailto:matejbaco2000@gmail.com
## Pages
### Page: about
## The Beginnings
I started programming in 5th grade, and I built a web app for tracking homework. As ugly and buggy as it was, I will never stop being proud of this monstrosity. Soon after, I learned the basics of frontend, backend, and databases - which allowed me to build a [PHP](https://www.php.net/)-based social platform at the age of 14.

_The biggest challenge I faced was querying a database for users that were inactive for more than 5 minutes. I simply couldn't comprehend `user.activeAt >= now - 5min`, and it took me multiple weeks to implement this._
---
Websites weren't my thing, so I switched to gaming and developed many addons, mods, and even standalone games. While exploring [Unity](https://unity.com/), my backend skills backed me up (pun intended) to implement multiplayer and realtime interactions with [Colyseus](https://colyseus.io/) websockets.
As silly as it sounds, even Minecraft servers got a lot of networking complexity under the hood. My greatest achievement was a proxy on top of auto-scaling stateless instances of servers using [CloudNet](https://github.com/CloudNetService/CloudNet), allowing support for as many players as imaginable (for me and all my 3 friends).
---
Software slowly became boring, and I became interested in microcontrollers. [Arduino](https://www.arduino.cc/) and [Raspberry Pi](https://www.raspberrypi.com/) gave me a basic understanding of the Internet of Things, and allowed me to automate my homeworks for technical drawing by making a plotter drawing machine.

_It took me multiple dead SD cards and many burned LEDs to understand the basics of current, voltage, and resistance. While not relevant in my career path, knowing electronics allows me to understand the boundaries of technologies and how to connect them._
---
As you can see, my beginnings were all over the place. For a long time, my source of passion wasn't mastering a skill, but learning what technologies are capable of and finding their (and my) limits. But slowly, I settled.
## Settle and optimize
Over the years, I realized I want to make an impact. I want to build tools, help teachers, students, friends. Everyone. I quickly understood that the most commonly used platform is a web browser, so I aimed most of my focus on web development, becoming a [fullstack developer](https://www.w3schools.com/whatis/whatis_fullstack.asp) in the process.
My very first work experience was a 1-year part-time job building an e-commerce store with a [Node.js](https://nodejs.org/en)-based backend and [React](https://react.dev/) frontend.
This was the most stressful time of my career. Not only did I face many programming challenges, it was also my first time building in a collaborative team, under pressure of deadlines, and the weight of responsibilities to deliver features to customers. It feels boring talking about it now as an adult, but my teenage self had a hard time.

_The most interesting problem I faced was dealing with large nested category trees. To prevent recursive search through the database, I implemented [nested sets](https://en.wikipedia.org/wiki/Nested_set_model). Making it fast and memory-efficient wasn't an easy task for a self-taught developer who had never heard of [big O notation](https://en.wikipedia.org/wiki/Big_O_notation) before._
---
After graduating from school and becoming a freelancer, I found out that speed of development is what makes me money. Throughout a year of freelancing, I developed `Fullstack Boilerplate`, a web app starter kit with most of the processes automated. Soon after, when I realized it was hell to maintain such a project, I was faced with a hard decision - do I continue development of my starter, or do I become dependent on someone else's technology?
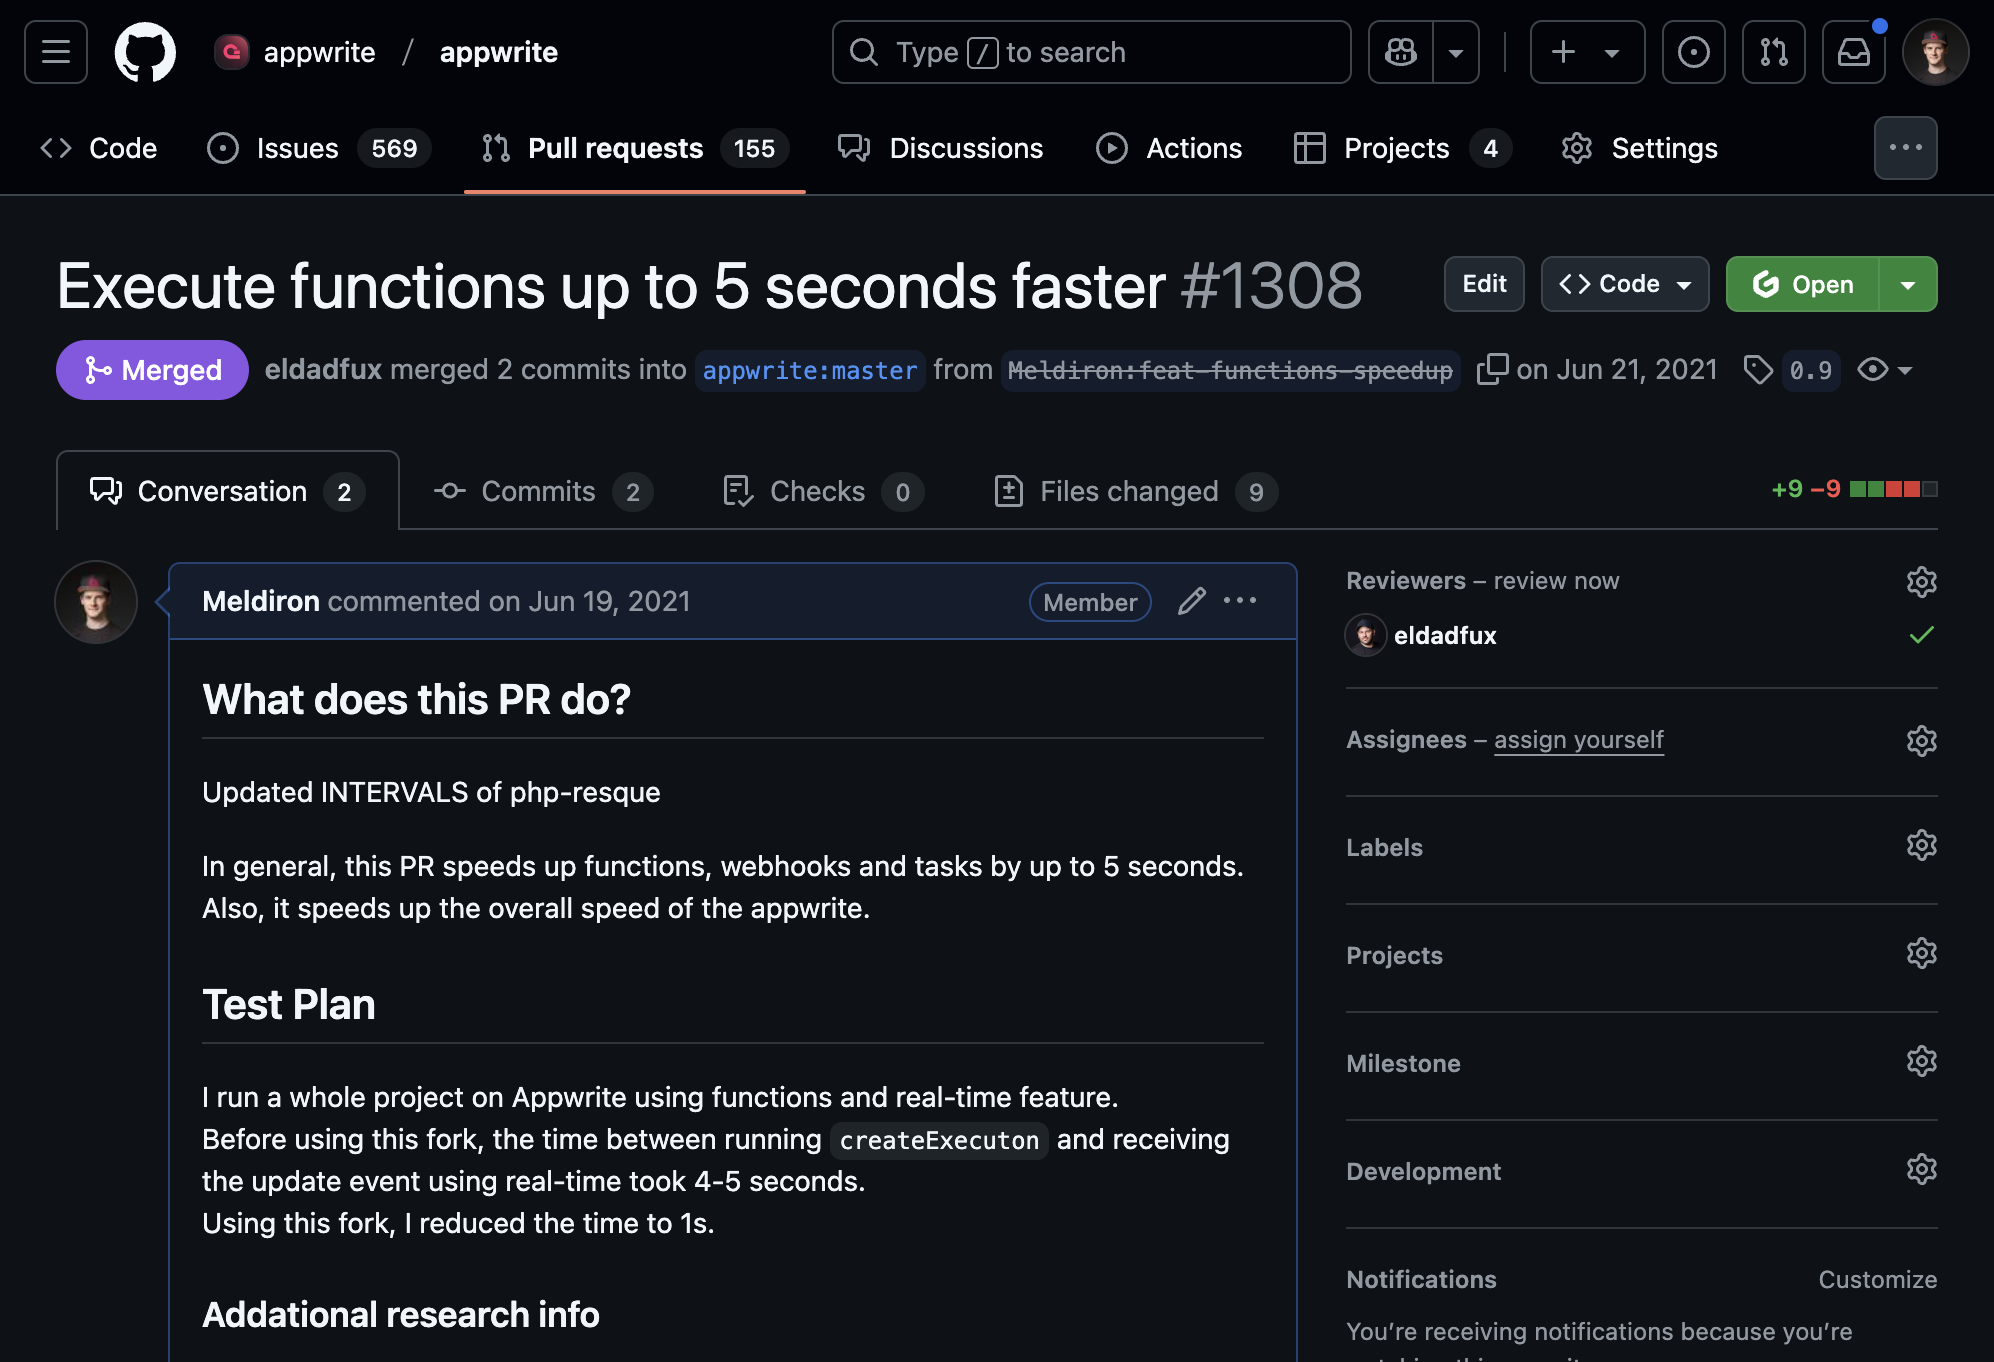
I chose to use [Appwrite](https://appwrite.io/), since it was open-sourced, and their GitHub repository provided everything I needed to be as confident with Appwrite as I was with my own boilerplate.
It didn't take long before I started contributing to the community, and later to the source code as well. A magical thing happened when I made my first [pull request](https://github.com/appwrite/appwrite/pull/1308) - removing random 5-second slowness in serverless functions. The founder of Appwrite reached out to me with a job interview offer and an opportunity to become a core member of Appwrite with a full-time contract.
## Welcome to Open source
Appwrite was the opportunity of my life. My [GitHub graph](https://github.com/Meldiron?tab=overview&from=2024-12-01&to=2024-12-29) never looked cleaner, and I built dozens of free applications. I learned to work with every major runtime (Bun, C++, Dart, .NET, Go, Java, Kotlin, Node.js, PHP, Python, Ruby, Swift) and every major framework (Angular, Analog, Flutter, Next.js, Nuxt, Remix, SvelteKit). I also had the opportunity to work on Appwrite Cloud and learn architecture management with [Terraform](https://www.terraform.io/), and Docker cluster orchestration with [Docker Swarm](https://docs.docker.com/engine/swarm/).
As part of marketing efforts (which be the way, when working at startup, expect to become expert at everything), I built clone of Reddit Place canvas, an event allowing everyone around the globe to make permanent contribution to a painting. After sharing it on social media, our application went viral and within 24 hours I learned to scale to millions visitors and thousands of active users. While this was perfect opportunity for Appwrite backend to show what it's capable of, it was also one of my proudest moments as it allowed me to prove to others, and myself, what I am capable of.
Below you can find rendered history of our Canvas over couple of days, including dozens of millions of actions.
The biggest achievement by far was a 0-downtime migration when I migrated hundreds of thousands of projects across a couple of databases with billions of records into new databases, changing data structure in the process. The transfer was done while still serving tens of millions of requests, and the migration was a success with only a 0.015% failure rate that was migrated with downtime afterwards, after confirming it with the affected organizations.
I'm proud of the 0-downtime migration because it allowed me to learn how to develop critical parts of applications safely. Before launching the feature, it was heavily tested, benchmarked, and simulated. I included validation scripts for every step with the ability to retry, rollback, or recover. With this experience, I gained confidence in critical thinking when it comes to preventing downtime.
_As much as I would love to include some visuals from this migration, I respect privacy and security of the this company process. Imagine small team of engineers on in-person meetup rolling back database changes because a script broke all relationships by replaicng document hexadecimal IDs with numeric IDs. The one in the middle who pressed enter, that's me._
## Project and people leadership
Thanks to my career path, I am currently able to gain experience in leading dedicated projects and leading teams of engineers. I am excited to become a great leader and grow my skills even further.
---
## Projects
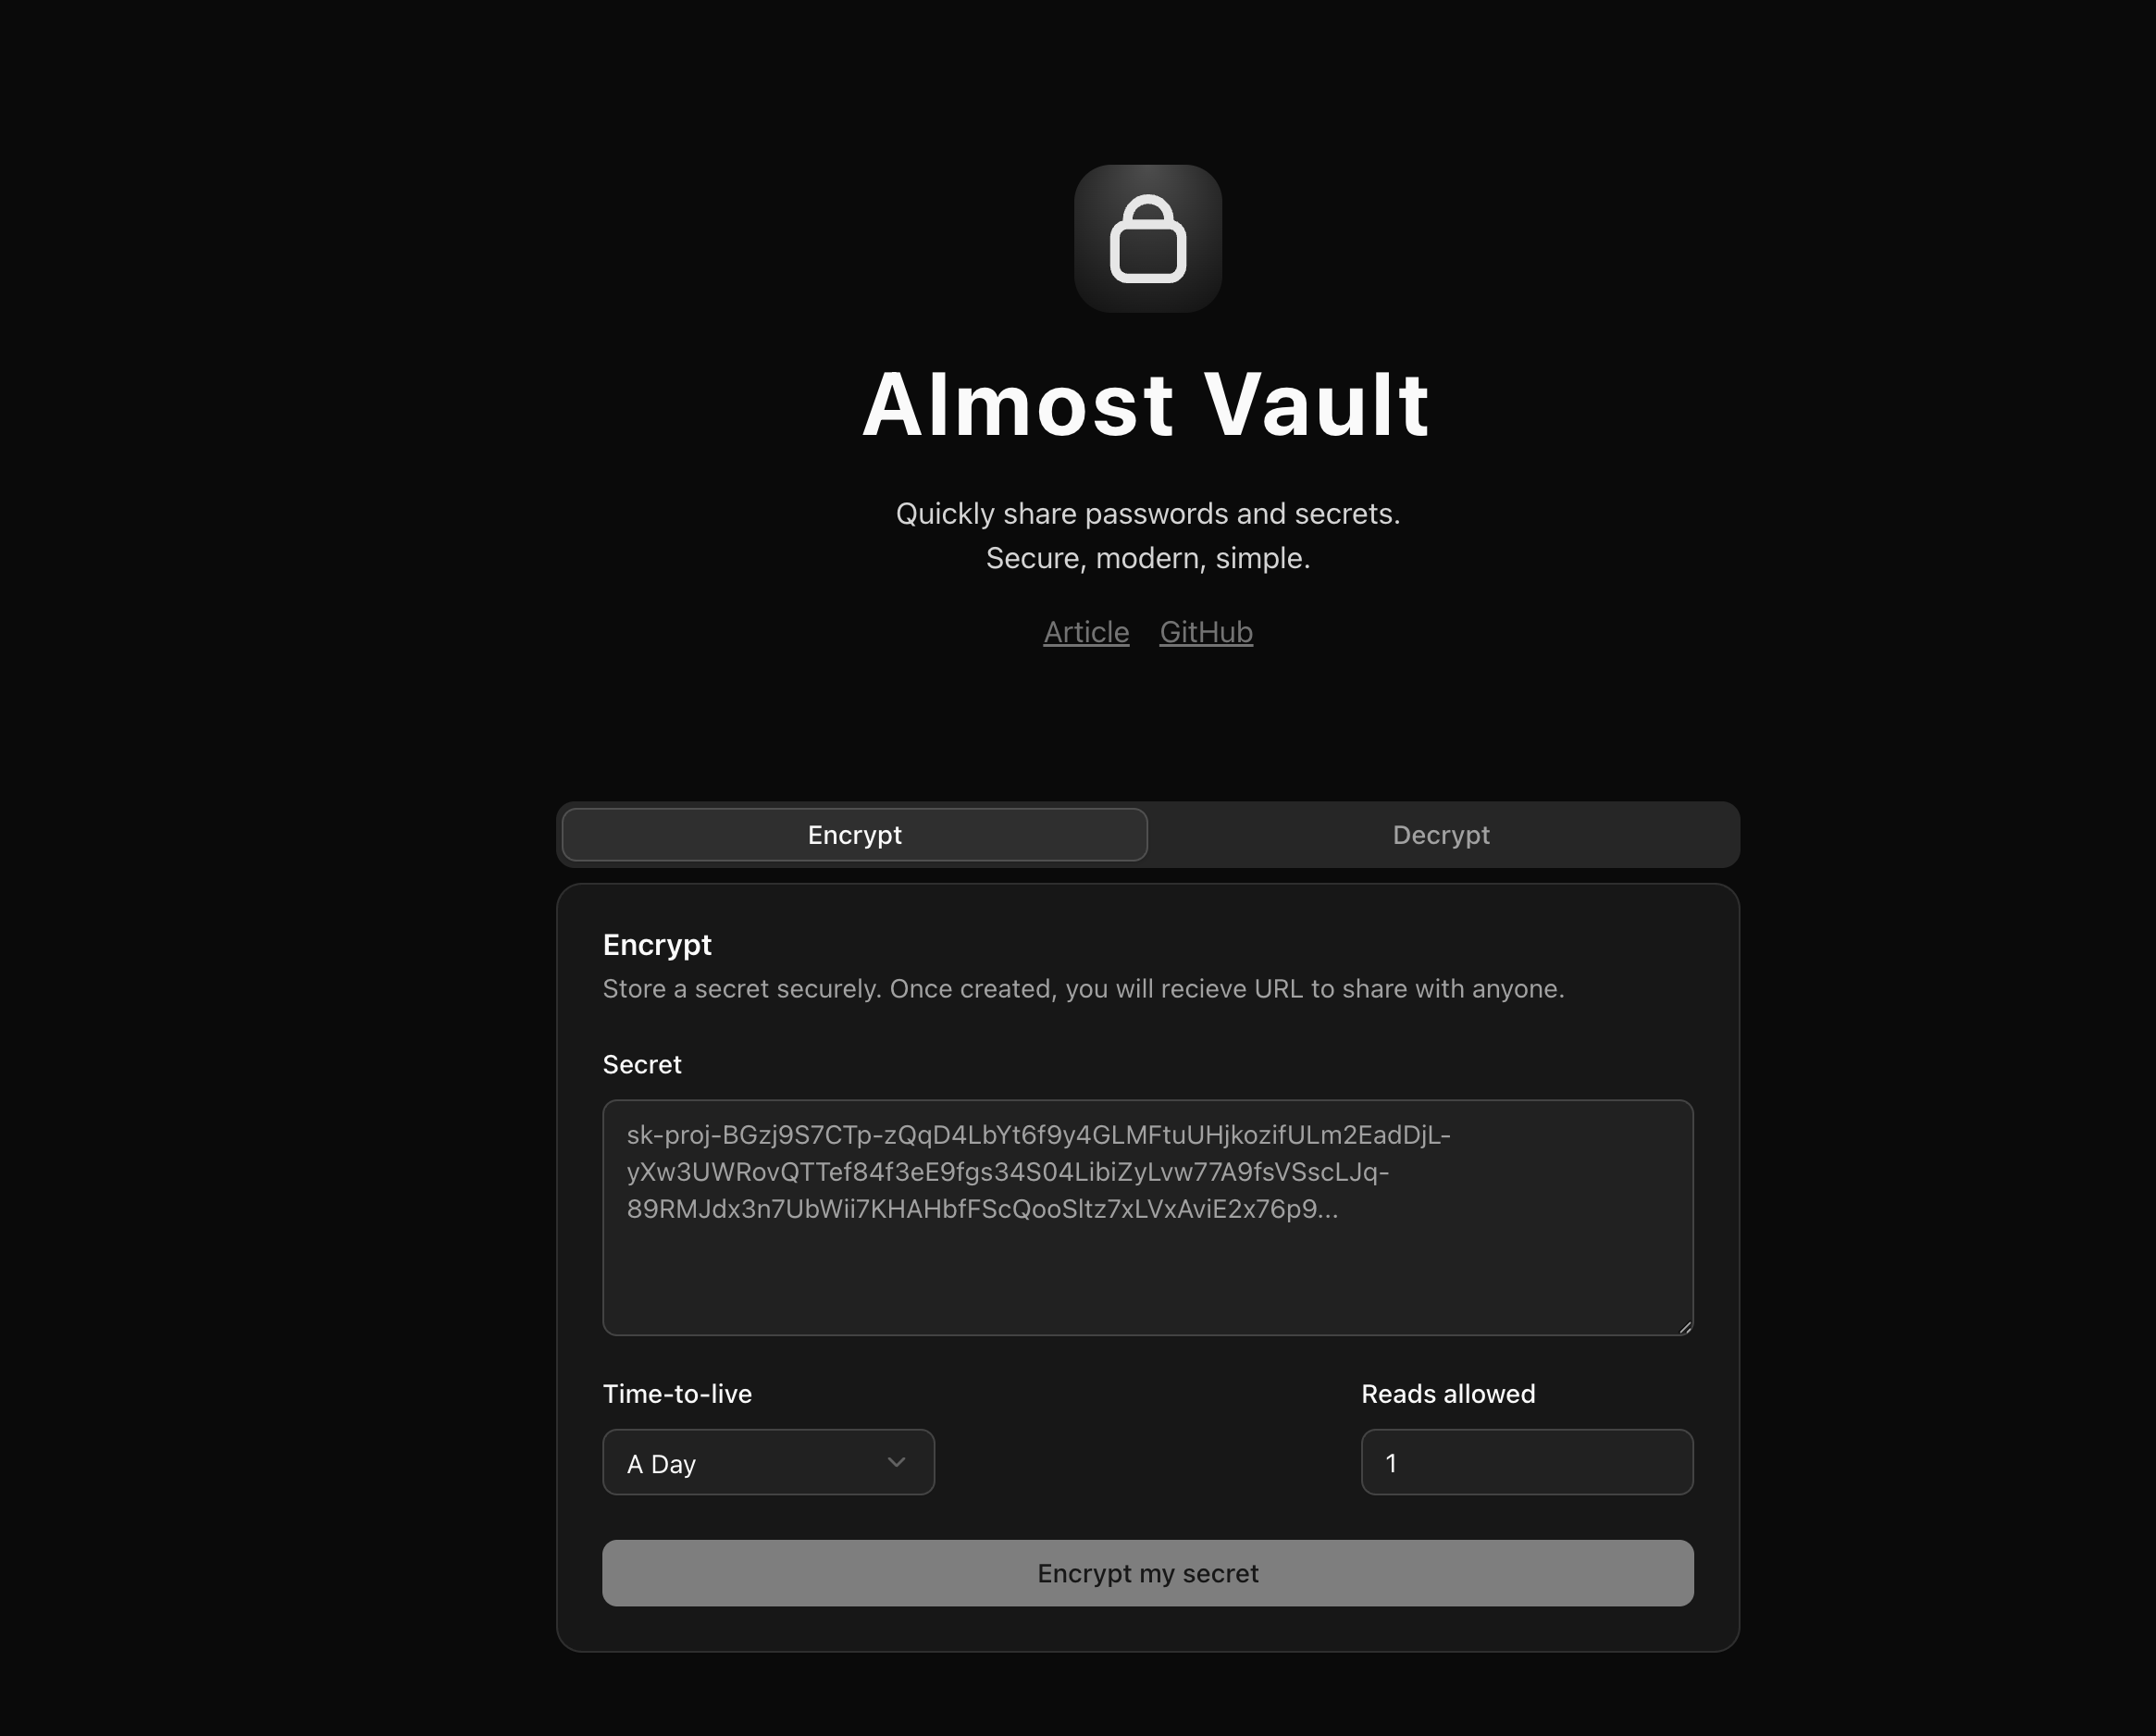
### Project: Almost Vault
Description: Quickly share passwords and secrets with anyone.
Demo: almost-vault.appwrite.network
GitHub: Meldiron/almost-vault
Published: 2025-09-03
## Vision
A few weeks ago I was browsing [daily.dev](https://daily.dev), and I came across an open source tool [Orange-OpenSource/hurl](https://github.com/Orange-OpenSource/hurl), a command line tool for running HTTP tests. From [hurl.dev](https://hurl.dev/), their homepage, I quickly understood it's a Curl-based HTTP testing framework, and it immediately clicked with me; perfect testing tool for Appwrite Functions.
Just a couple of days later, I discovered [Basecoat](https://basecoatui.com/), a UI library similar to [shadcn/ui](https://ui.shadcn.com/), but with the simplicity of [Bootstrap](https://getbootstrap.com/). A CSS library that provides simple one-word classes, giving components a consistent look, extensible with JS functionality for more complex components. This, in my mind, was a great addition to my toolset; it felt just like [launch.css](https://launch-css.dev/), just with more variations.
And last weekend, at [Appwrite](https://appwrite.io/), we announced a Sites hackathon, and I saw it as the perfect opportunity to try out those tools I wanted to try out anyway.
But what do I build?
I wanted the focus of the web app to be Appwrite Function, an HTTP server, so I could take full advantage of the Hurl testing tool. As I was browsing project ideas, I remembered [Shelve](https://www.shelve.cloud/), a password manager I researched for managing my AI API keys. It had a mini project inside of it, [Shelve Vault](https://vault.shelve.cloud/), a simple platform for sharing secrets with others by sharing a URL.
And so the plan was ready. Build a Shelve Vault alternative, but it's a weekend project, so it won't be as finished as theirs. _(or so I thought)_
So, Almost Shelve Vault. So... Almost Vault.
## Technologies
- [Appwrite](https://appwrite.io/)
- Databases, for storing secrets. With the recently released TablesDB, encrypted attributes for privacy, and atomic operations for counting the amount of reads
- Sites, for deploying the webapp to the internet
- Functions, for running the HTTP REST API
- [Koa.js](https://koajs.com/), an HTTP framework like [Express](https://expressjs.com/), but lightweight
- [Zod](https://zod.dev/), a schema validator
- [Alpine.js](https://alpinejs.dev/), a minimal JavaScript framework for reactive UI
- [Vite](https://vite.dev/), a build tool for modern web apps
- [Axios](https://axios-http.com/), an HTTP client, which I used for proxying requests
- [Hurl](https://hurl.dev/), an HTTP testing tool
- [Basecoat](https://basecoatui.com), a simple UI library
And, like everyone nowadays, AI ([Gemini](https://gemini.google.com/) and [Claude Sonnet](https://claude.ai/)) served as my personal assistant for writing documentation, improving code quality, generating test assertions, adding CI/CD checks, and other time-consuming tasks.
## Screens
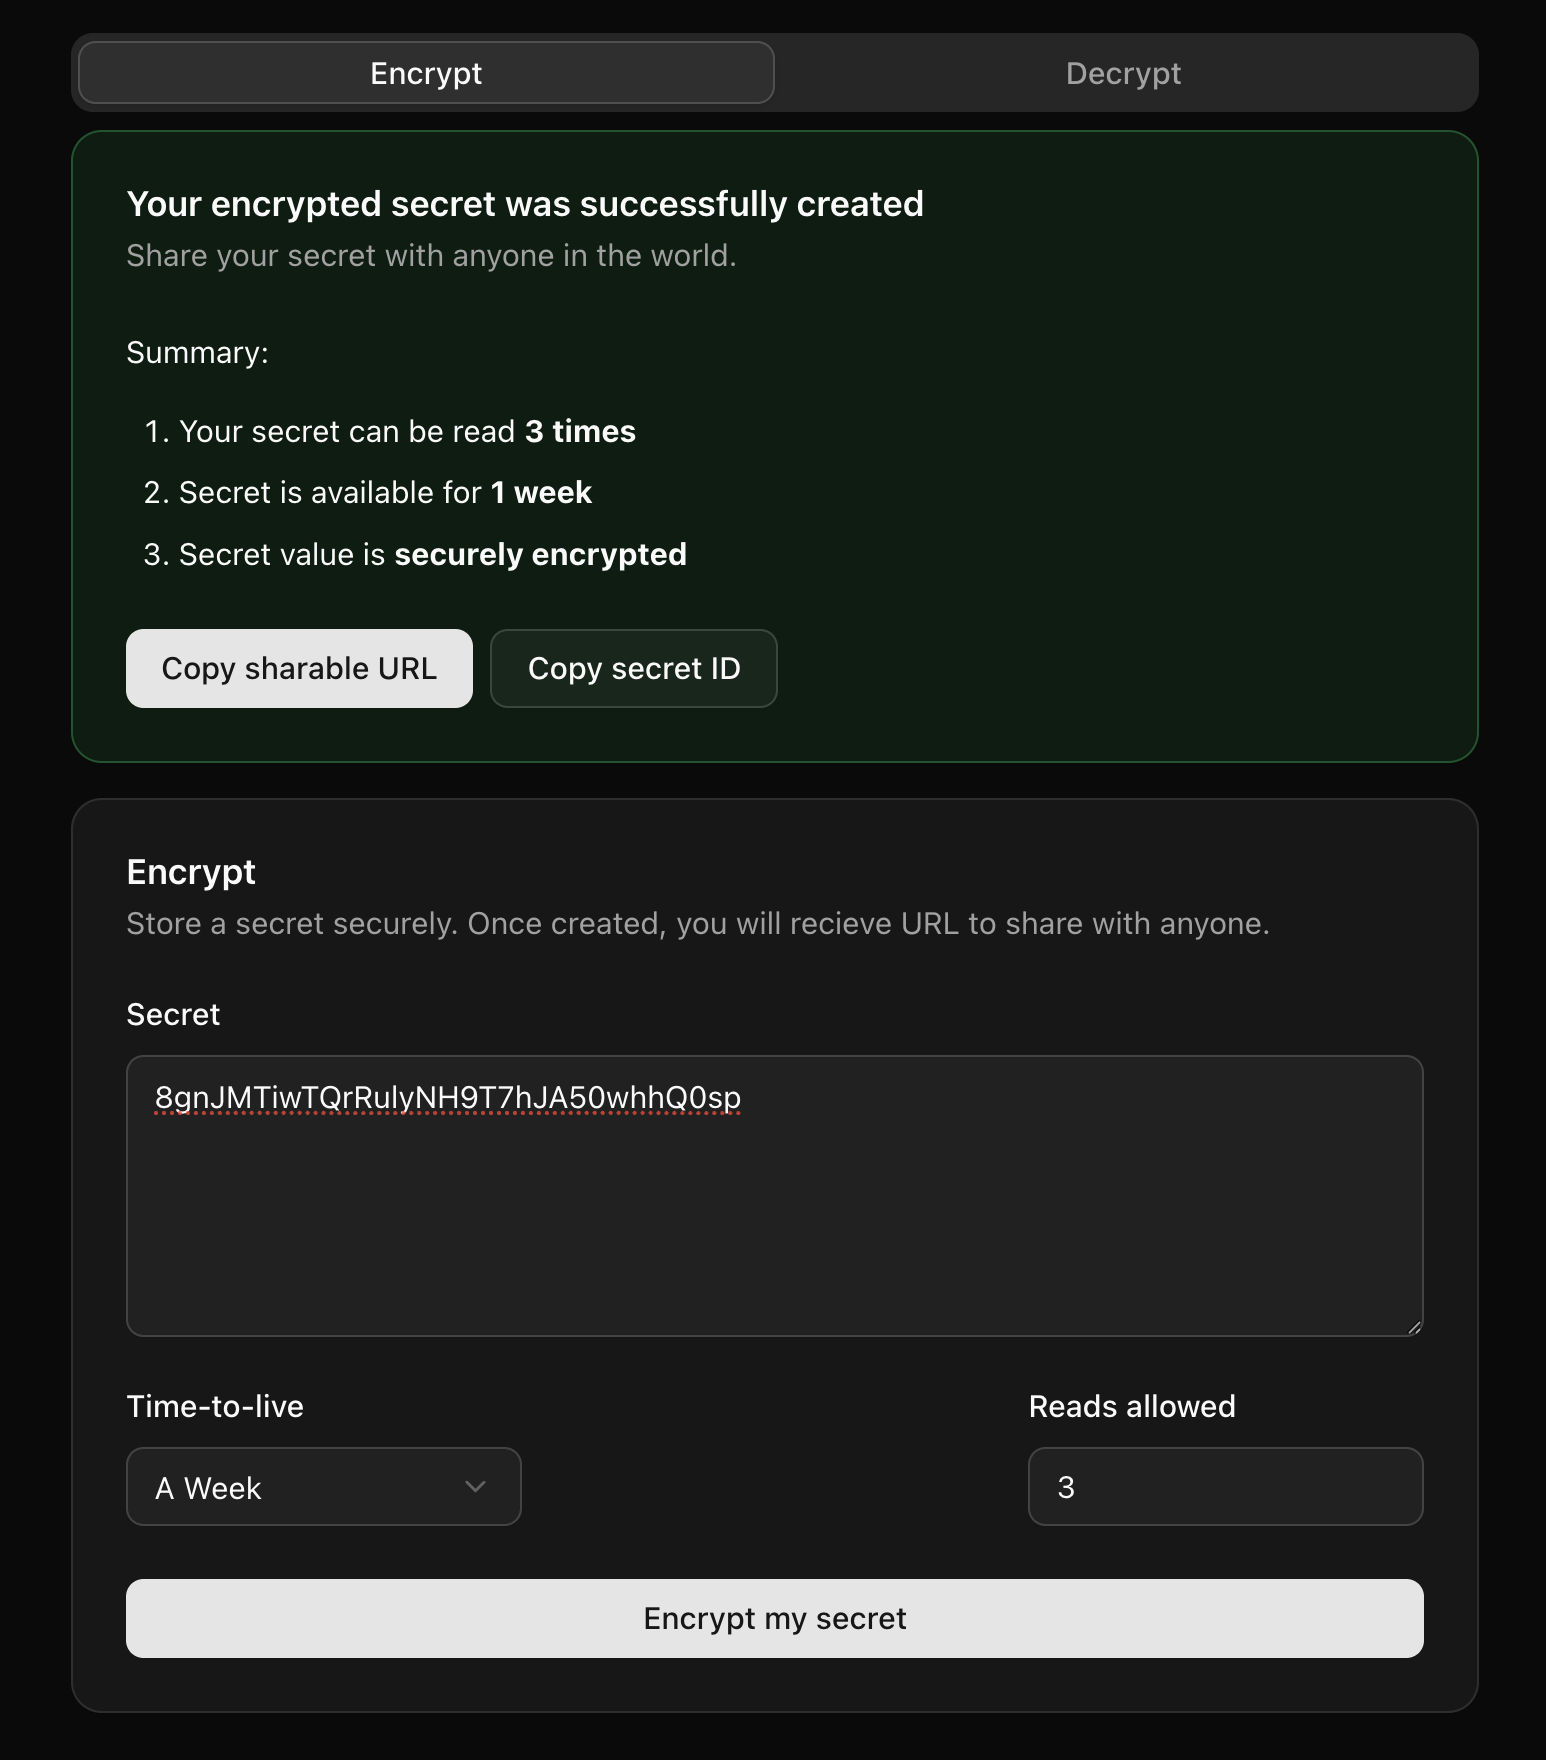
A simple homepage with basic information, and a main component for creating a secret.
A secret consists of a value, time to live, and amount of allowed reads.
Time to live supports multiple values beginning at one hour, all the way up to an entire year. While there are use cases for all, I decided to go with 24 hours as the default value, since that is safe while also being enough for most use cases, including remote collaboration.
Amount of reads is typically set to just one, meaning it can only be read once. This serves as a great indication; if the target person cannot read the secret, it might have been compromised. But higher values also make sense, for example two (so I can check if it works), or 30, so all my colleagues can use it.
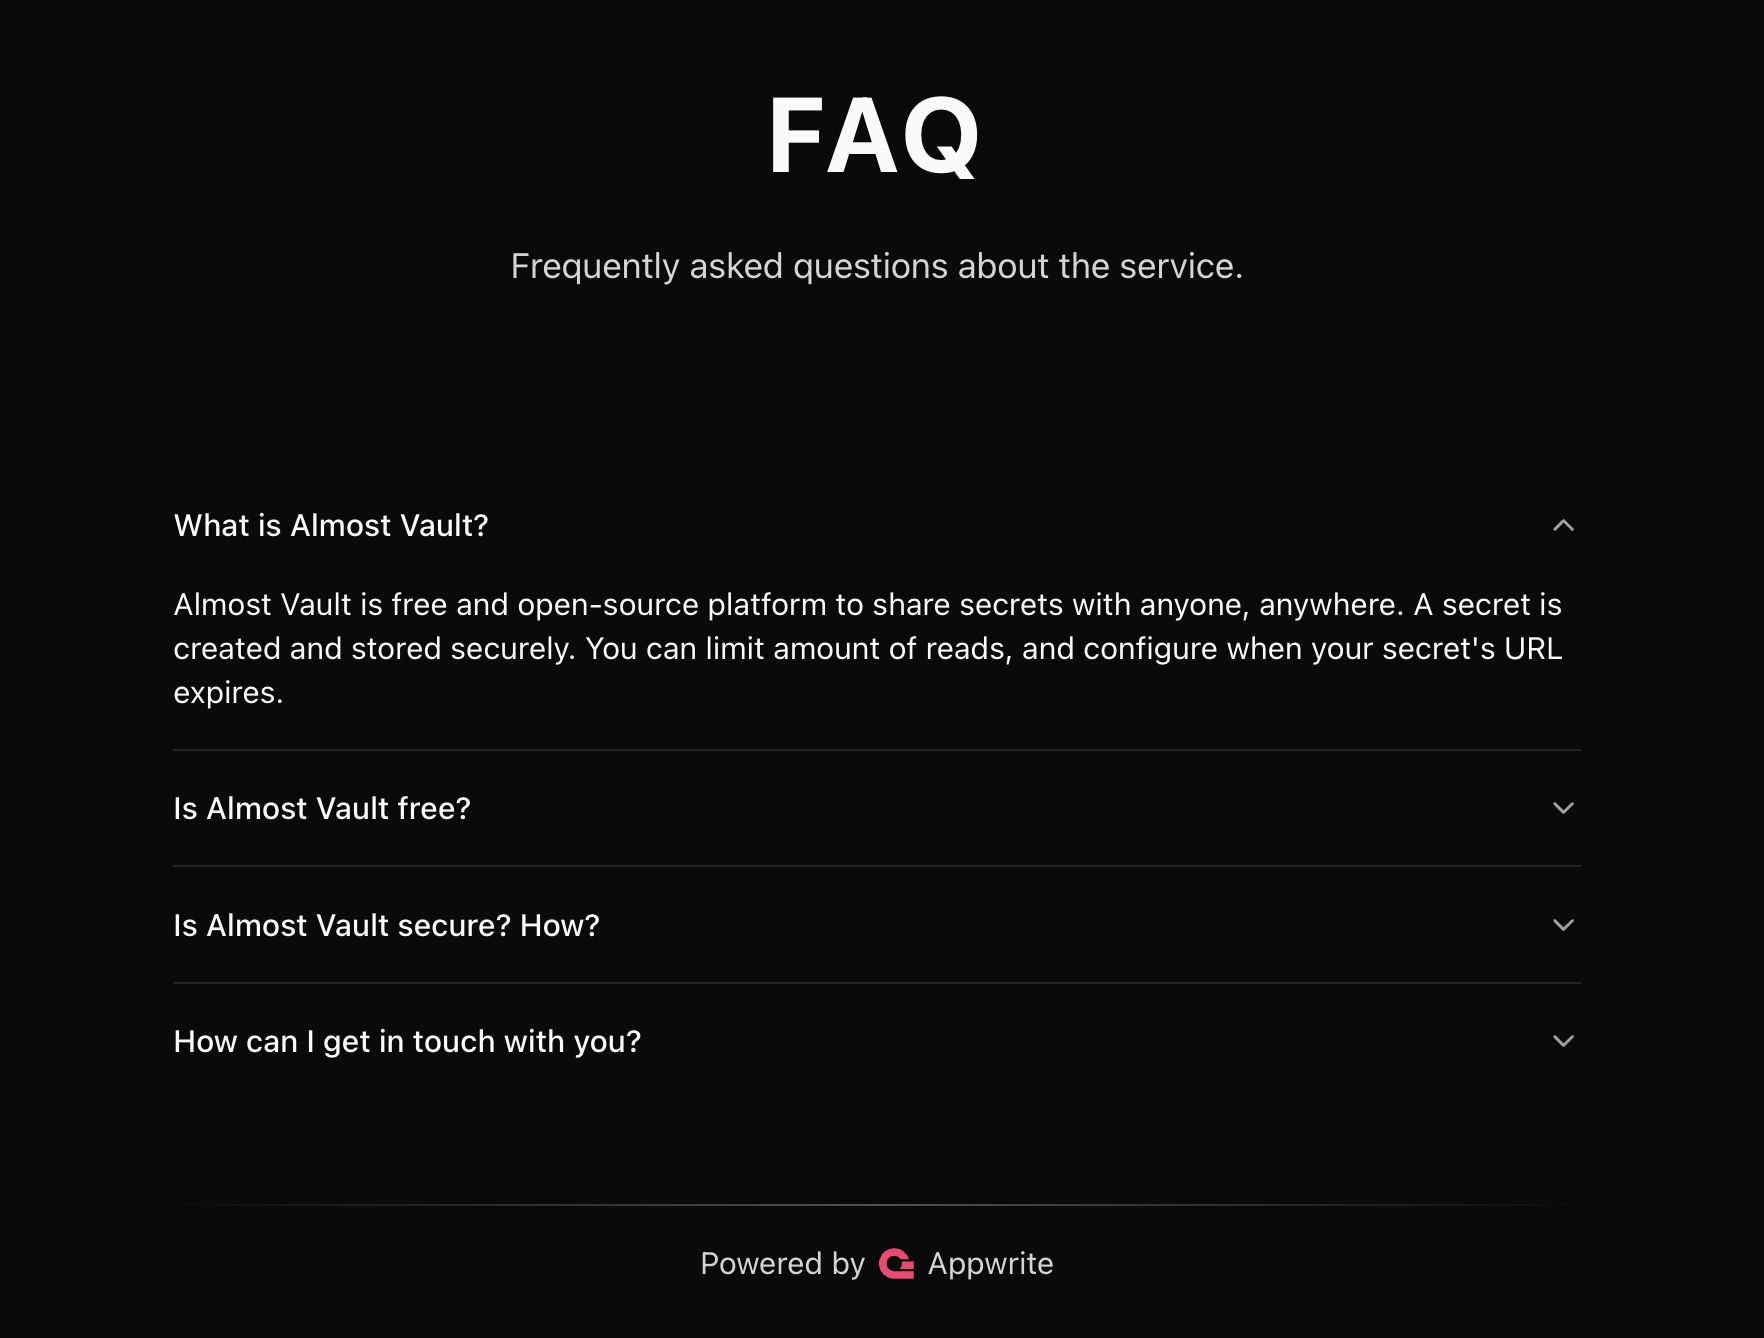
Because the homepage felt too plain, I added a frequently asked questions section and filled it with basic information both engineers and non-engineers might need.
Once a secret is created, an alert shows a summary of the configuration for a quick double-check, as well as a box that people can screenshot for future reference. A secret ID is provided to be easily copied, or even a URL that can be opened to automatically pre-fill the secret ID.
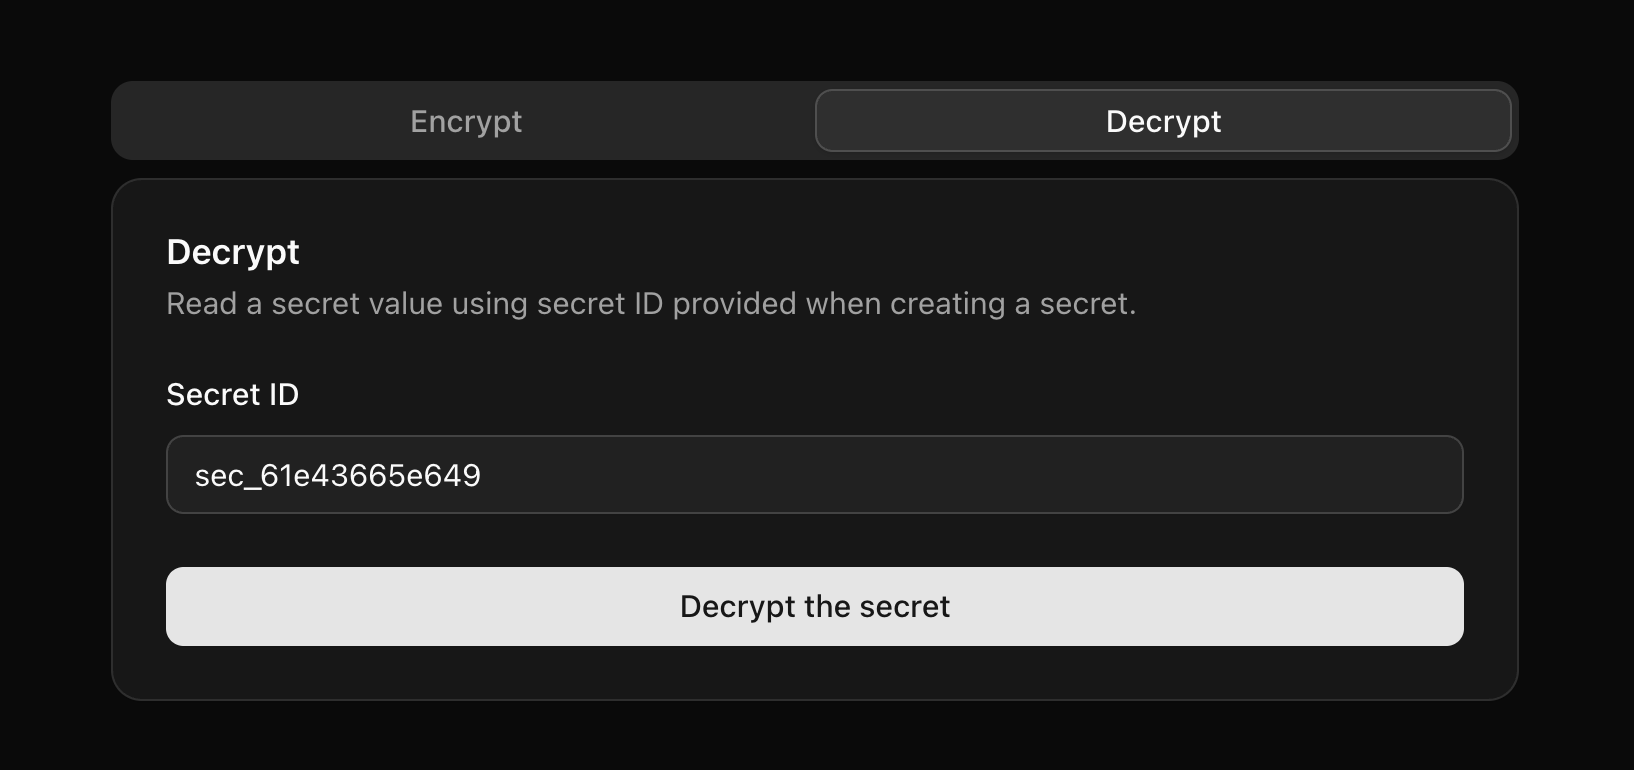
A person who gets the secret ID can visit the same website, switch the tab to "Decrypt," and paste the secret ID into the input field.
Alternatively, if a URL is shared, once the URL opens, the tab automatically switches to "Decrypt" and pre-fills the secret ID; so all a visitor needs to do is click "Decrypt."
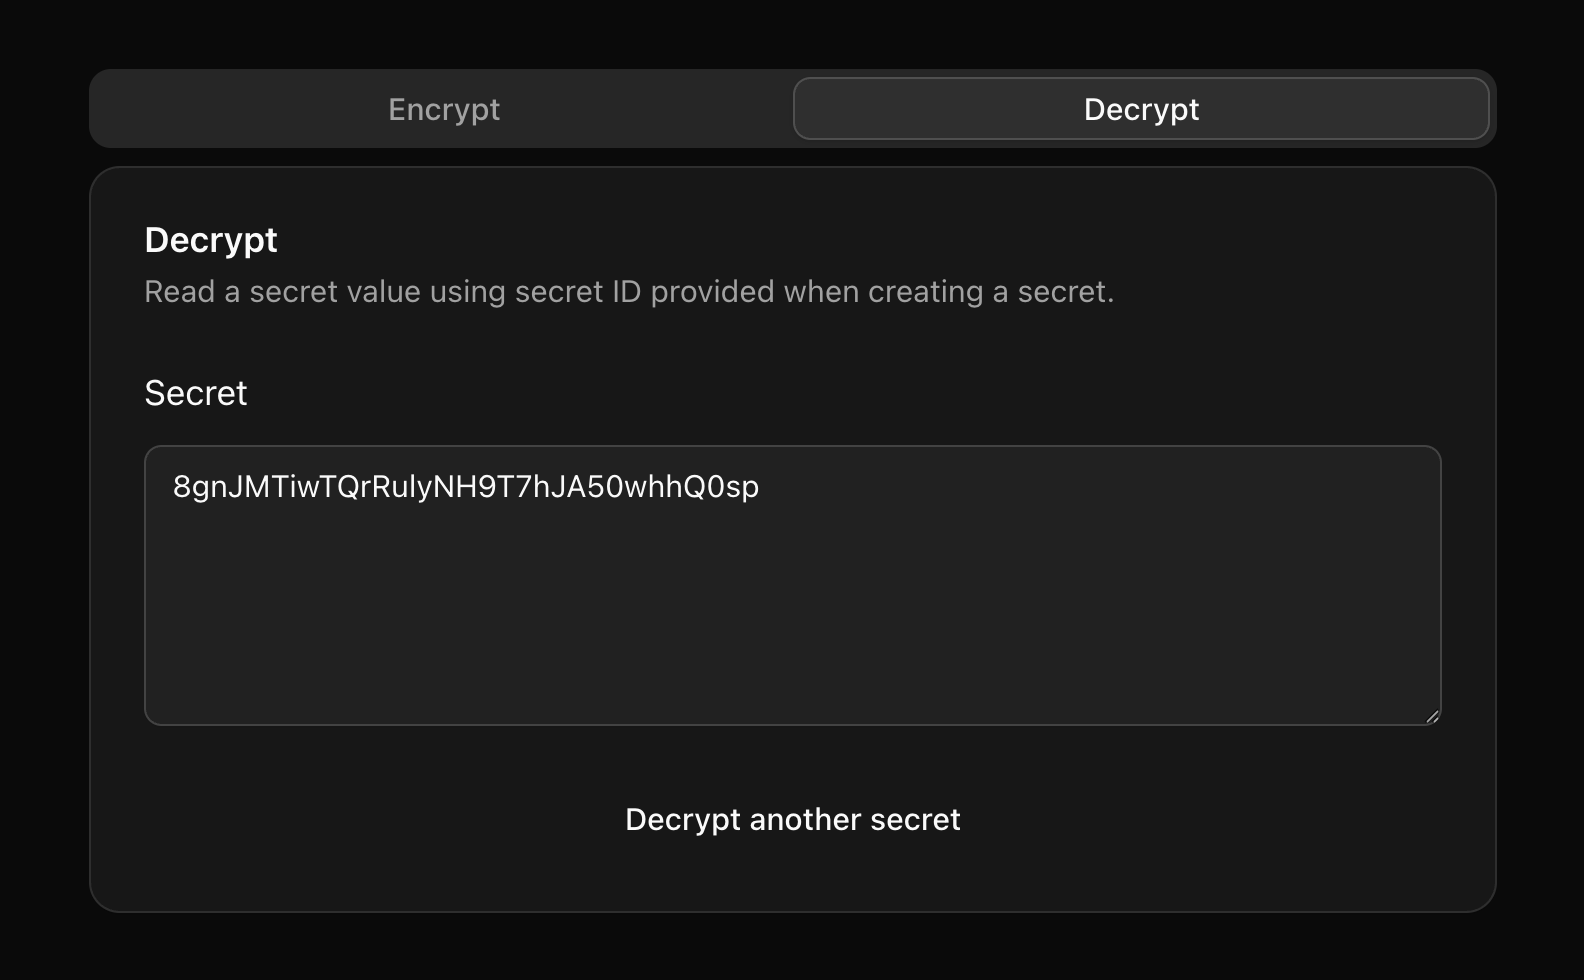
When a secret is decrypted, the API server ensures the TTL meets requirements and at least one read is still available. An atomic operation decrements the read amount while ensuring the value is higher than zero during the operation, to prevent race conditions from allowing multiple reads.
Finally, the API returns the secret to the client to be shown. As part of the response, it also provides the configured TTL, remaining amount of reads, and a timestamp of when the secret was created. This information can be added to the UI later.
## Retrospective
I was pretty surprised that within a few days I managed to rebuild the entire Shelve Vault web app, without missing any major features. All props to Appwrite and Basecoat!
Speaking of Basecoat, it's an amazing UI library. It's exactly like I remember Bootstrap, and I didn't face any problems with it. Everything worked, it had the components I needed, and the documentation was great. I plan to use it again and again, on any project where shadcn is overkill.
I am also very happy I took this opportunity to try out all the recently released features of Appwrite, including TablesDB, atomic operations, and the SDK with object arguments.
Hurl was exactly what I wished it would be! So many times I wrote small APIs in different languages, and I didn't write tests, to avoid learning their testing frameworks and picking the right one. Hurl, with its own `.hurl` files, is a runtime-agnostic testing tool I can use anytime I need E2E tests.
I was pretty confident with Alpine.js for this project, but I was surprised to find out there isn't any simple setup between Alpine.js and Vite that would allow routing and layouts. I will need to keep that in mind for more complex projects - either find a solution in the future, or use more robust frameworks for those use cases.
And finally, AI (LLMs) met my expectations exactly. I only used it for "side quests," which I could quickly validate. It saved me a bunch of time with things I wouldn't otherwise do, like documentation.
## Future plans
My use of Axios was pretty redundant, and I should use the native [Fetch API](https://developer.mozilla.org/en-US/docs/Web/API/Fetch_API) instead.
After decrypting the secret, the API returns more information, such as TTL (time-to-live), remaining reads, and creation date. I should update the UI to display this information in a user-friendly way.
While the application is responsive, mobile integration can be improved by adding better share functionality with the ability to share it with contacts, in messaging apps, notes, emails, and more.
As the app grows, proper accounts (not just guests) can be implemented to see all secrets that were created and better manage them - delete, increase reads, or extend time-to-live.
If the app becomes used by organizations and agencies, teams and team sharing can be added to simplify working across teams.
And finally, to allow even more users to use Almost Vault, integrations are very important; Starting with a CLI tool, REST API documentation, GitHub action templates, and more.
---
### Project: Auth UI
Description: Fully customizable login flow for any applications.
Demo: authui.site
GitHub: Meldiron/authui
Published: 2024-05-11
## Vision
There are many backend-as-a-service platforms that include authentication and authorization as one of their main features. While this already saves a lot of time, popular platforms such as [Auth0](https://auth0.com/), [Supabase](https://supabase.com/), or [Firebase](https://firebase.google.com/) made auth even simpler by providing login pages out of the box.
I researched how they work, and I liked the simplicity of [Auth0 Universal Login](https://auth0.com/docs/authenticate/login/auth0-universal-login), allowing developers to customize through a simple admin panel. Compared to [Supabase UI Auth](https://ui.supabase.io/components/auth) components, which focus on implementation using React components, I much prefer the simplicity and framework-agnostic approach of Auth0.
With this in mind, I wanted to create a similar Auth UI kit for [Appwrite](https://appwrite.io/). The main focus of the UI kit was:
- Simple setup and use
- Customizable branding
- Platform-agnostic (adapters for popular backends)
- Secure by default
- Free and open-source
## Technologies
- Svelte and SvelteKit
- Pink 1.0 design system
- Appwrite Auth
- Appwrite Databases
- Appwrite Storage
## Screens
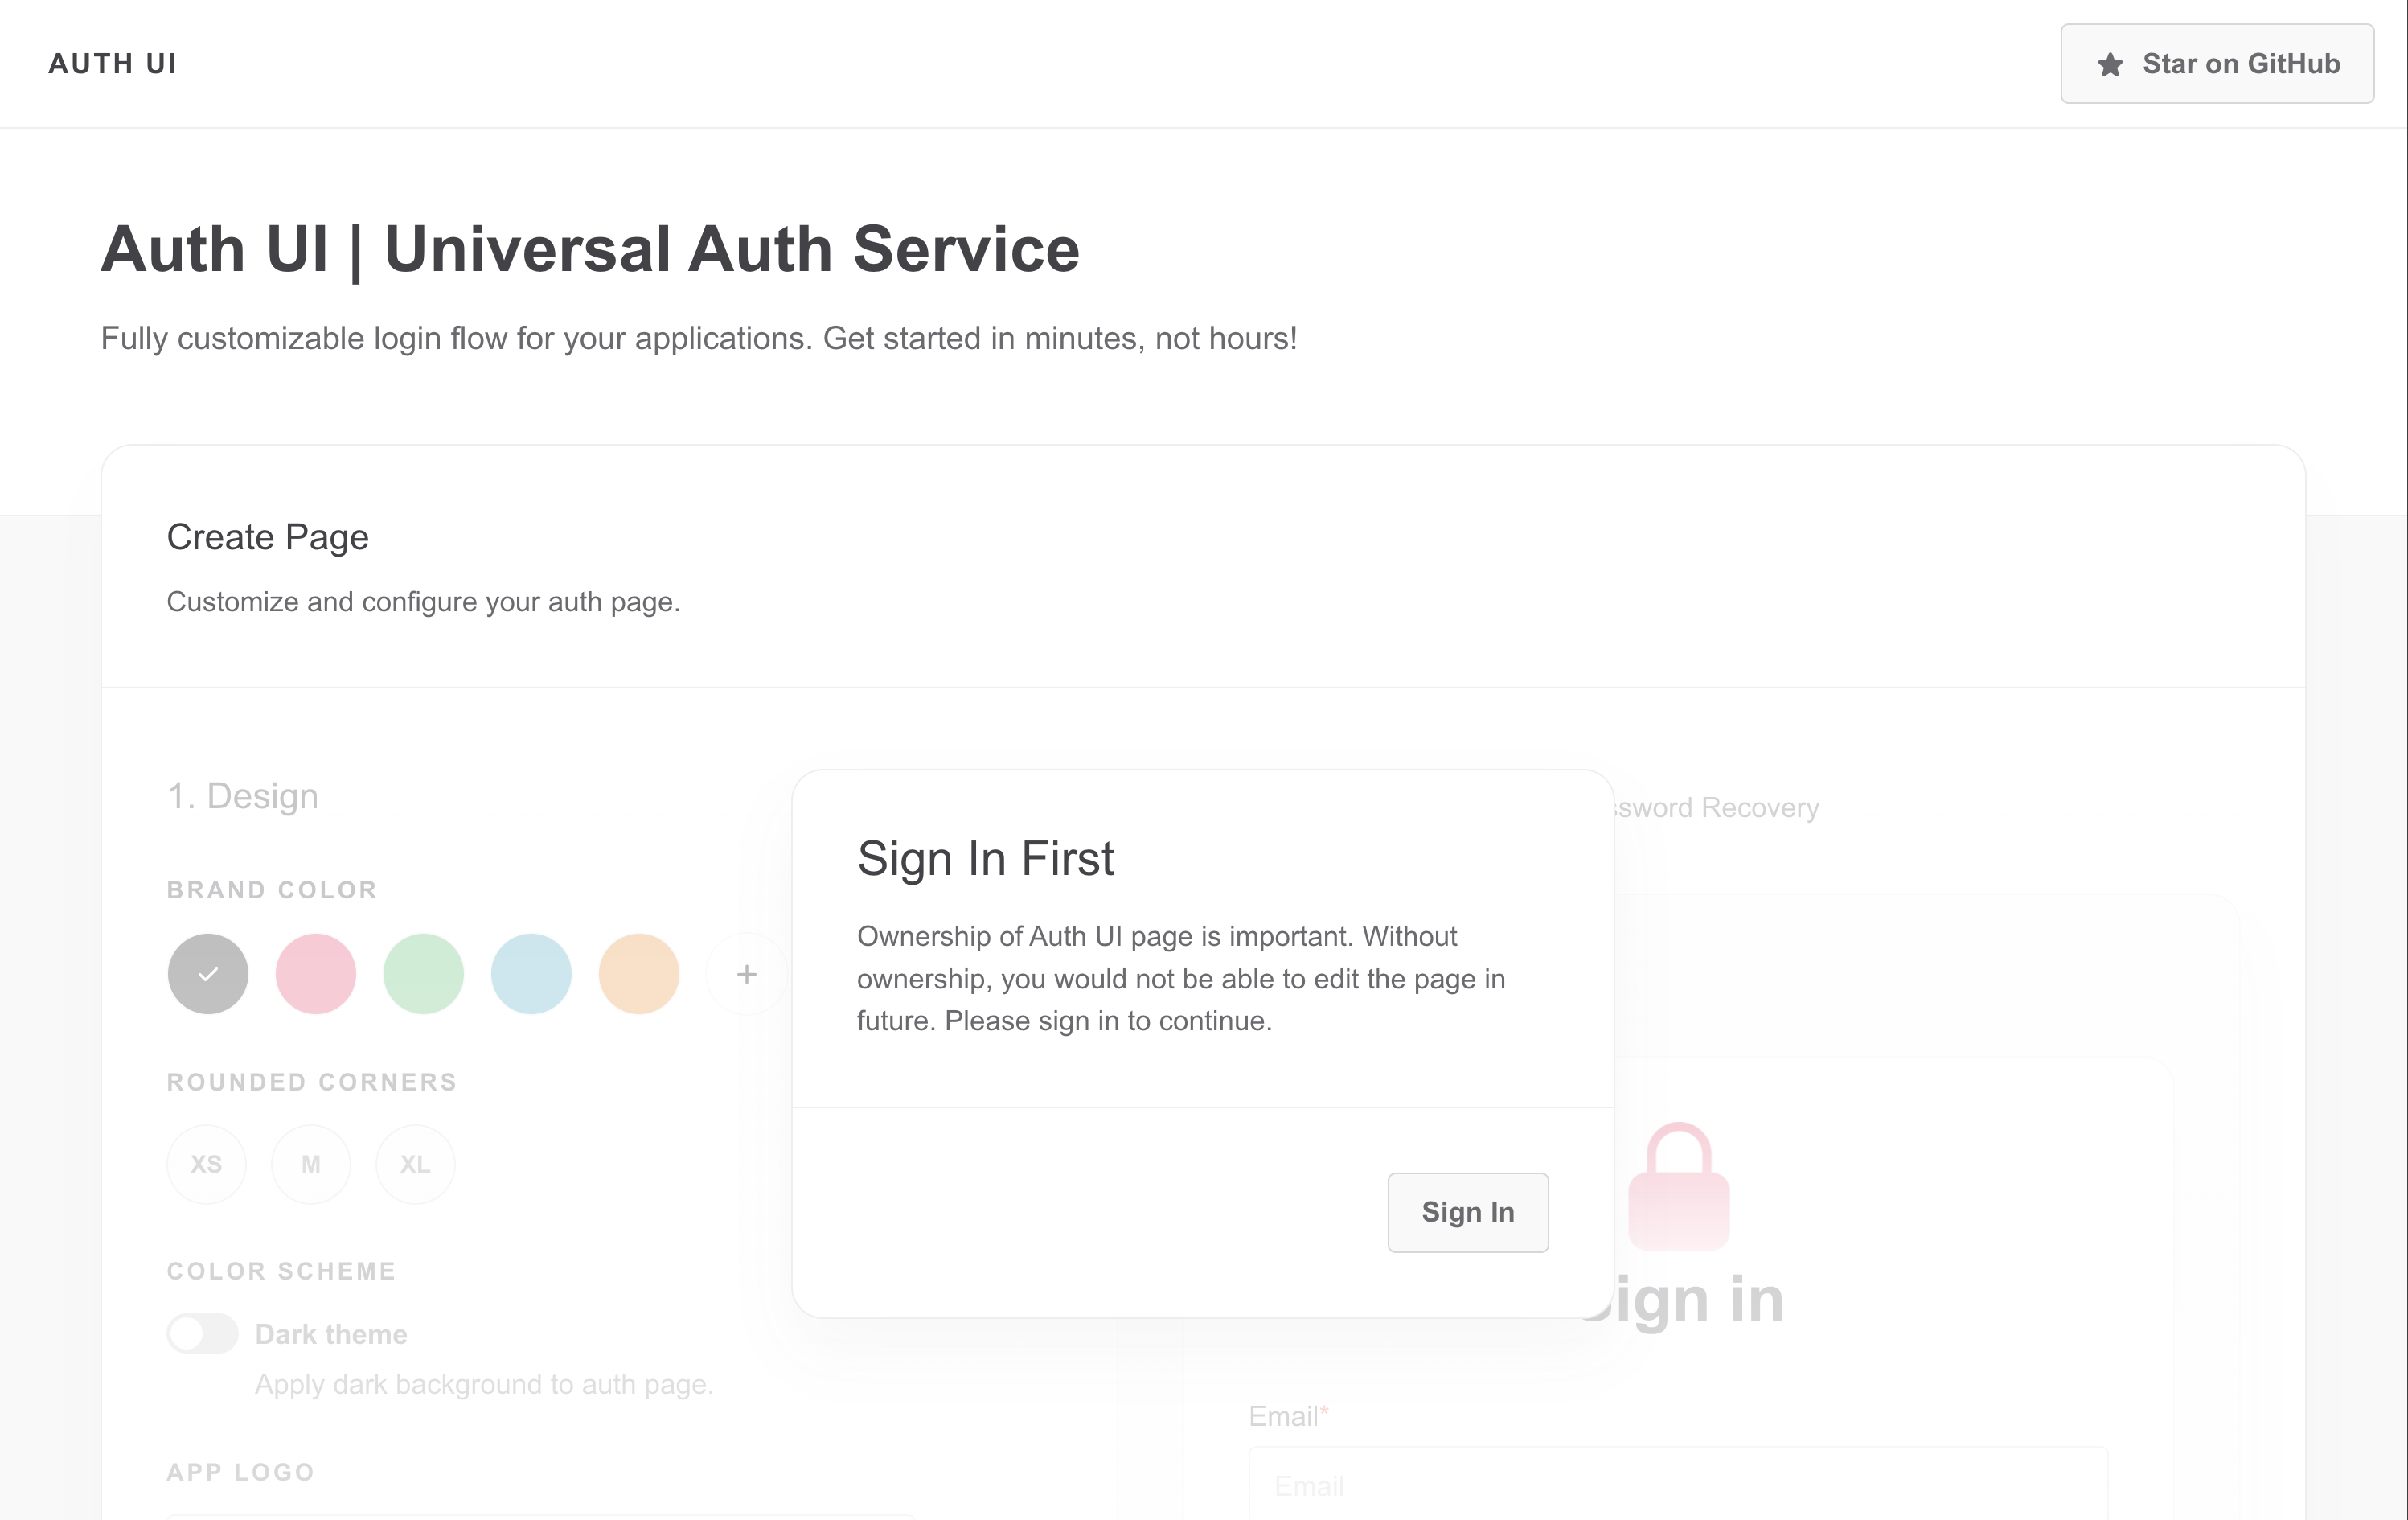
The developer is welcomed with the entire application that slowly fades away as the visitor scrolls. Interaction is not possible, and the entire website is locked and overlaid with a prompt to sign in. This design gives visitors a basic understanding of what the website has to offer while prompting them to sign in before getting any value.
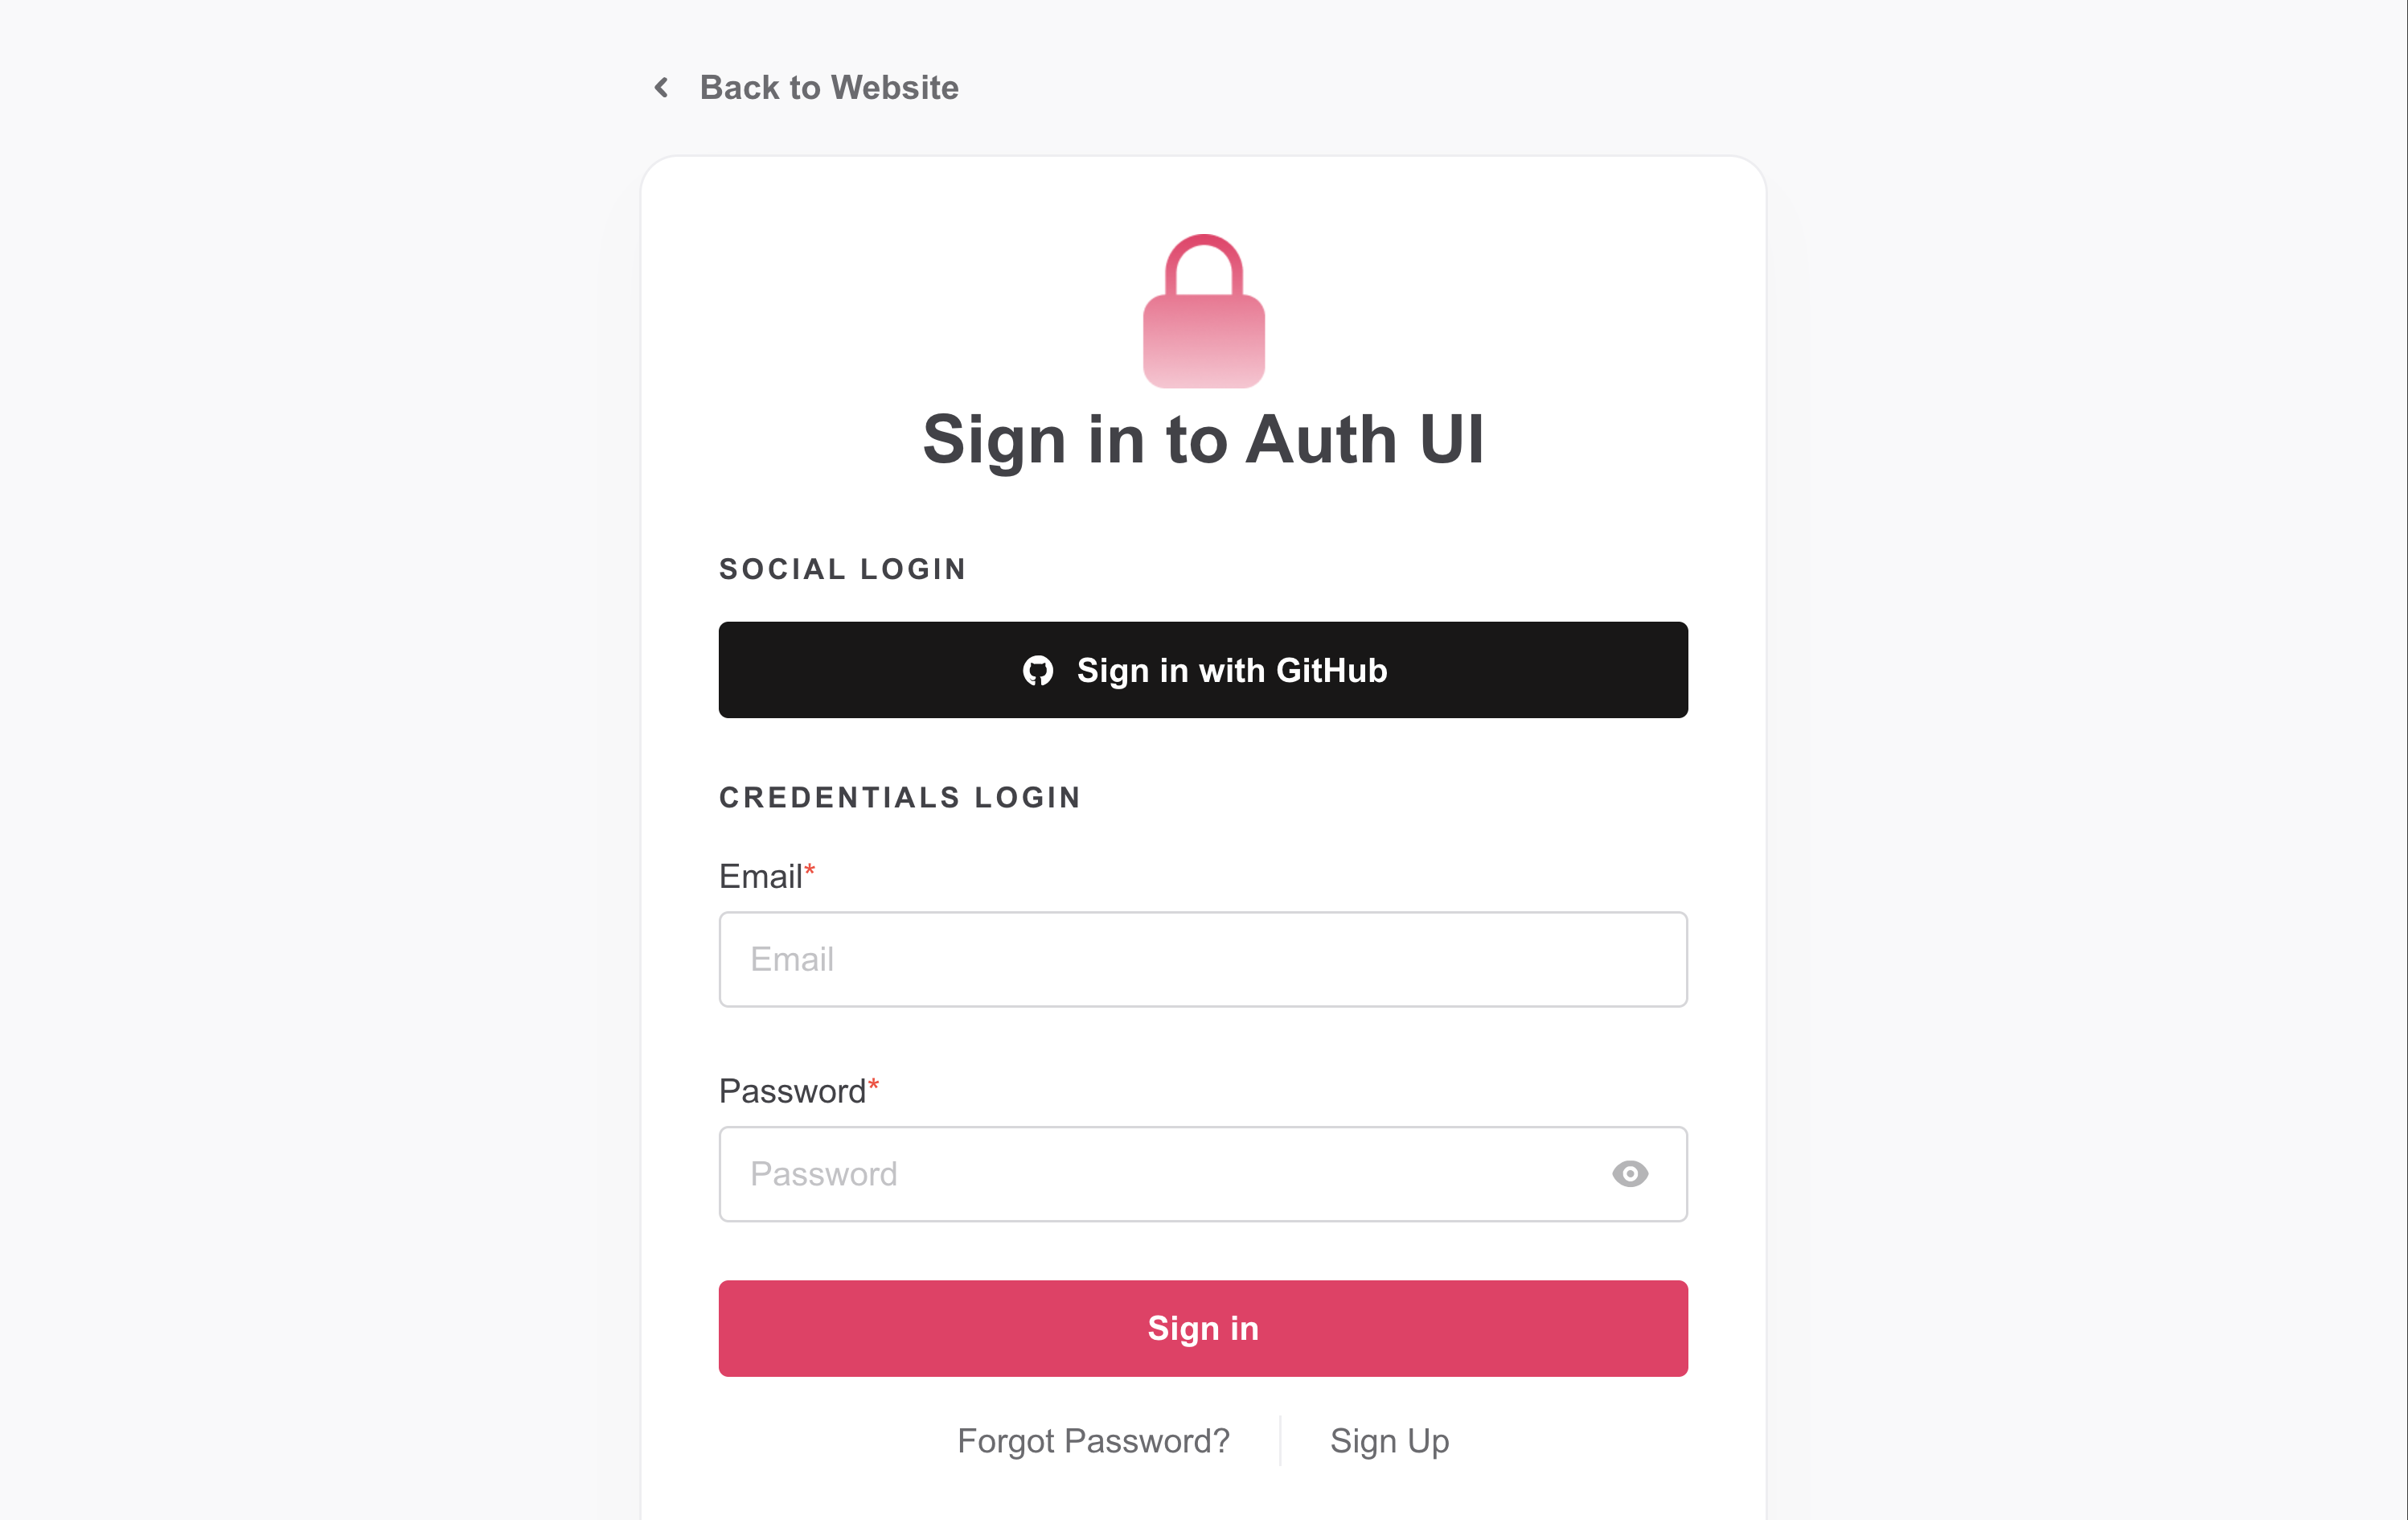
A sign-in page into Auth UI offers simple email and password login, alongside GitHub OAuth authentication. While this doesn't show all features available, it already provides a great understanding of what developers can expect from Auth UI when making their own login screens.
Once developers are signed in, they are redirected back to the homepage that is now unlocked and the website can be interacted with. A form to create a new login page is visible, alongside a quick preview of what the page will look like once finished.
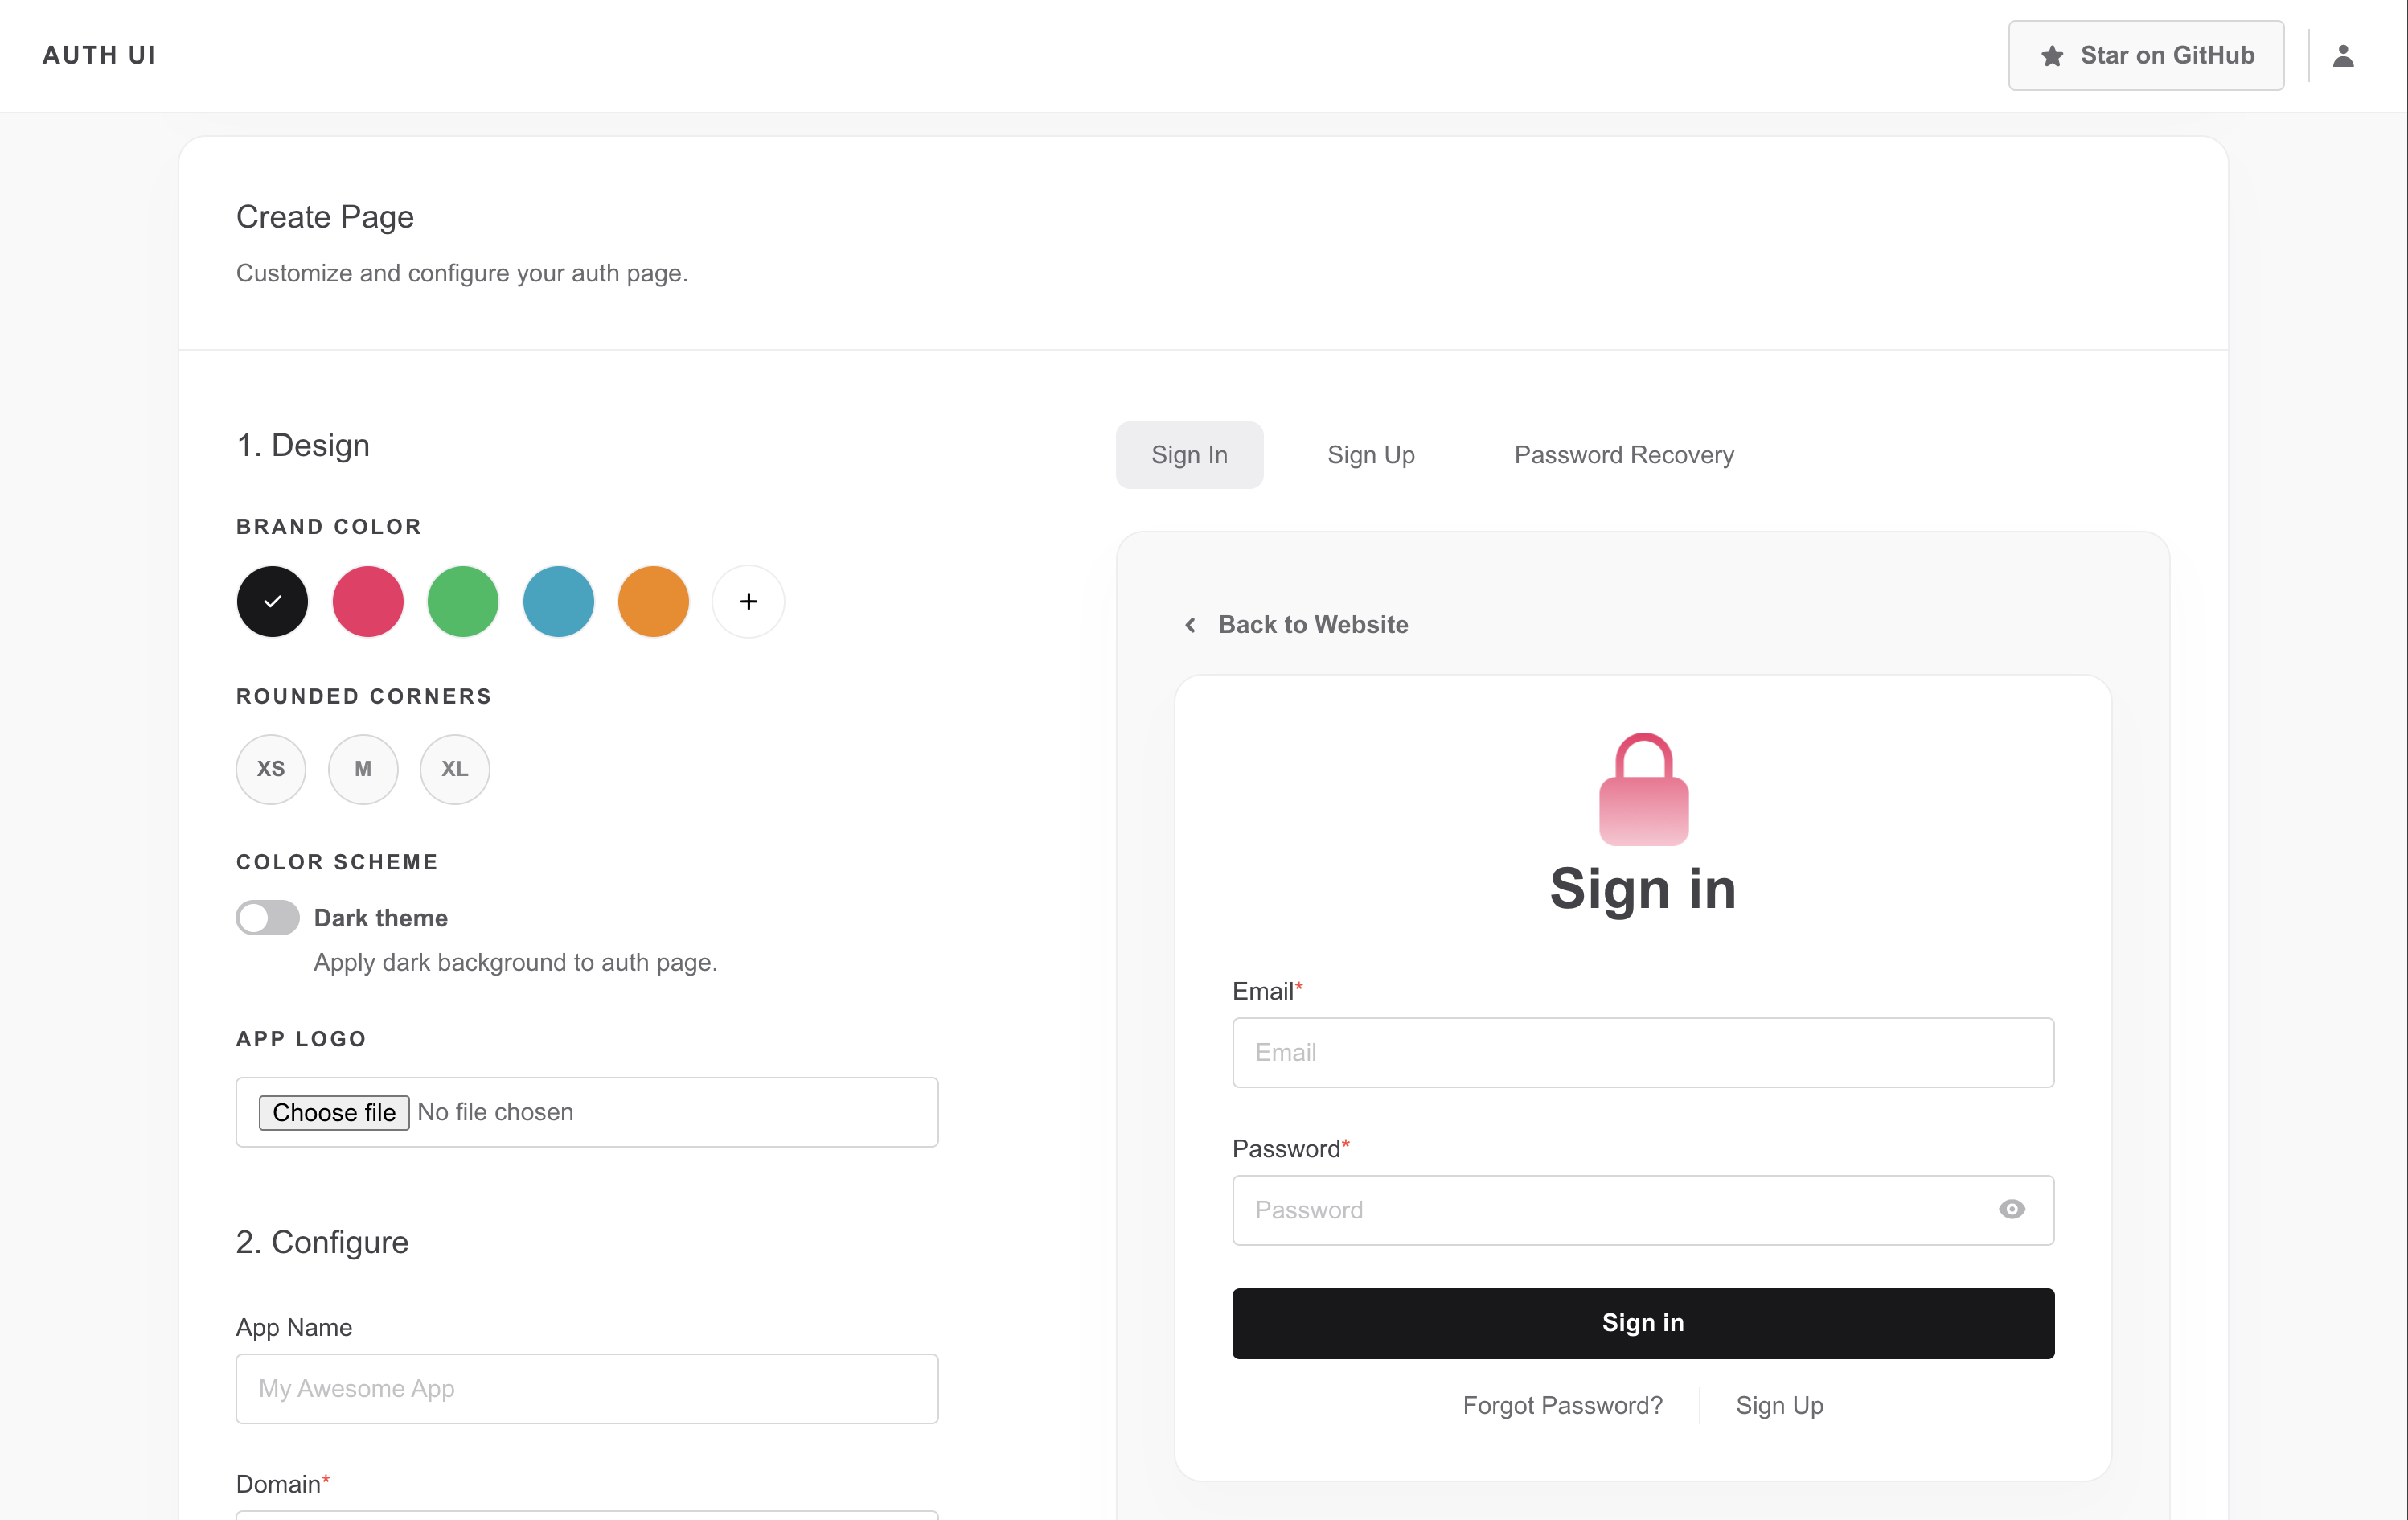
As seen throughout the remaining steps in the form, developers can customize the auth page to their liking including its design, copy, and which features are enabled.
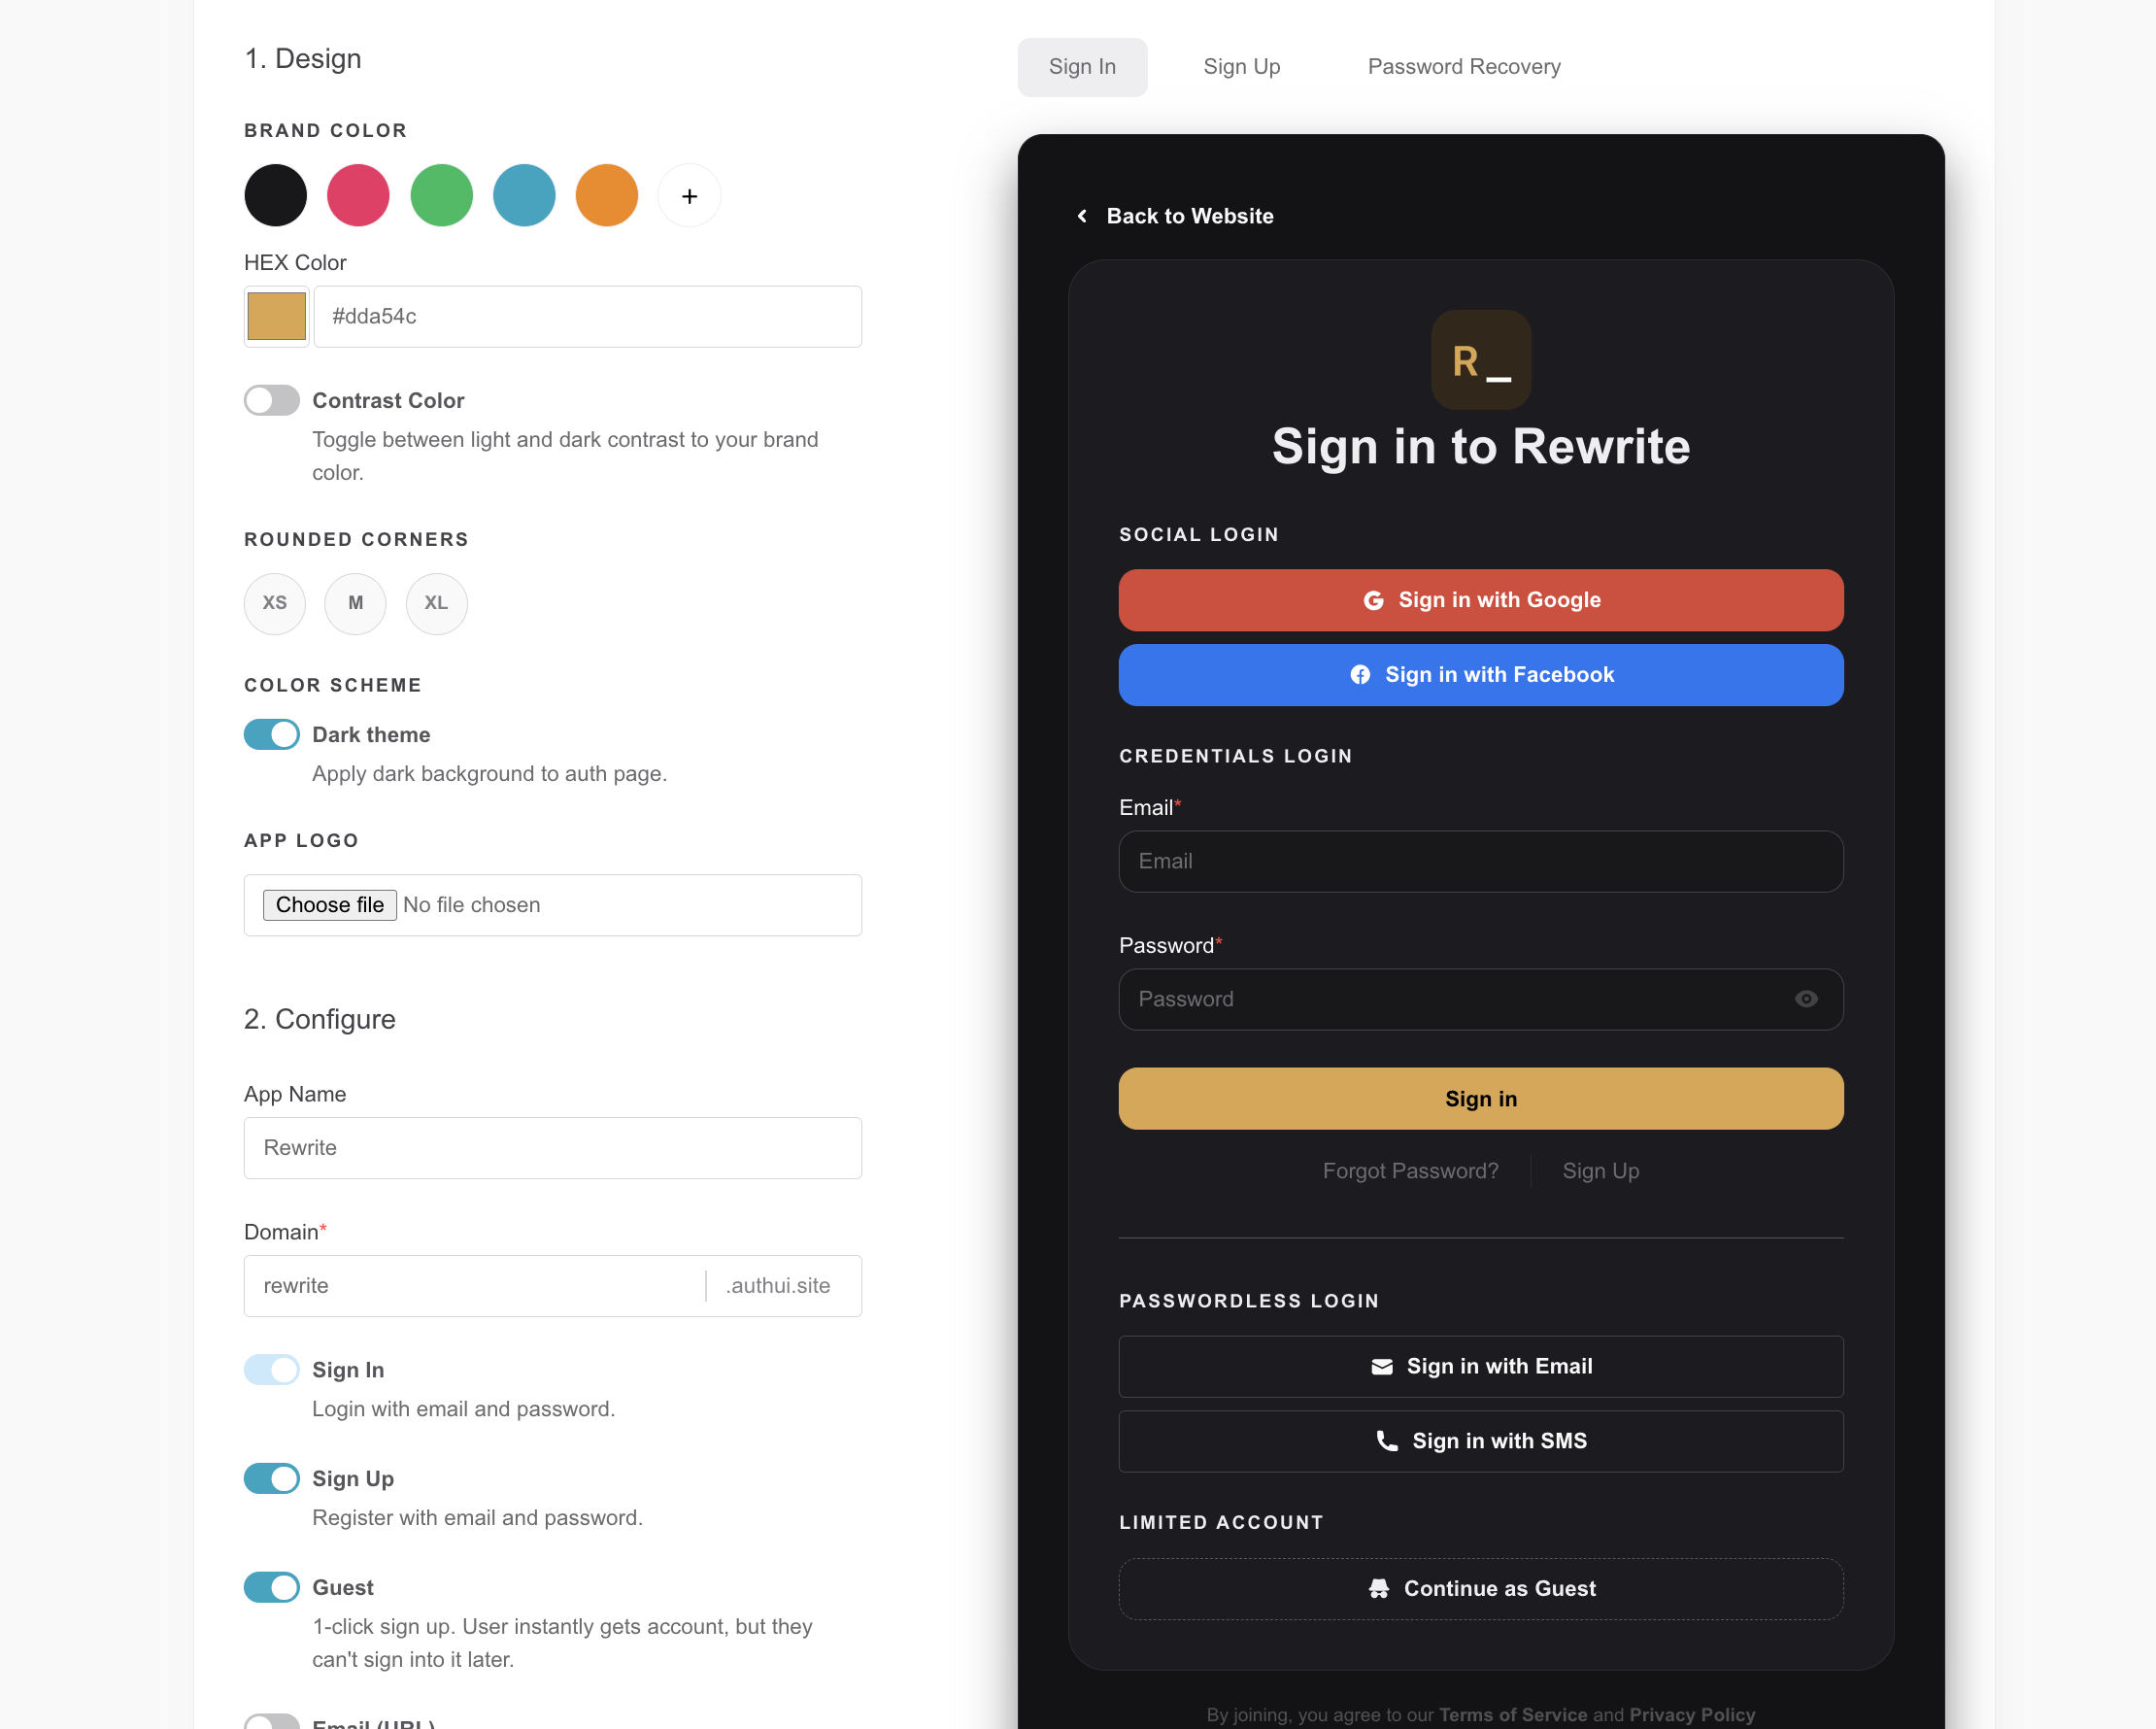
They can also preview screens for different features:
- Sign-in with all enabled methods
- Sign-up with email and password
- Password recovery
- Phone OTP login
- E-mail OTP or MagicURL login
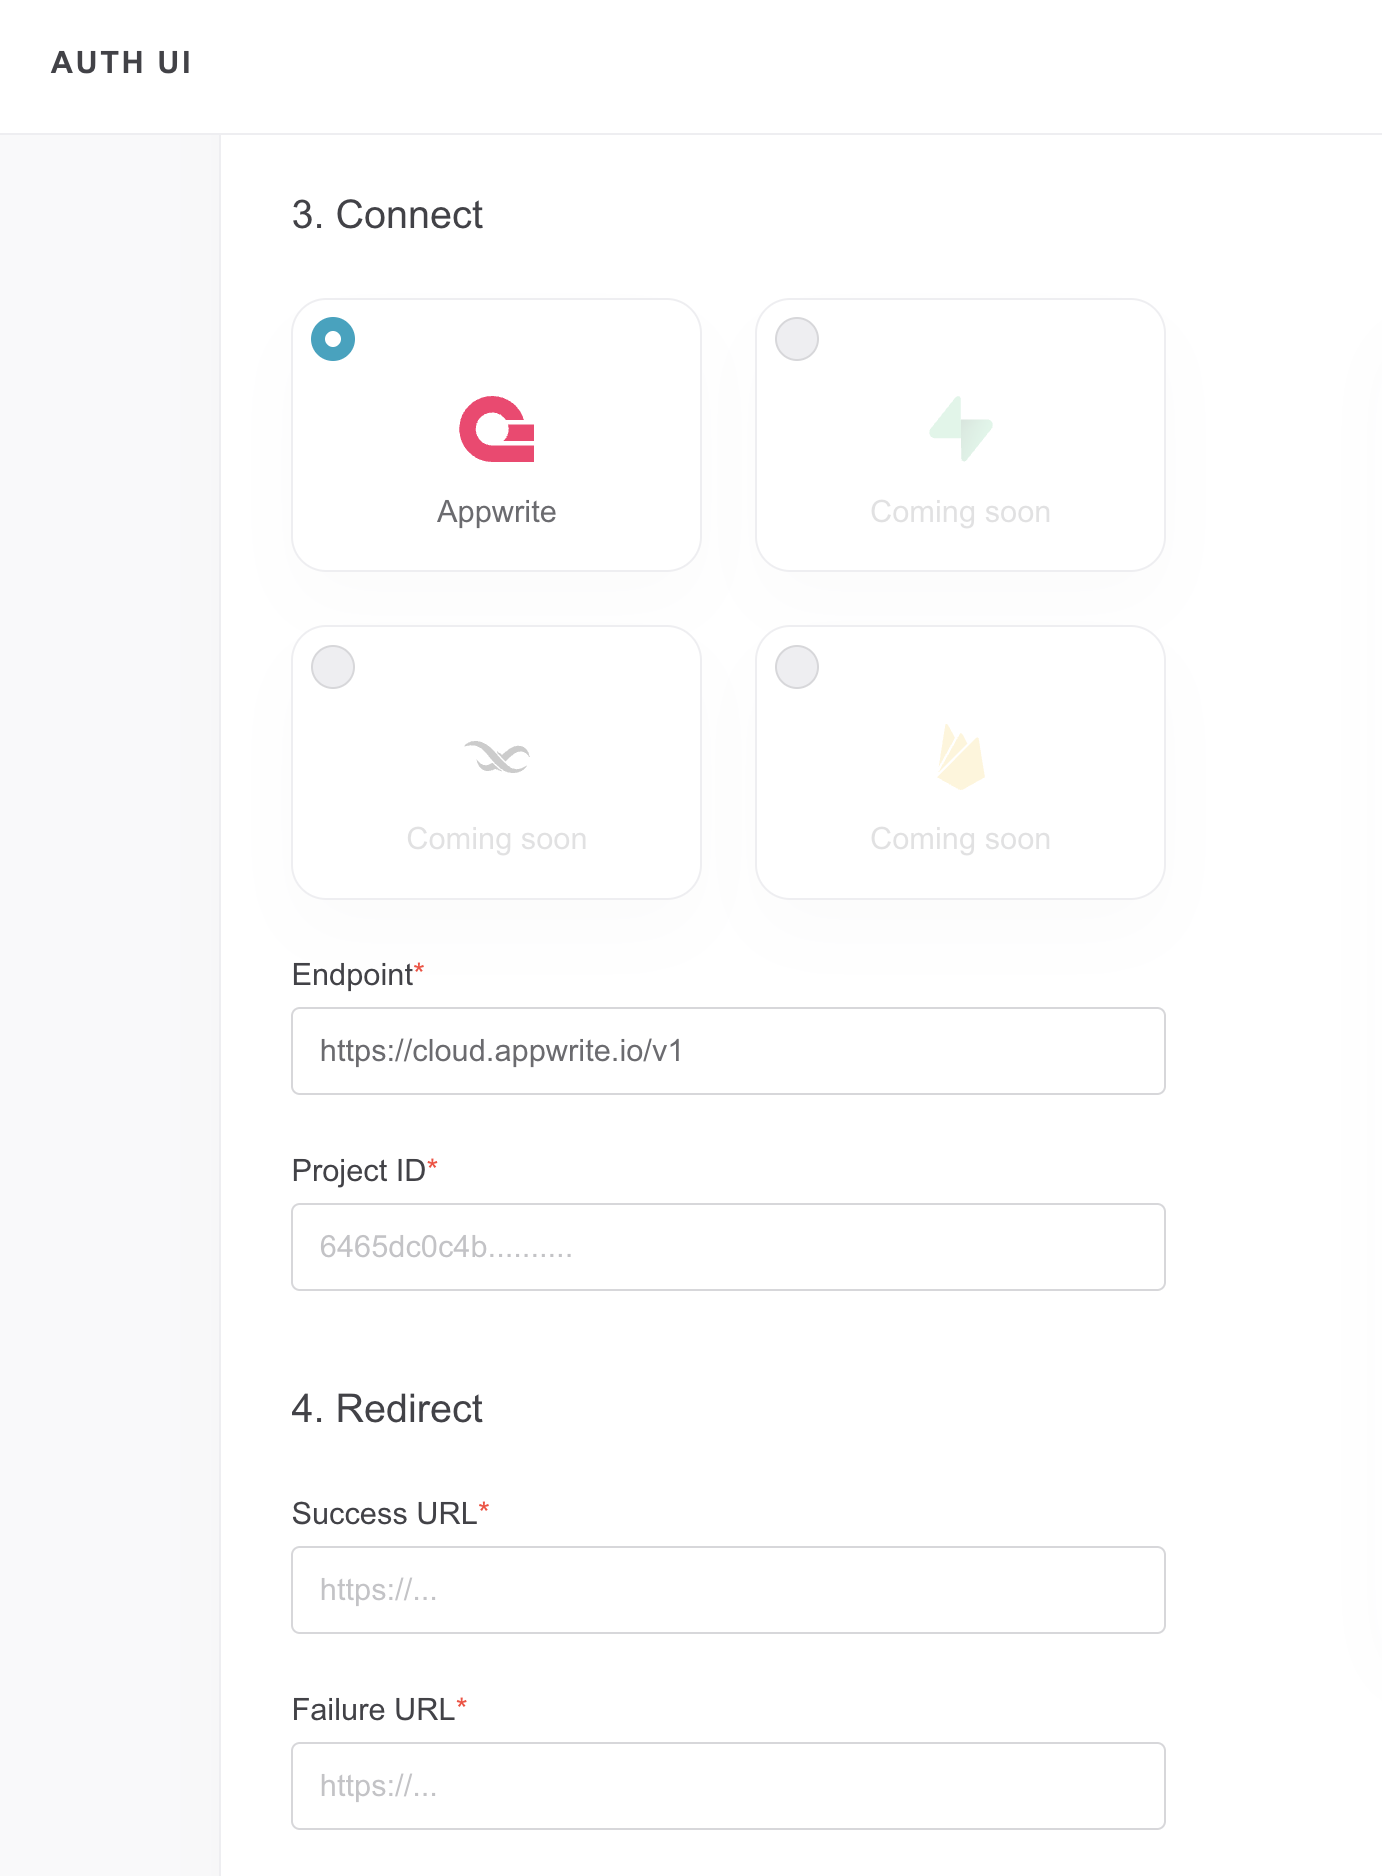
As the final step of preparation, developers are asked to pick which backend-as-a-service they are using and configure connection to their project. This ensures all users are registered under their accounts and organizations, instead of registering them under Auth UI (and Auth UI owning the authentication database).
Once developers finish configuration of their auth page, a small celebration copy is shown alongside any remaining steps that need to be done in the console of their backend provider. Developers can now also easily copy a URL or small HTML snippet with a link to their newly created auth page.
As developers keep creating more auth pages with Auth UI, they can find them at the top of the homepage. Sites can be easily edited, removed, or they can re-visit the celebration screen to easily get access to the URL again.
A screen that wasn't visible to developers yet is one that their users can see if they visit the auth page after already signing in. Developers can decide to show it to them, as this page includes account management for easily knowing which user is currently signed in and the ability to sign out.
## Retrospective
After sharing the tool with developers using Appwrite in the community Discord server, hundreds of developers started using it. Feedback from those first adopters allowed me to quickly add highly requested features such as customization of legal URLs or roundness of buttons. Furthermore, in following months during free time, I added dark theme support and kept it up to date with latest Appwrite features such as email OTP.
I also received great feedback for making authorization into Auth UI powered by Auth UI itself. This shows confidence in reliability, design, and features supported by the flow.
After a couple of weeks after release, a community member recorded a video on how to use Auth UI with Appwrite, which gave me a huge confidence boost in this project. Since then Auth UI had a couple of downtimes, due to which multiple developers sent me PMs asking when a fix could be expected. All of this goes to show the project idea was quickly validated and has a bright future.
## Future plans
As Auth UI gains more popularity, I plan to add more features as requested. Some ideas provided already include:
- More account details and option to reset password
- 2-factor challenge support
- Session management
- Ability to link/unlink social accounts
- Ability to delete or block account
---
### Project: FormBin
Description: Simple and powerful backend for your HTML forms.
Demo: formbin.almostapps.eu
GitHub: Meldiron/form-bin
Published: 2025-02-18
## Vision
There are multiple websites providing simple connections between HTML forms and e-mails, such as [Formspree](https://formspree.io/) or [Formcarry](https://formcarry.com/). My main issue with those is expensive pricing and limiting free tiers.
My goal was to create an equally simple HTML form backend, which is free and open source. To keep it 100% free, submissions aren't sent by email, but instead are stored in a database. To have an experience similar to e-mail with notifications, pings, and ability to mark it as read, I decided to integrate with Discord.
While this idea was in my mind for over a year, I decided to work on this during [Leo's mini-hackathon](https://www.twitch.tv/learnwithleon) in collaboration with [Appwrite](https://appwrite.io/). The hackathon only lasted 3 days, out of which I spent 2 days working on FormBin.
## Technologies
- Svelte and SvelteKit
- TailwindCSS (shadcn-svelte)
- Appwrite OAuth (GitHub)
- Appwrite Databases
- Discord webhooks
## Screens
A visitor is presented with a landing page that explains the purpose of the service and quick call to actions to try out the demo or sign in. If an existing user visits the homepage, they are instead presented with a button to manage their forms.
Before a developer implements FormBin, the experience continues to a demo form page, where they can experience how their HTML form may look. A simple form includes a few inputs and a submit button.
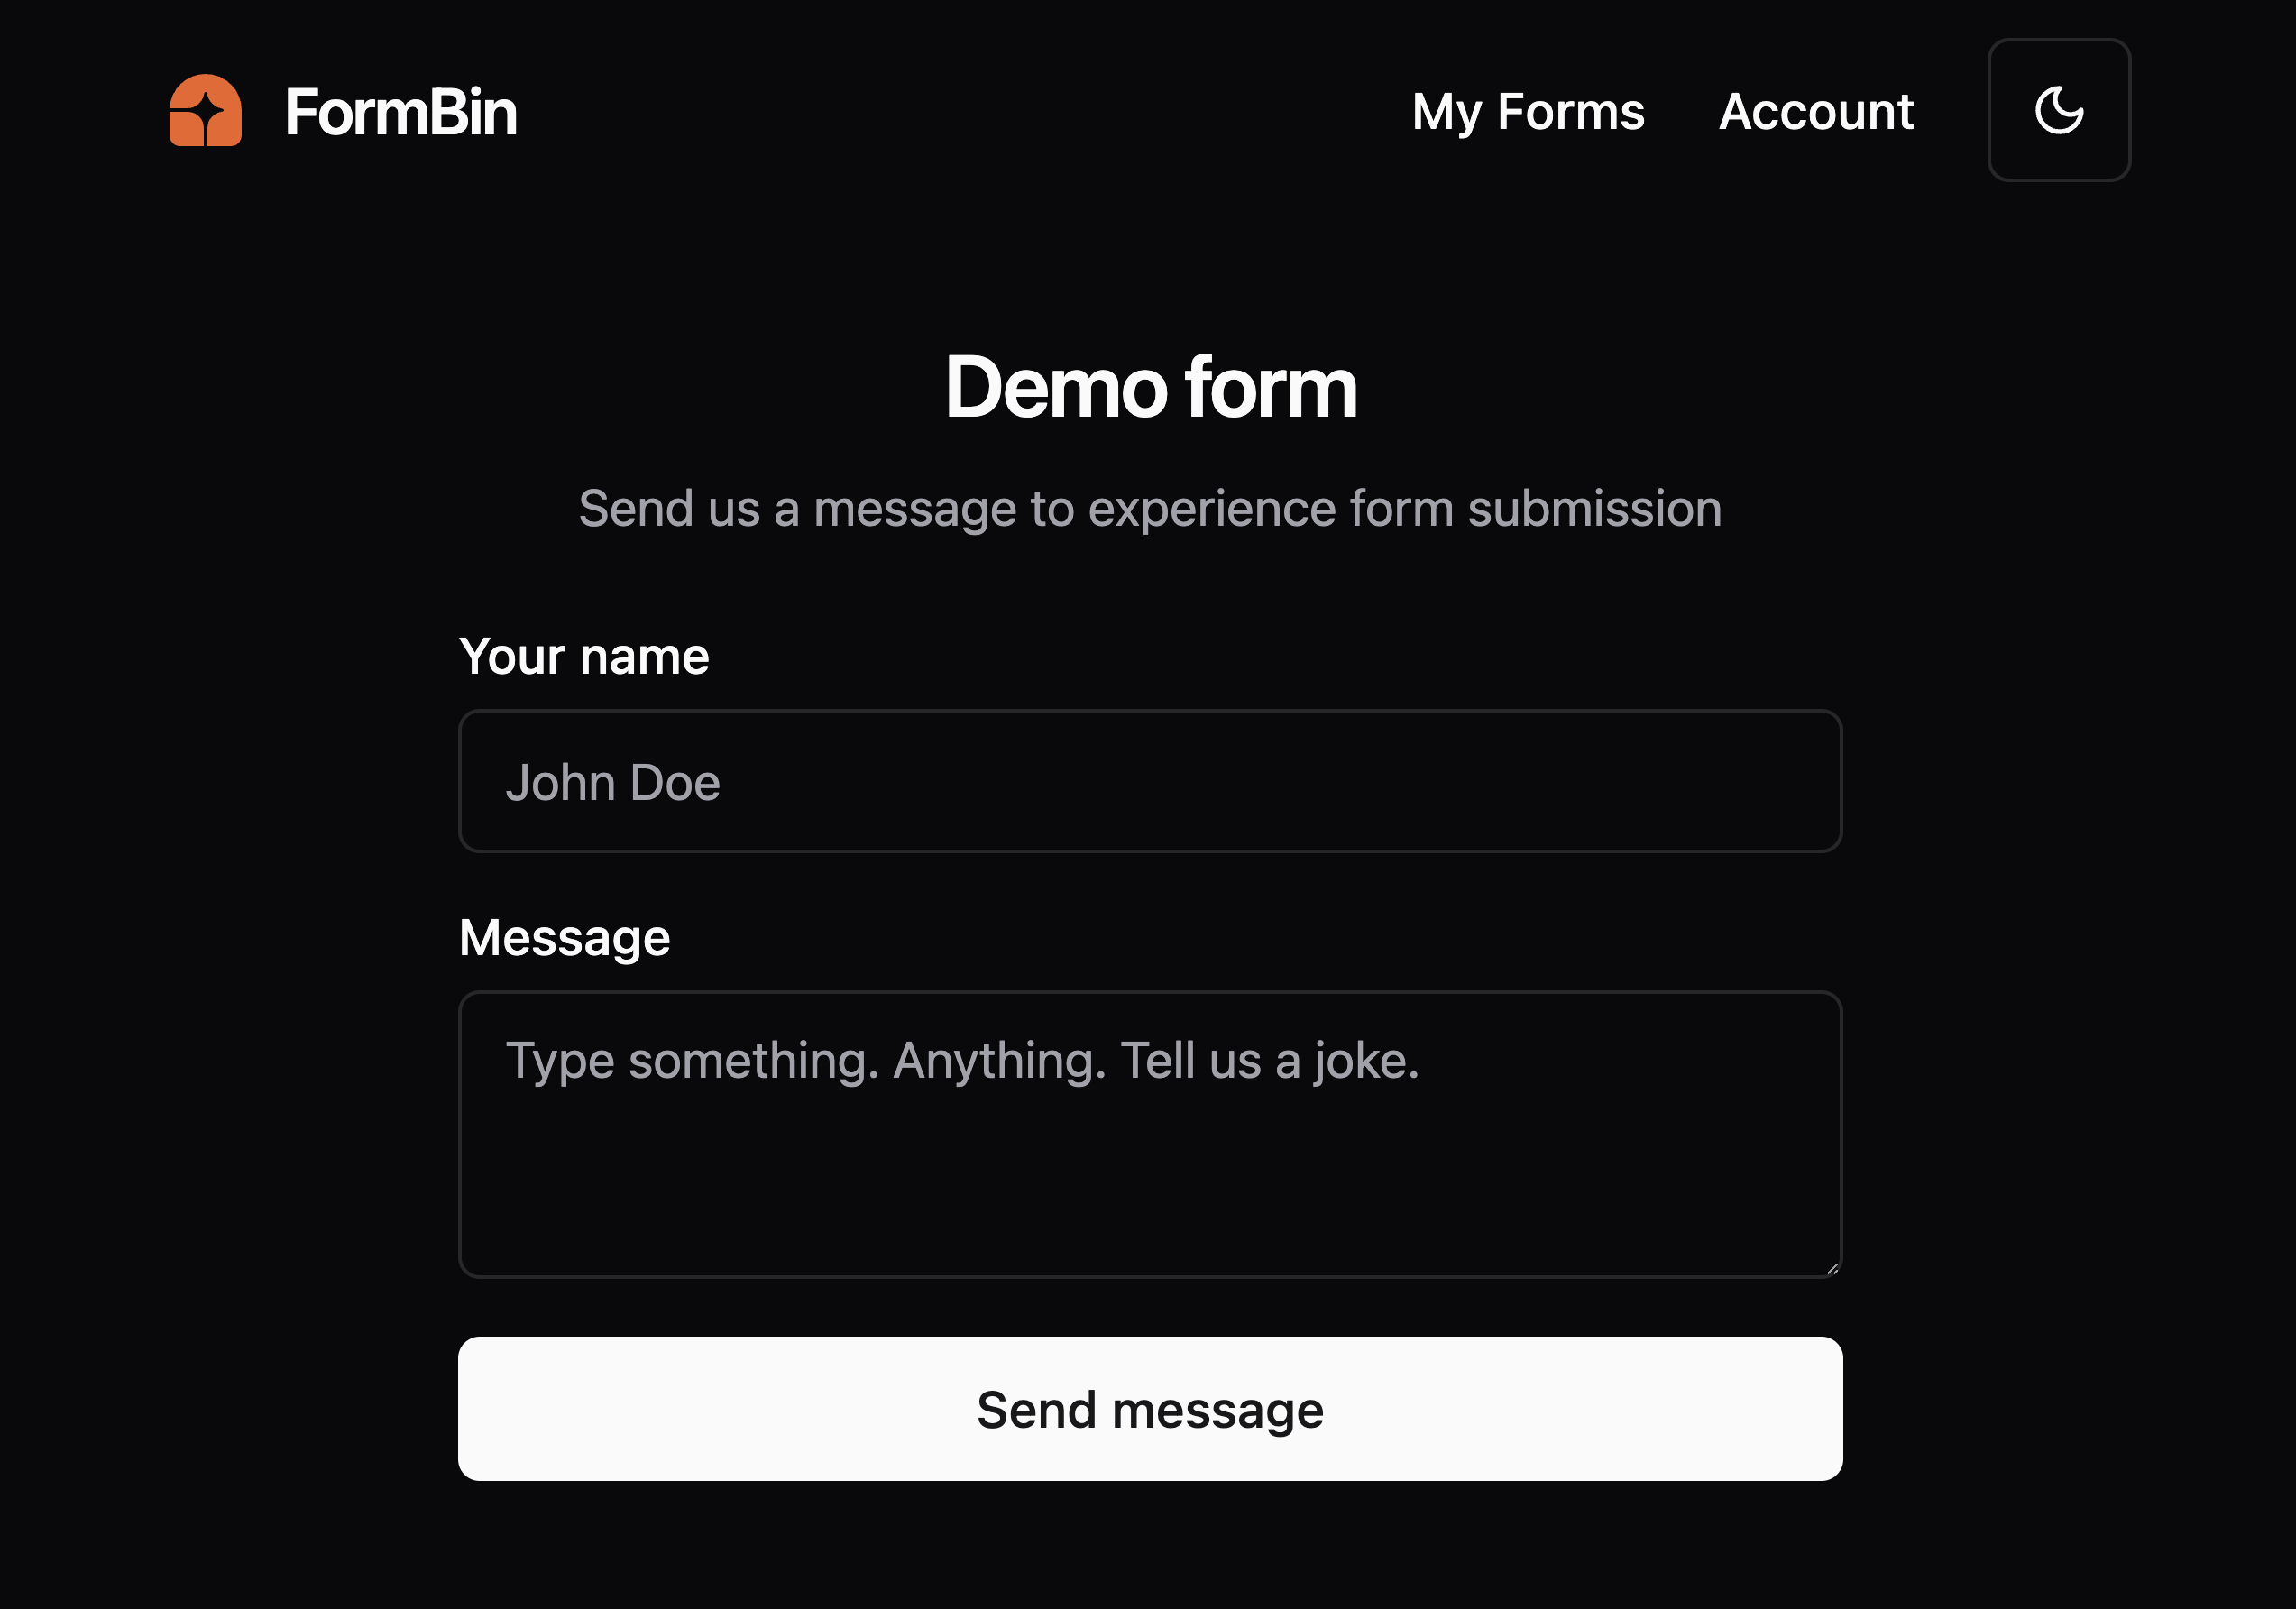
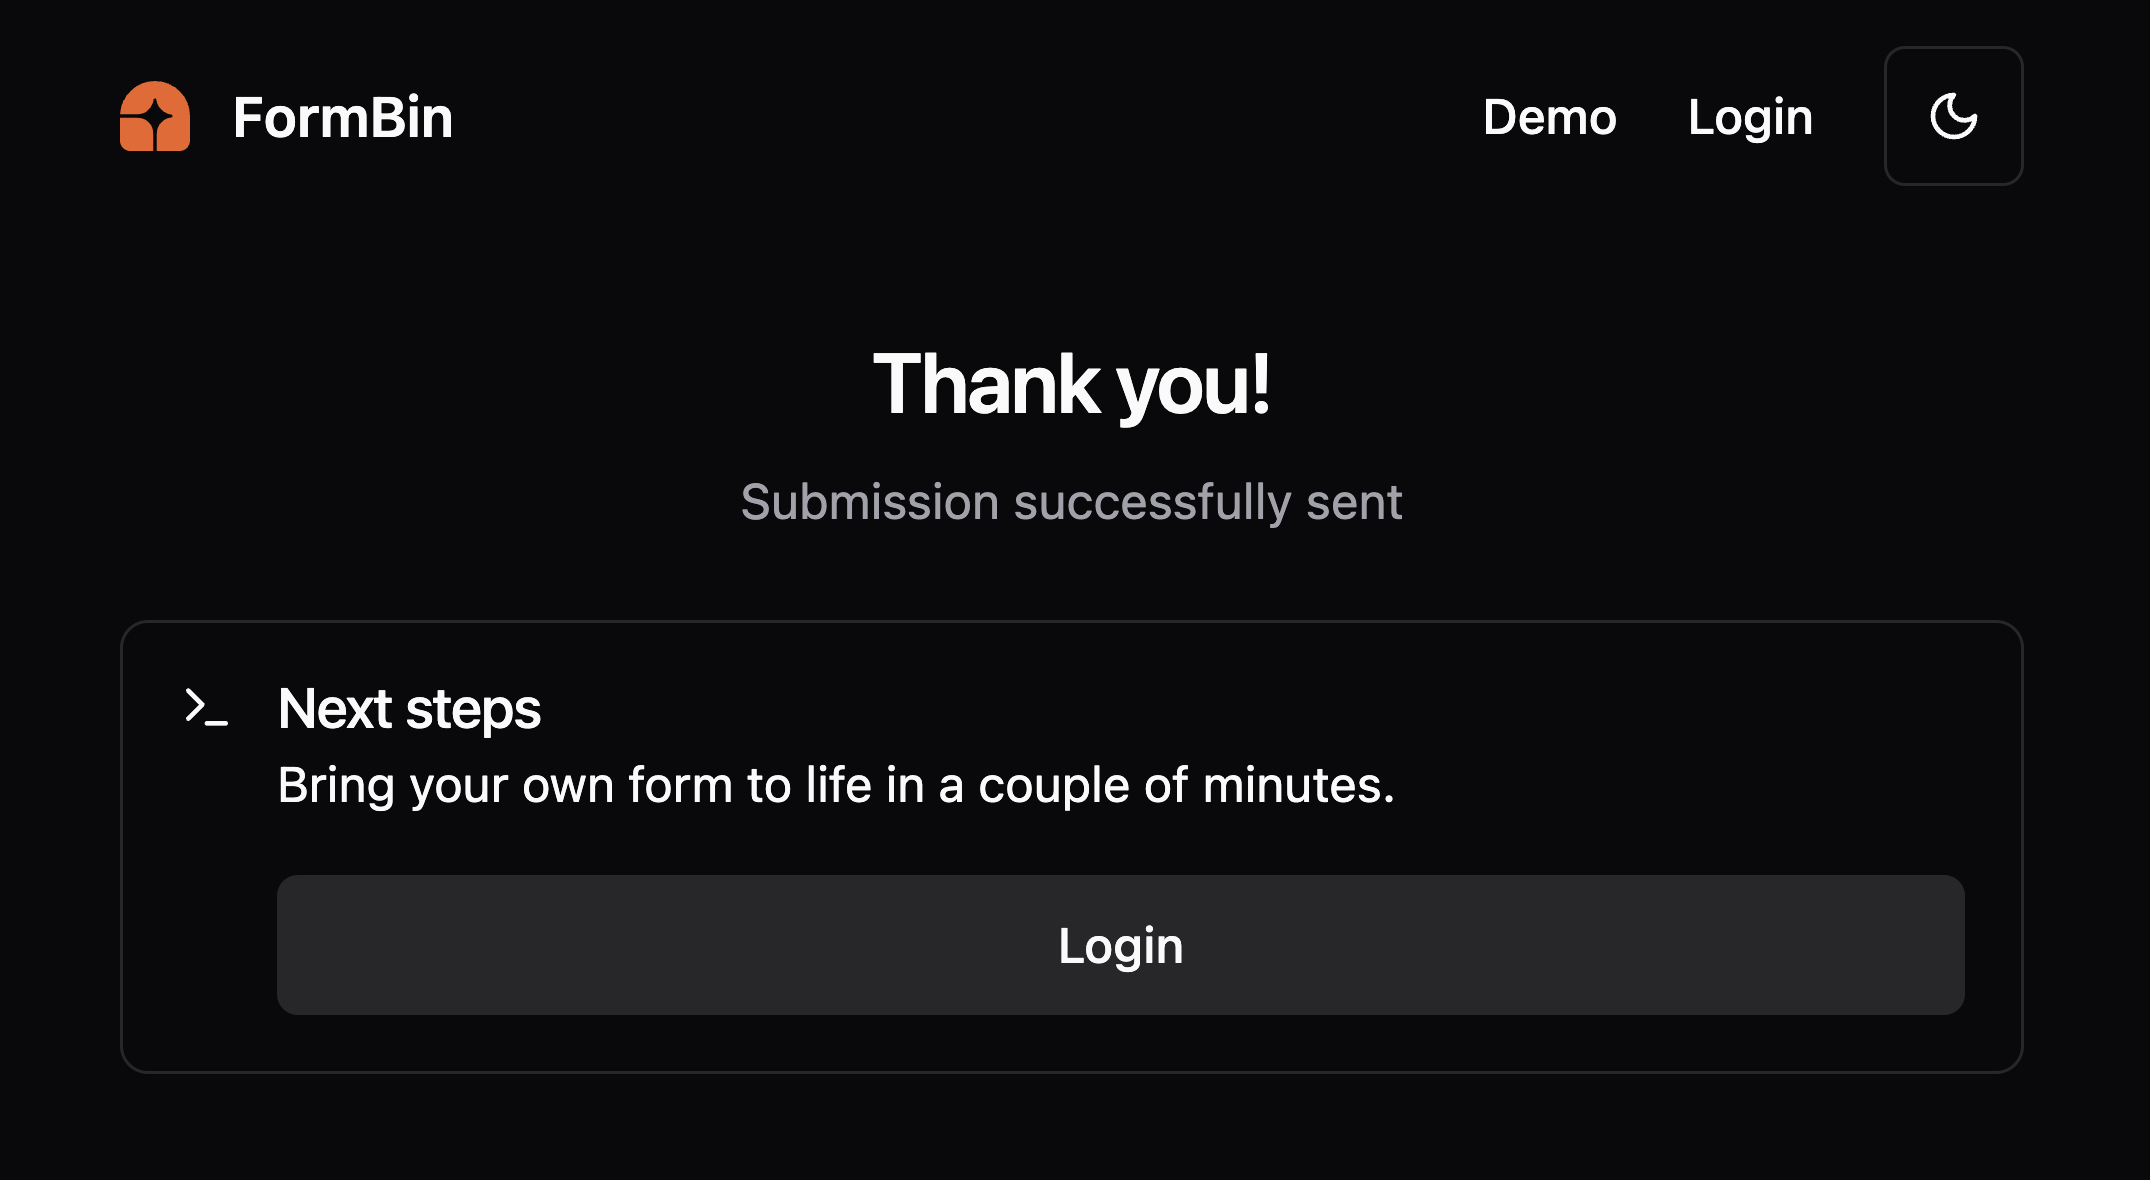
After submitting the form, a thank you page is shown as proof of successful redirection after submission. The developer is now prompted to sign in and create their first form with FormBin. Similar to the homepage, if the developer is already signed in, they are presented with a button to manage their forms.
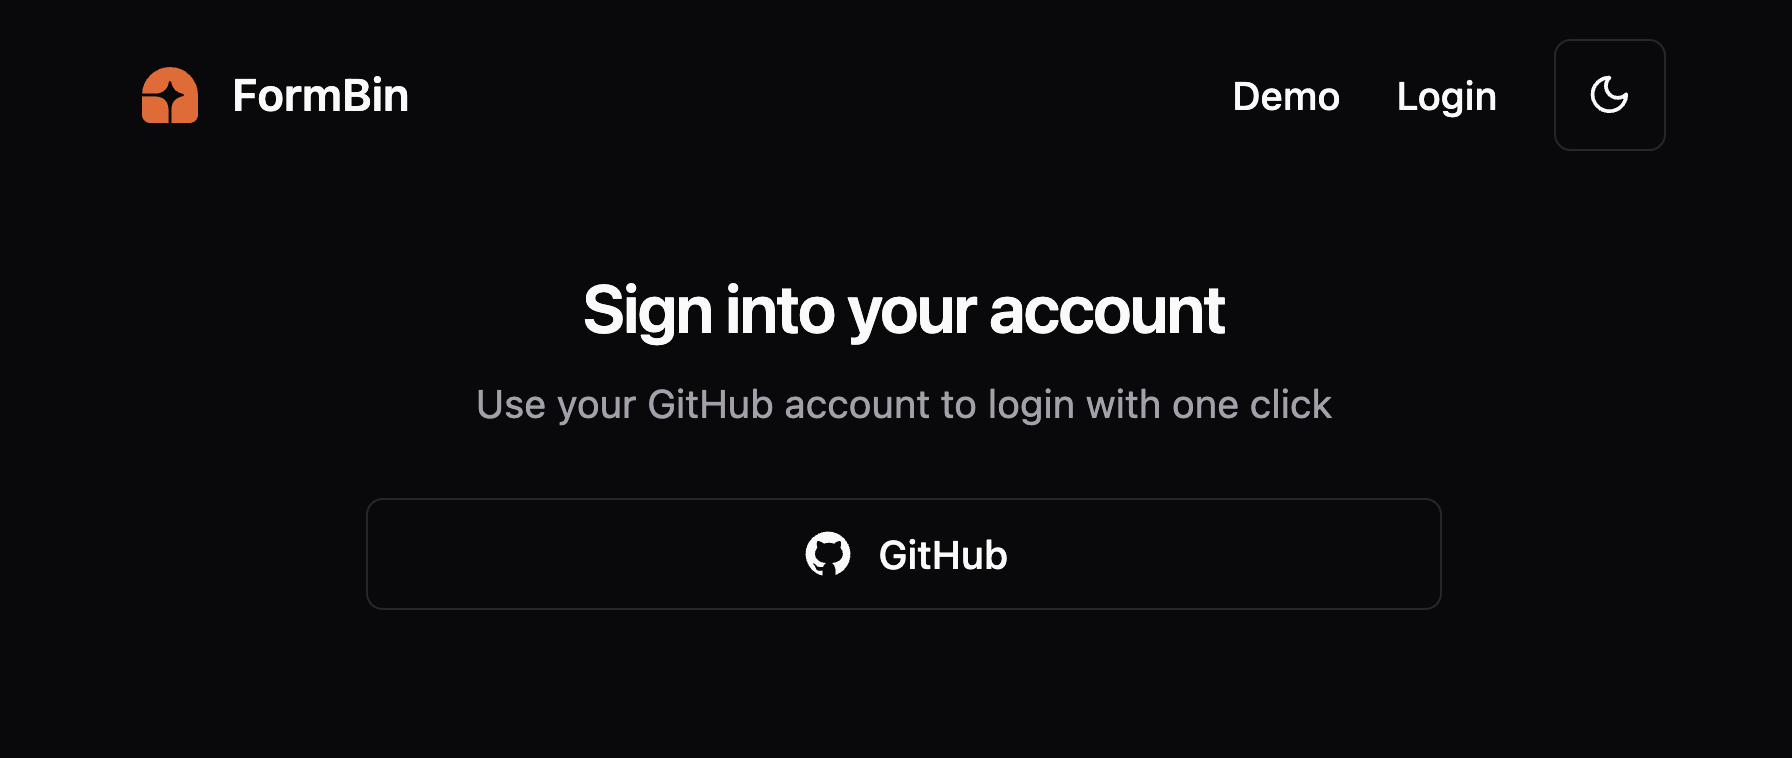
The sign-in page is the most minimal page, with a single button to sign in with GitHub. Once clicked, the user is redirected to GitHub where they authorize access, and then get redirected back to FormBin.
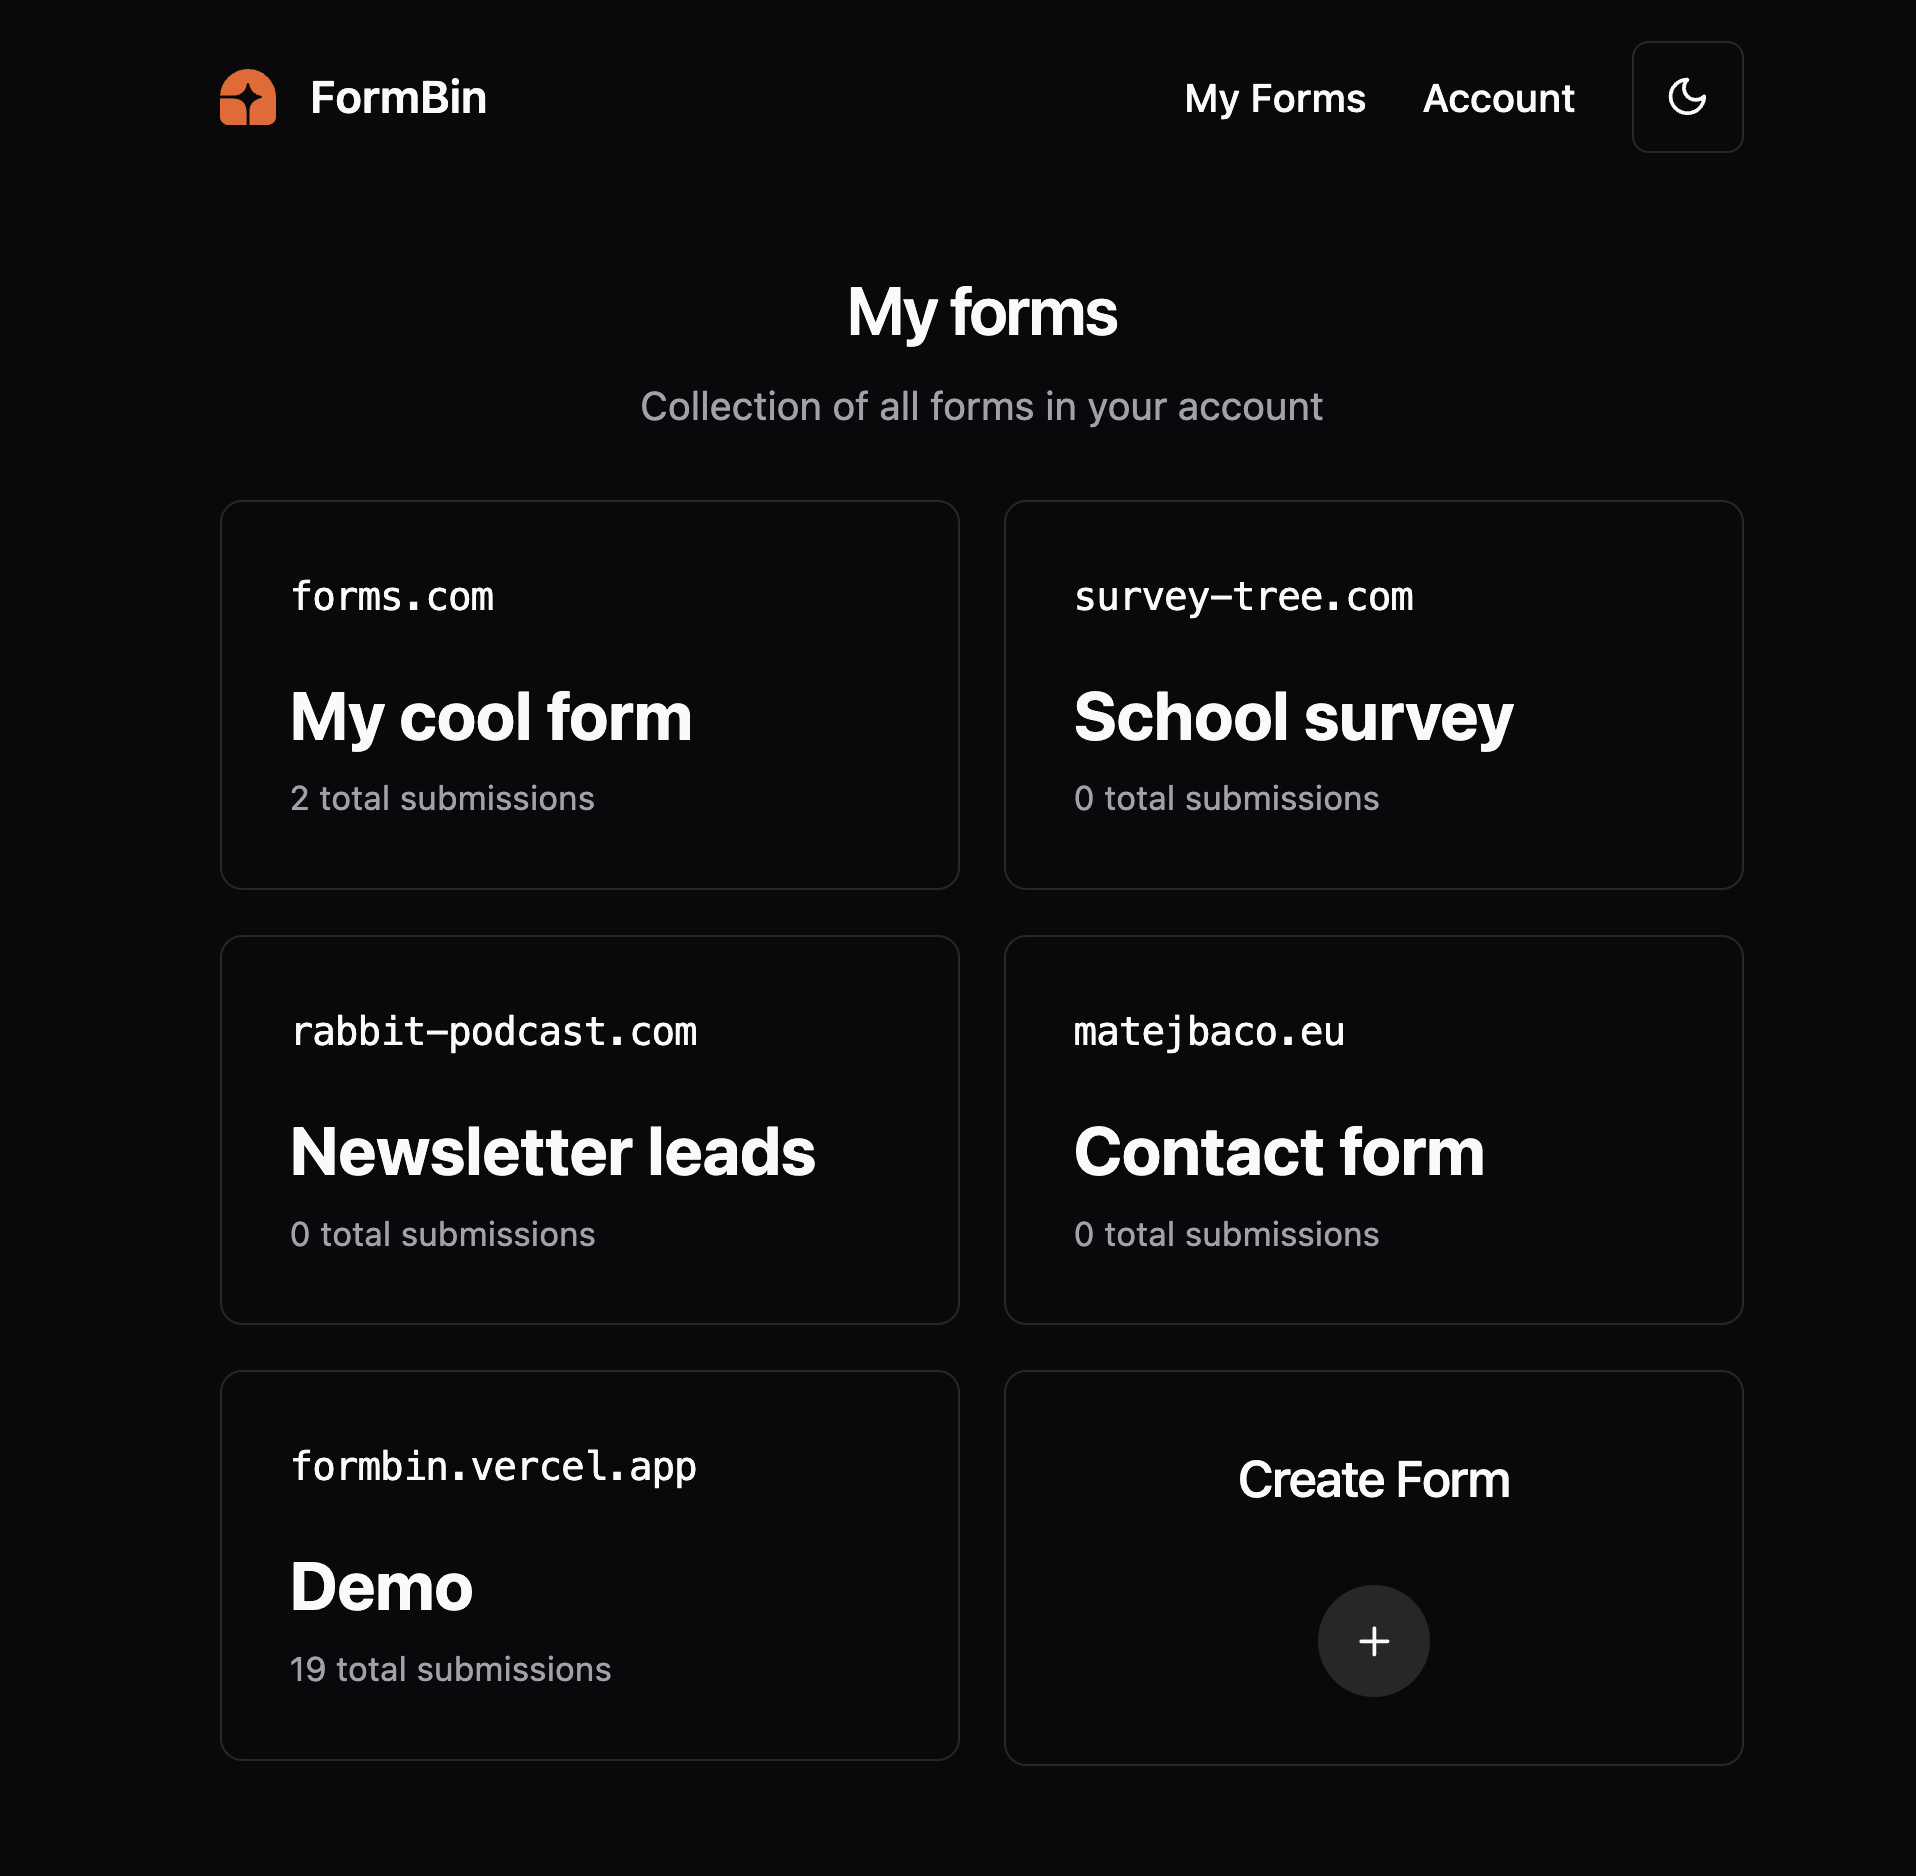
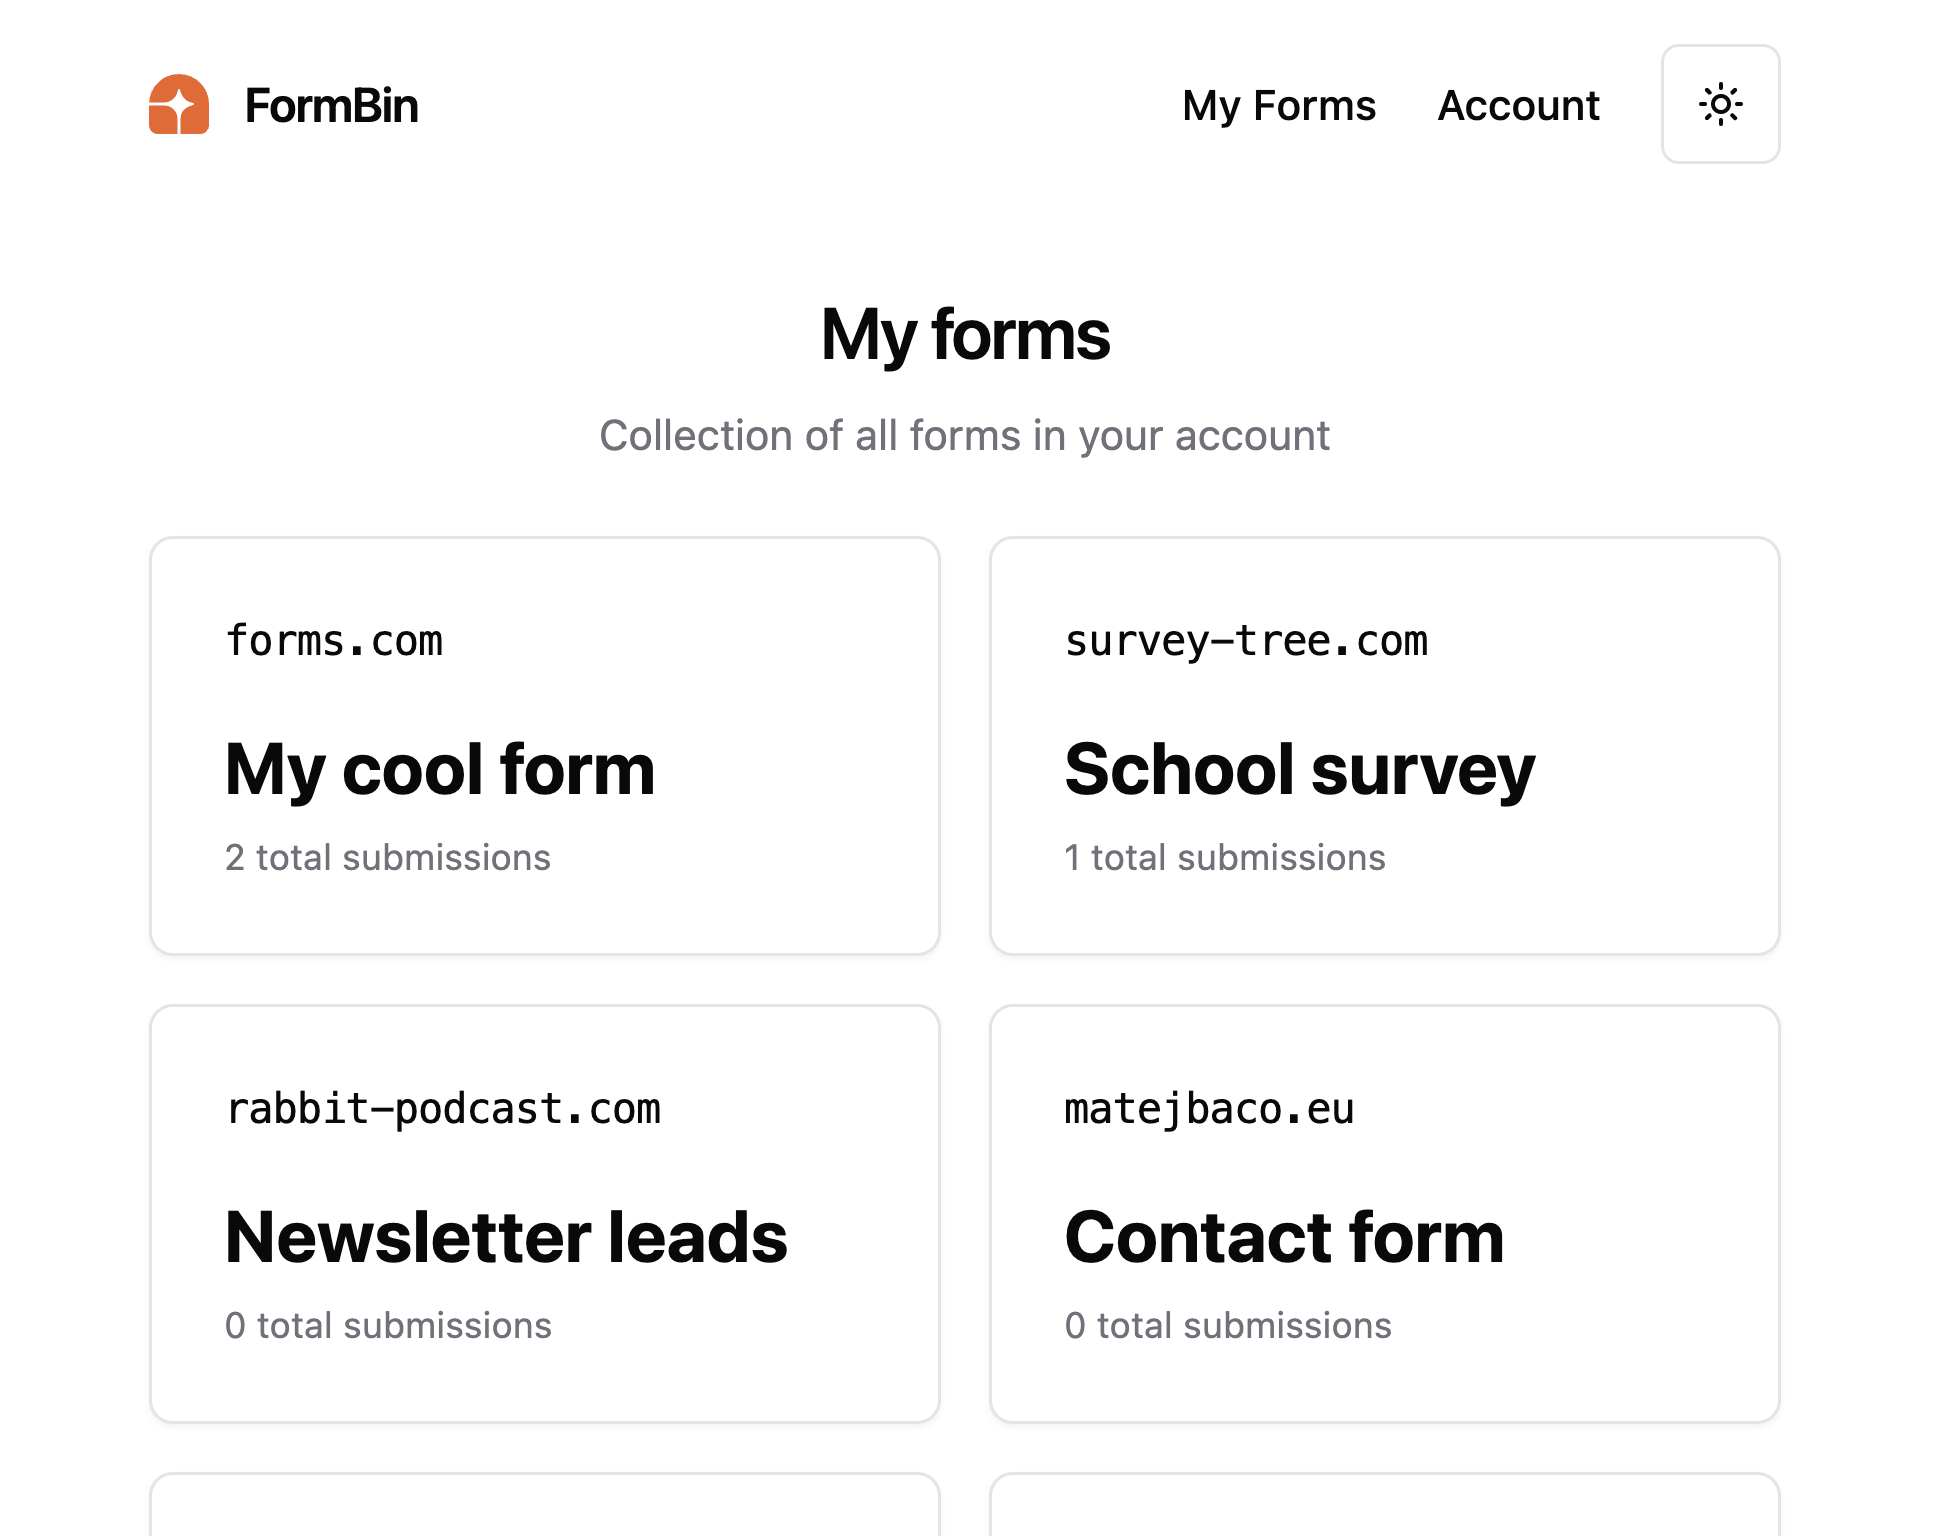
Once authenticated, the user is presented with a list of forms. At the beginning it's empty, so only a button to create a new form is available. Once the user adds a few forms, a list of cards shows each form's name, hostname of redirect URL, and amount of submissions. By clicking a card, the developer can view submissions and change form settings.
Have you noticed the theme toggle in the upper right corner? The entire website is styled with dark and light themes, and you can switch between them by clicking the toggle. The site also automatically detects the user's preferred theme based on their system settings.
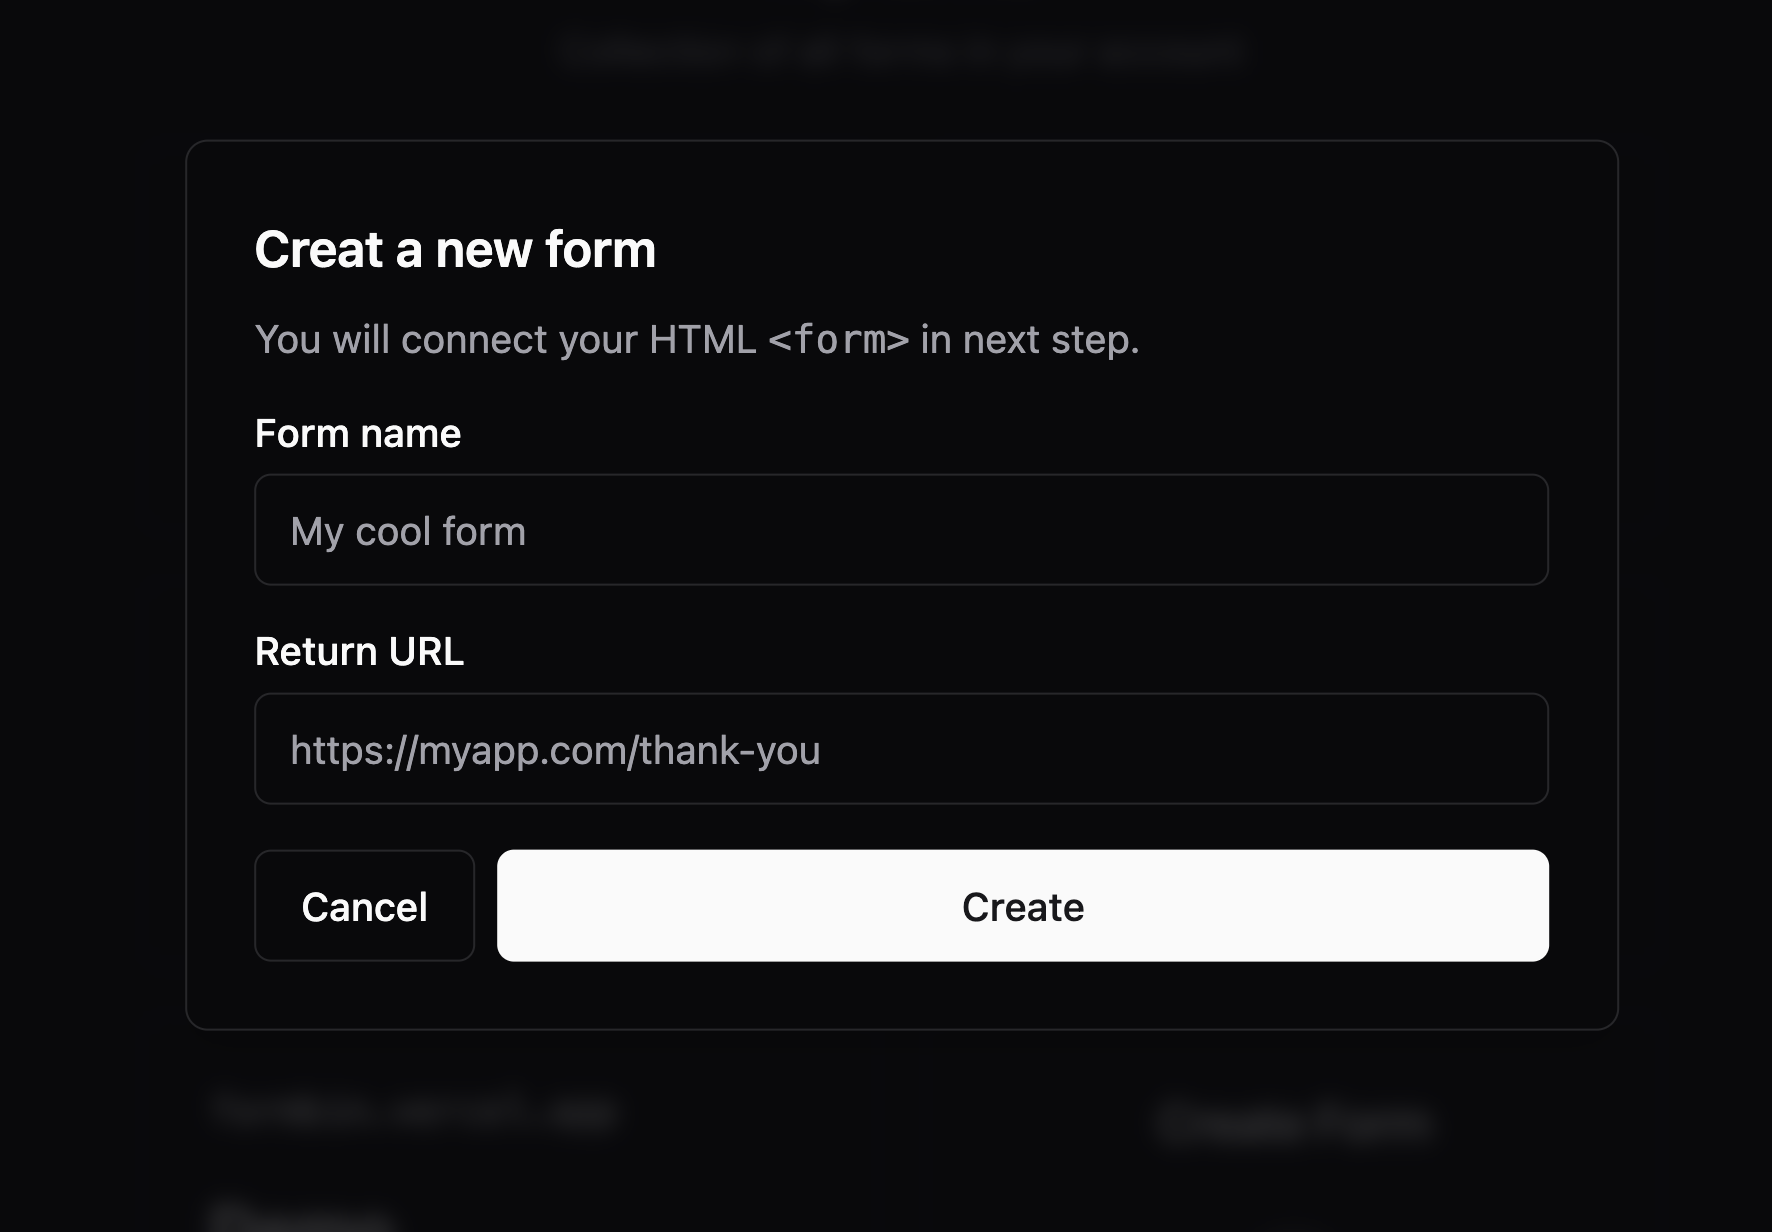
The modal to create a new form is very simple with focus on having as few inputs as possible. The form's name is a private name to organize it in FormBin, and the redirect URL is a public URL to which visitors are redirected after submitting the HTML form on the developer's site.
Once the form is created, an onboarding page is shown where developers can learn how to integrate FormBin into their HTML forms. By default, the entire code snippet is presented, which when copied into an HTML page, will be fully functional. Developers are then expected to modify their source code to include the FormBin form, and visit the website locally, on staging, or in production. Finally, developers are guided to submit the form for the very first time before finishing the onboarding flow.
If for any reason developers cannot finish the onboarding but feel confident about using FormBin, they can click the skip button to bypass the onboarding flow. If done by mistake, they can always see the onboarding screen again from the form's settings page.
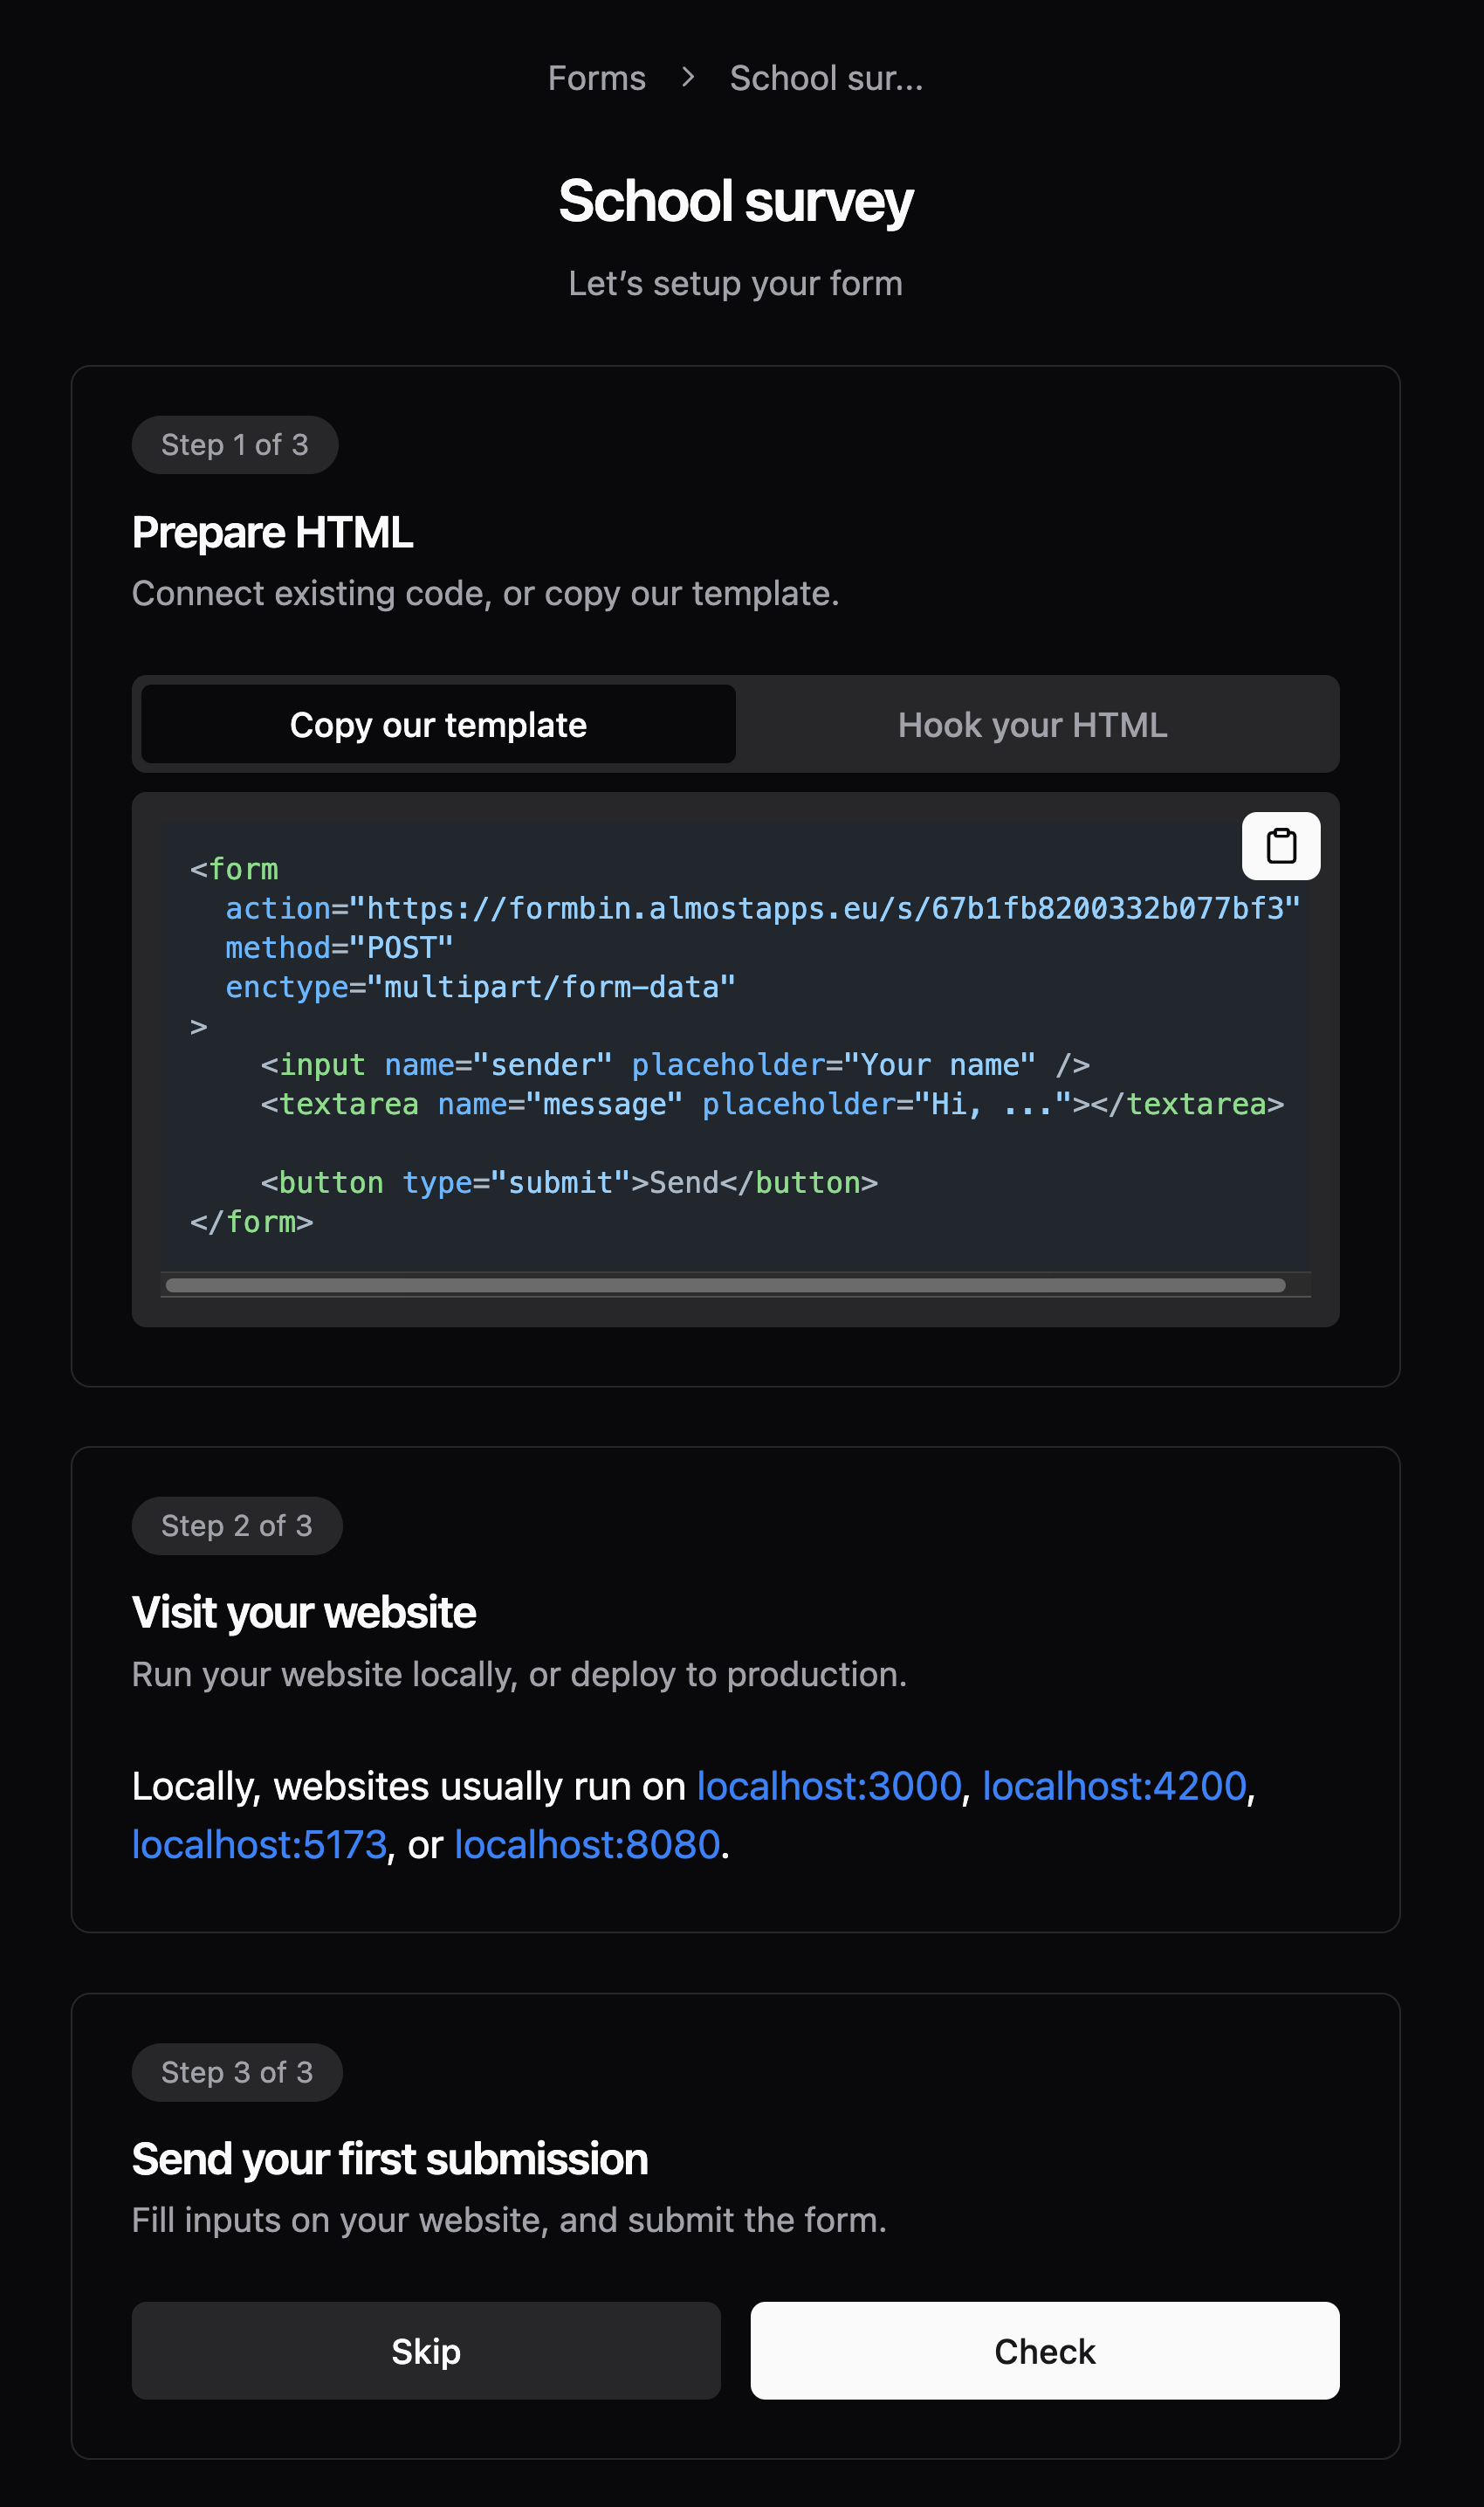
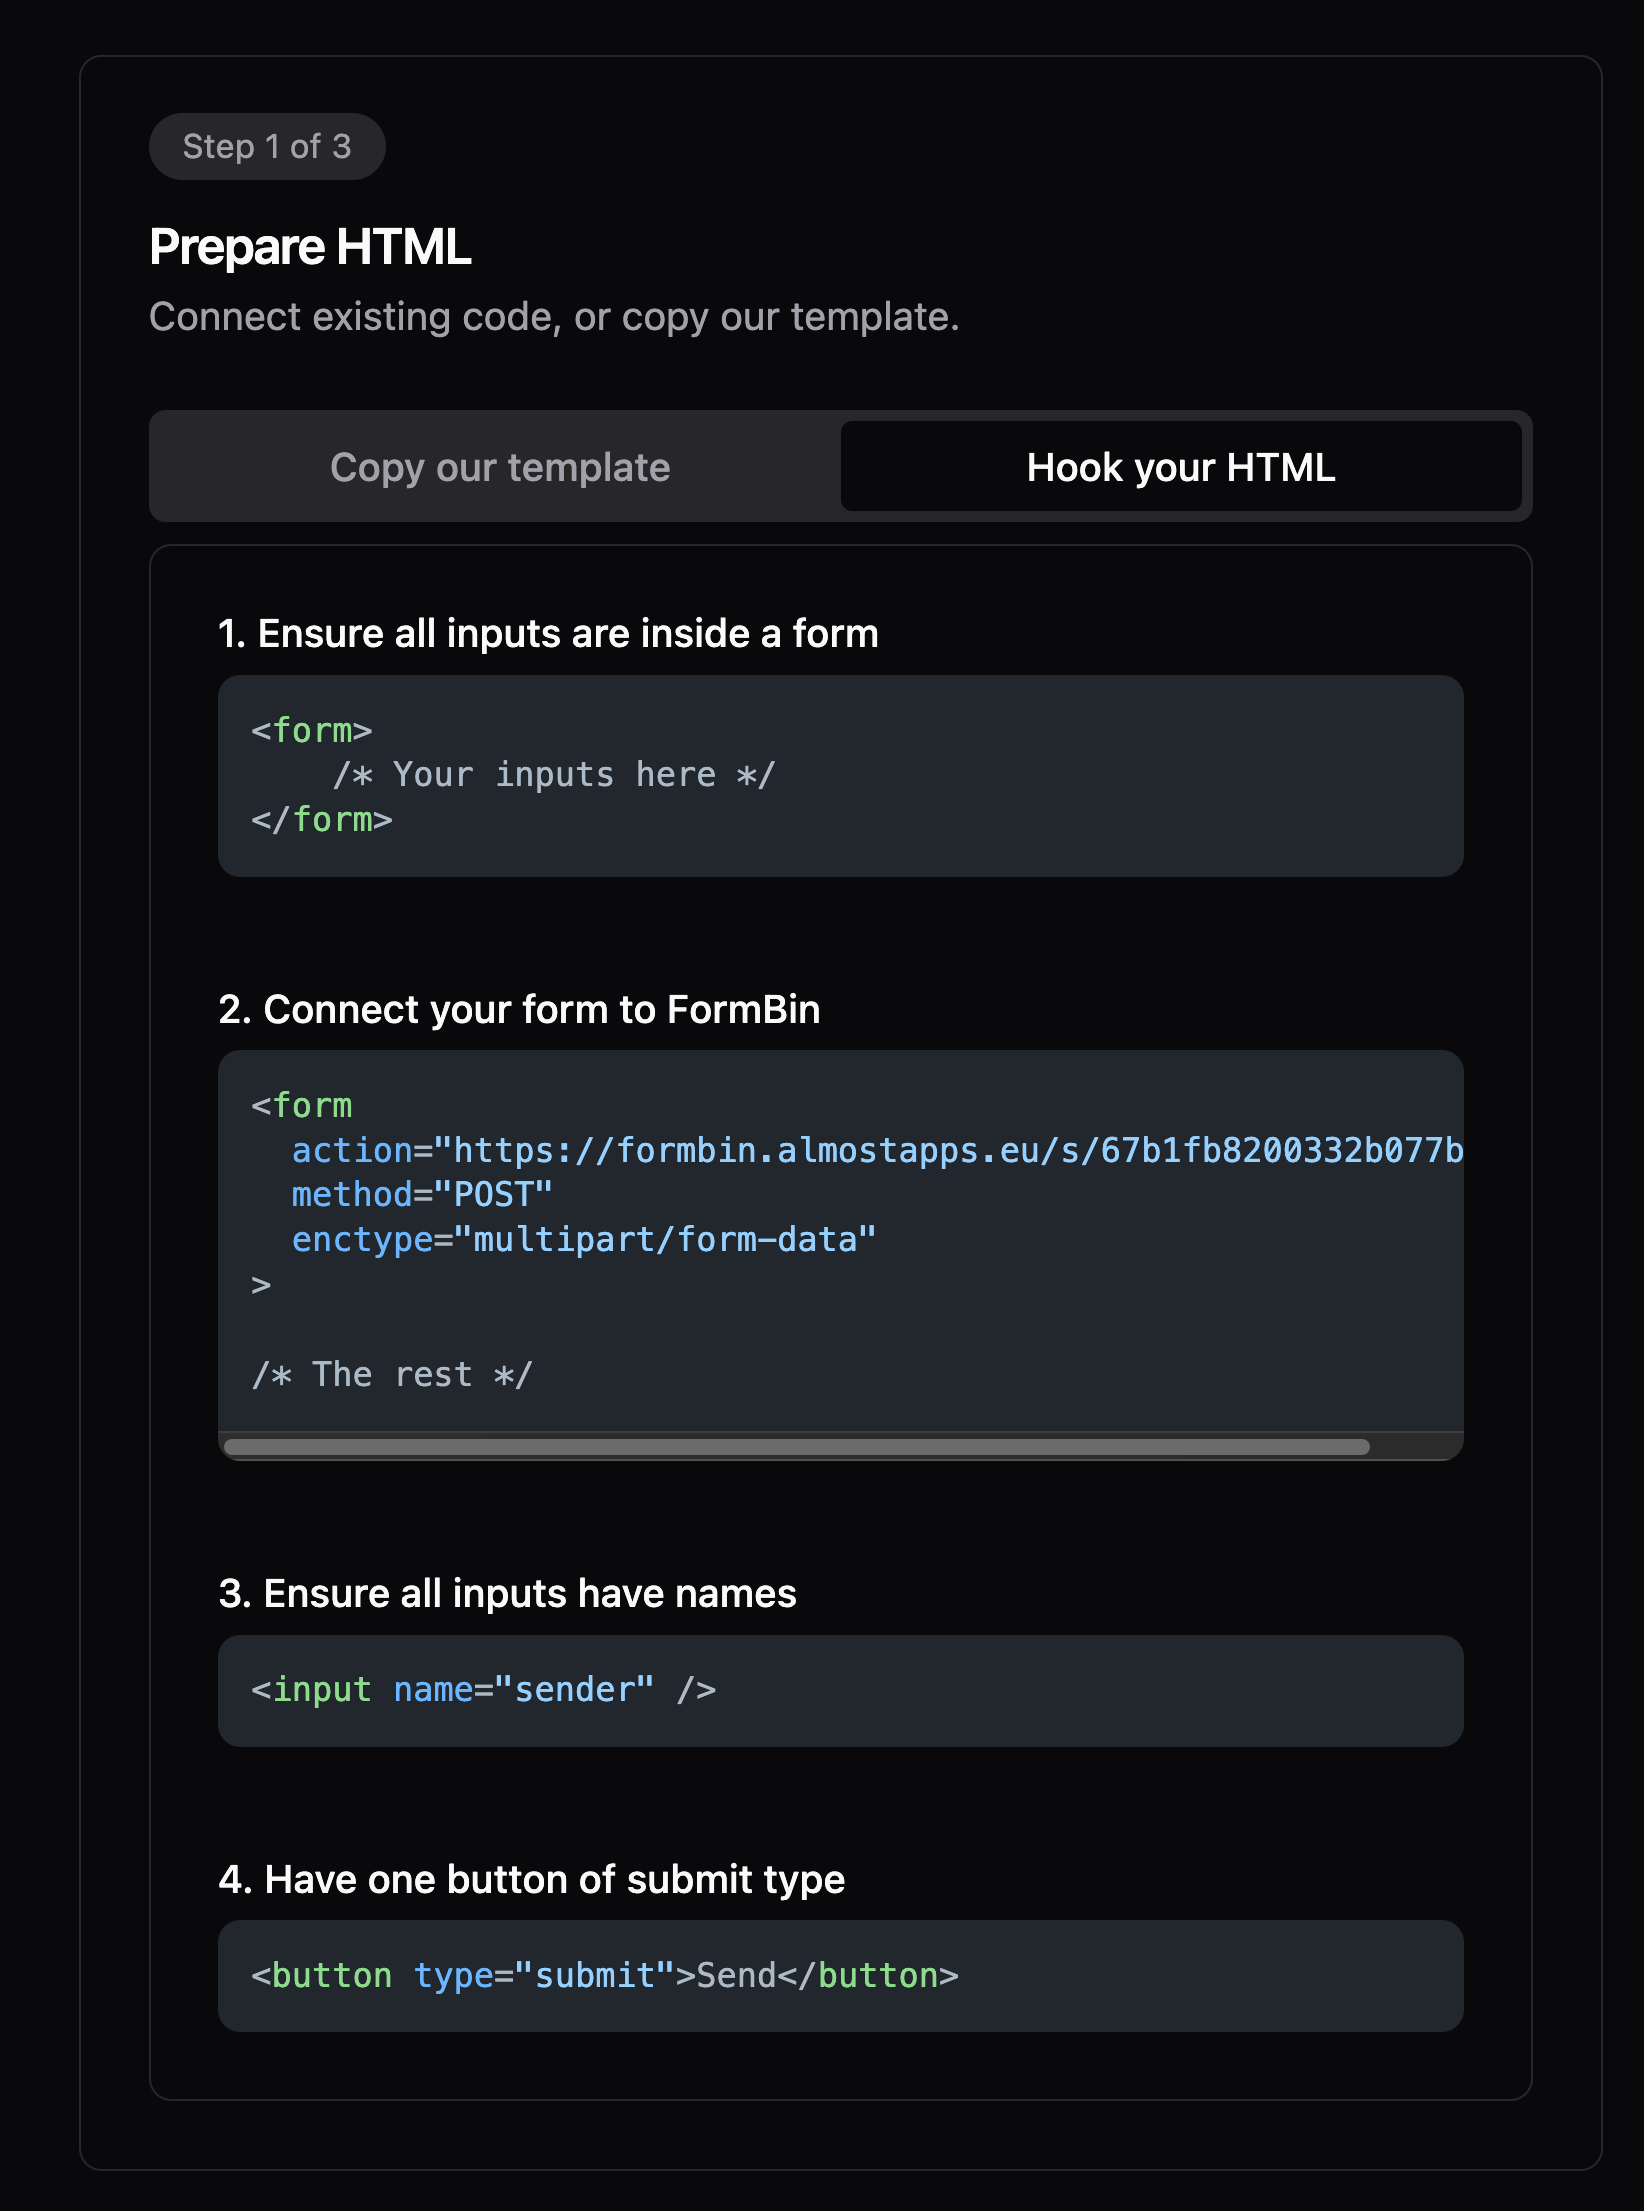
If developers already have an existing form not connected at all, or connected to another service, they can see steps for integrating with the existing HTML form, and a step-by-step checklist is presented. The rest of the flow remains the same.
Once developers successfully send their first submission and finish onboarding by checking if the submissions were received by FormBin, they are redirected back to the list of their forms with a confetti celebration effect.

By clicking on the form after onboarding, a list of submissions is shown, which now includes at least one submission created by the developer. The submission list supports pagination and presents a "Show more" button if there are more than 25 results. The list of submissions is minimal by default, but when clicked, submissions are expanded to show all details. The details can then be copied, or the submissions can be deleted.
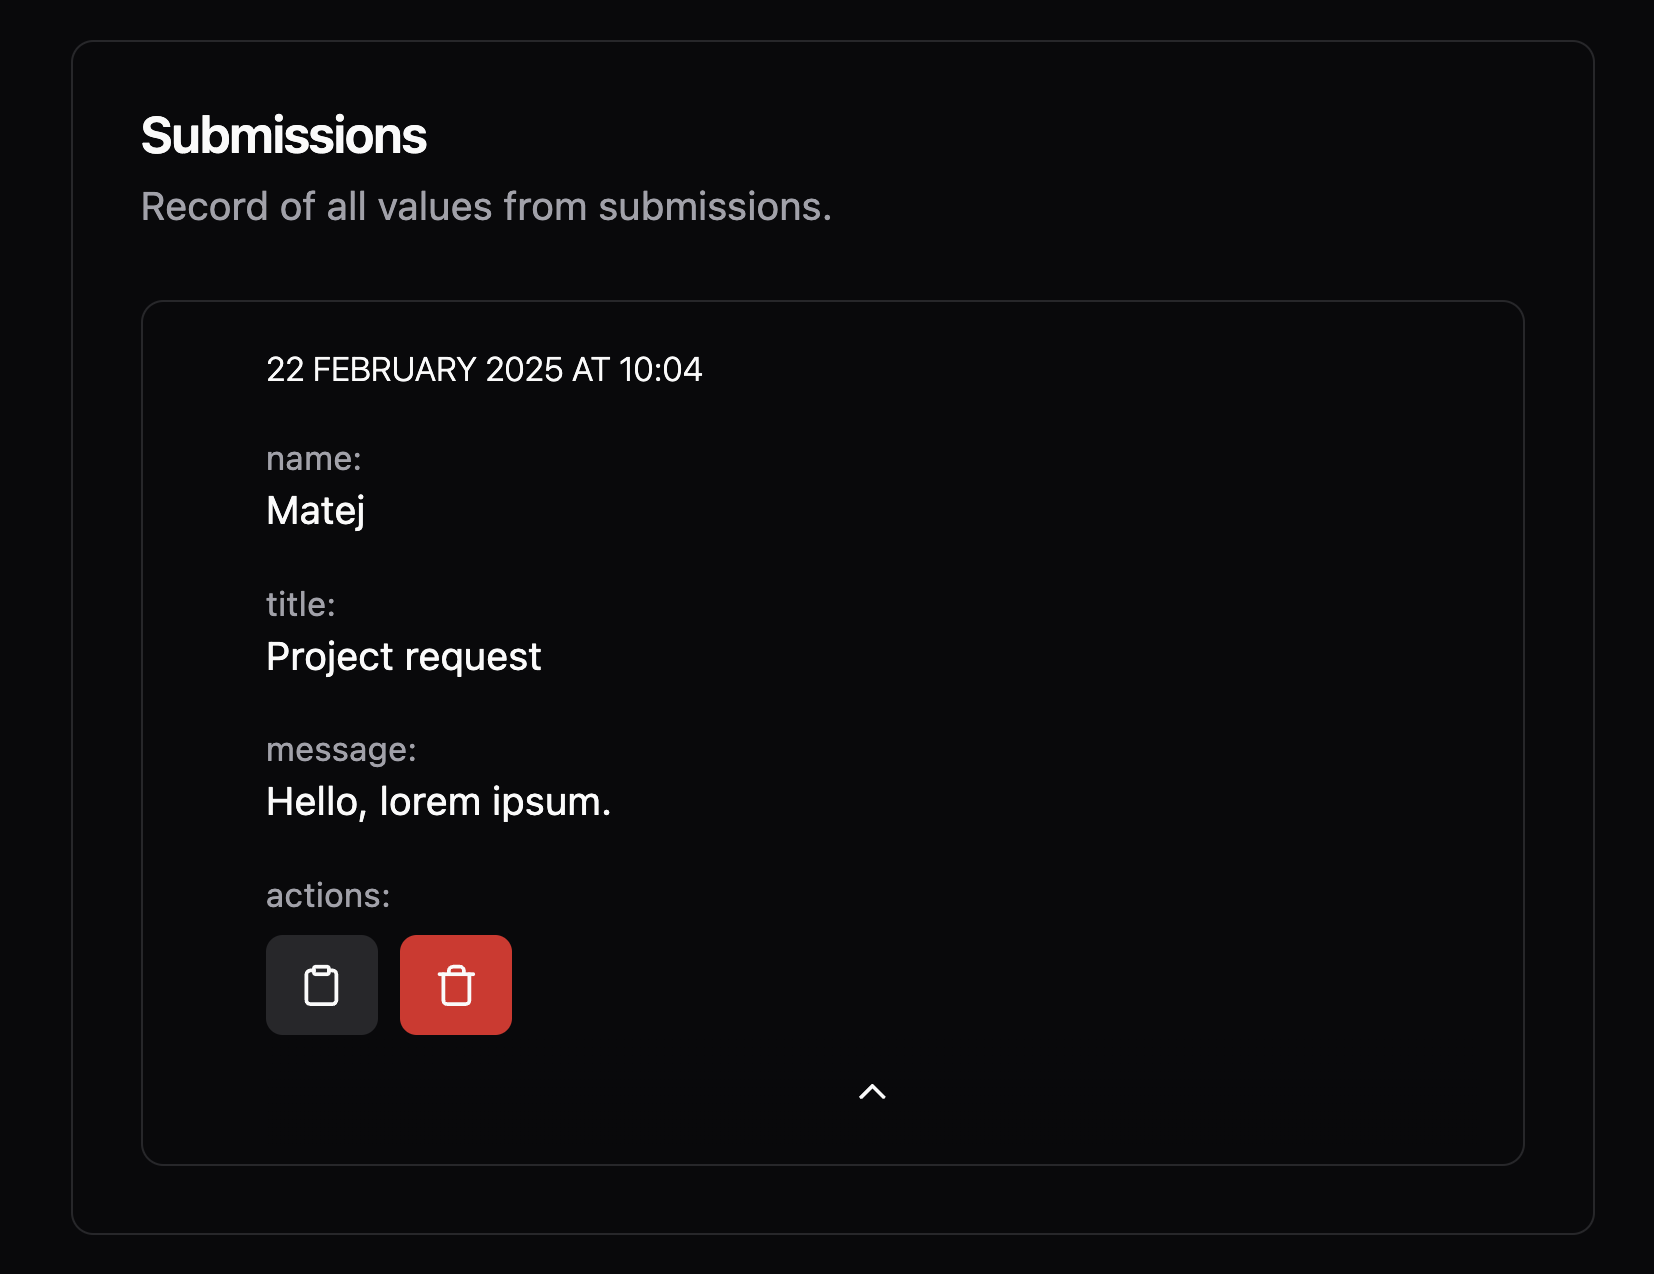
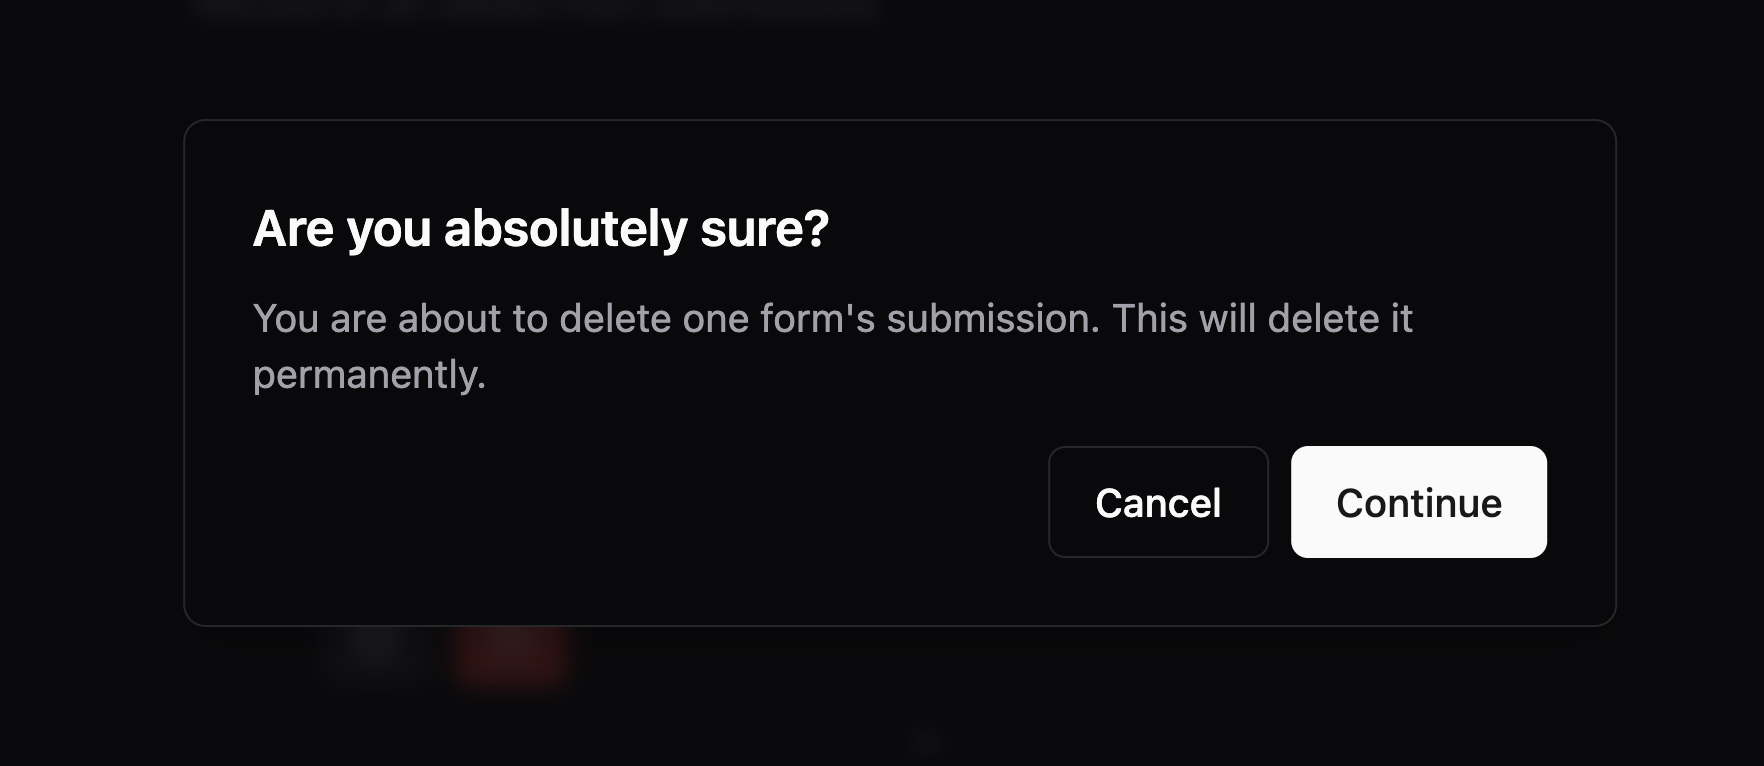
Any delete button on FormBin is protected by a confirmation modal to ensure no accidental deletions occur. Thanks to Appwrite, databases are backed up on a daily basis, so in case of emergency, data can always be recovered.
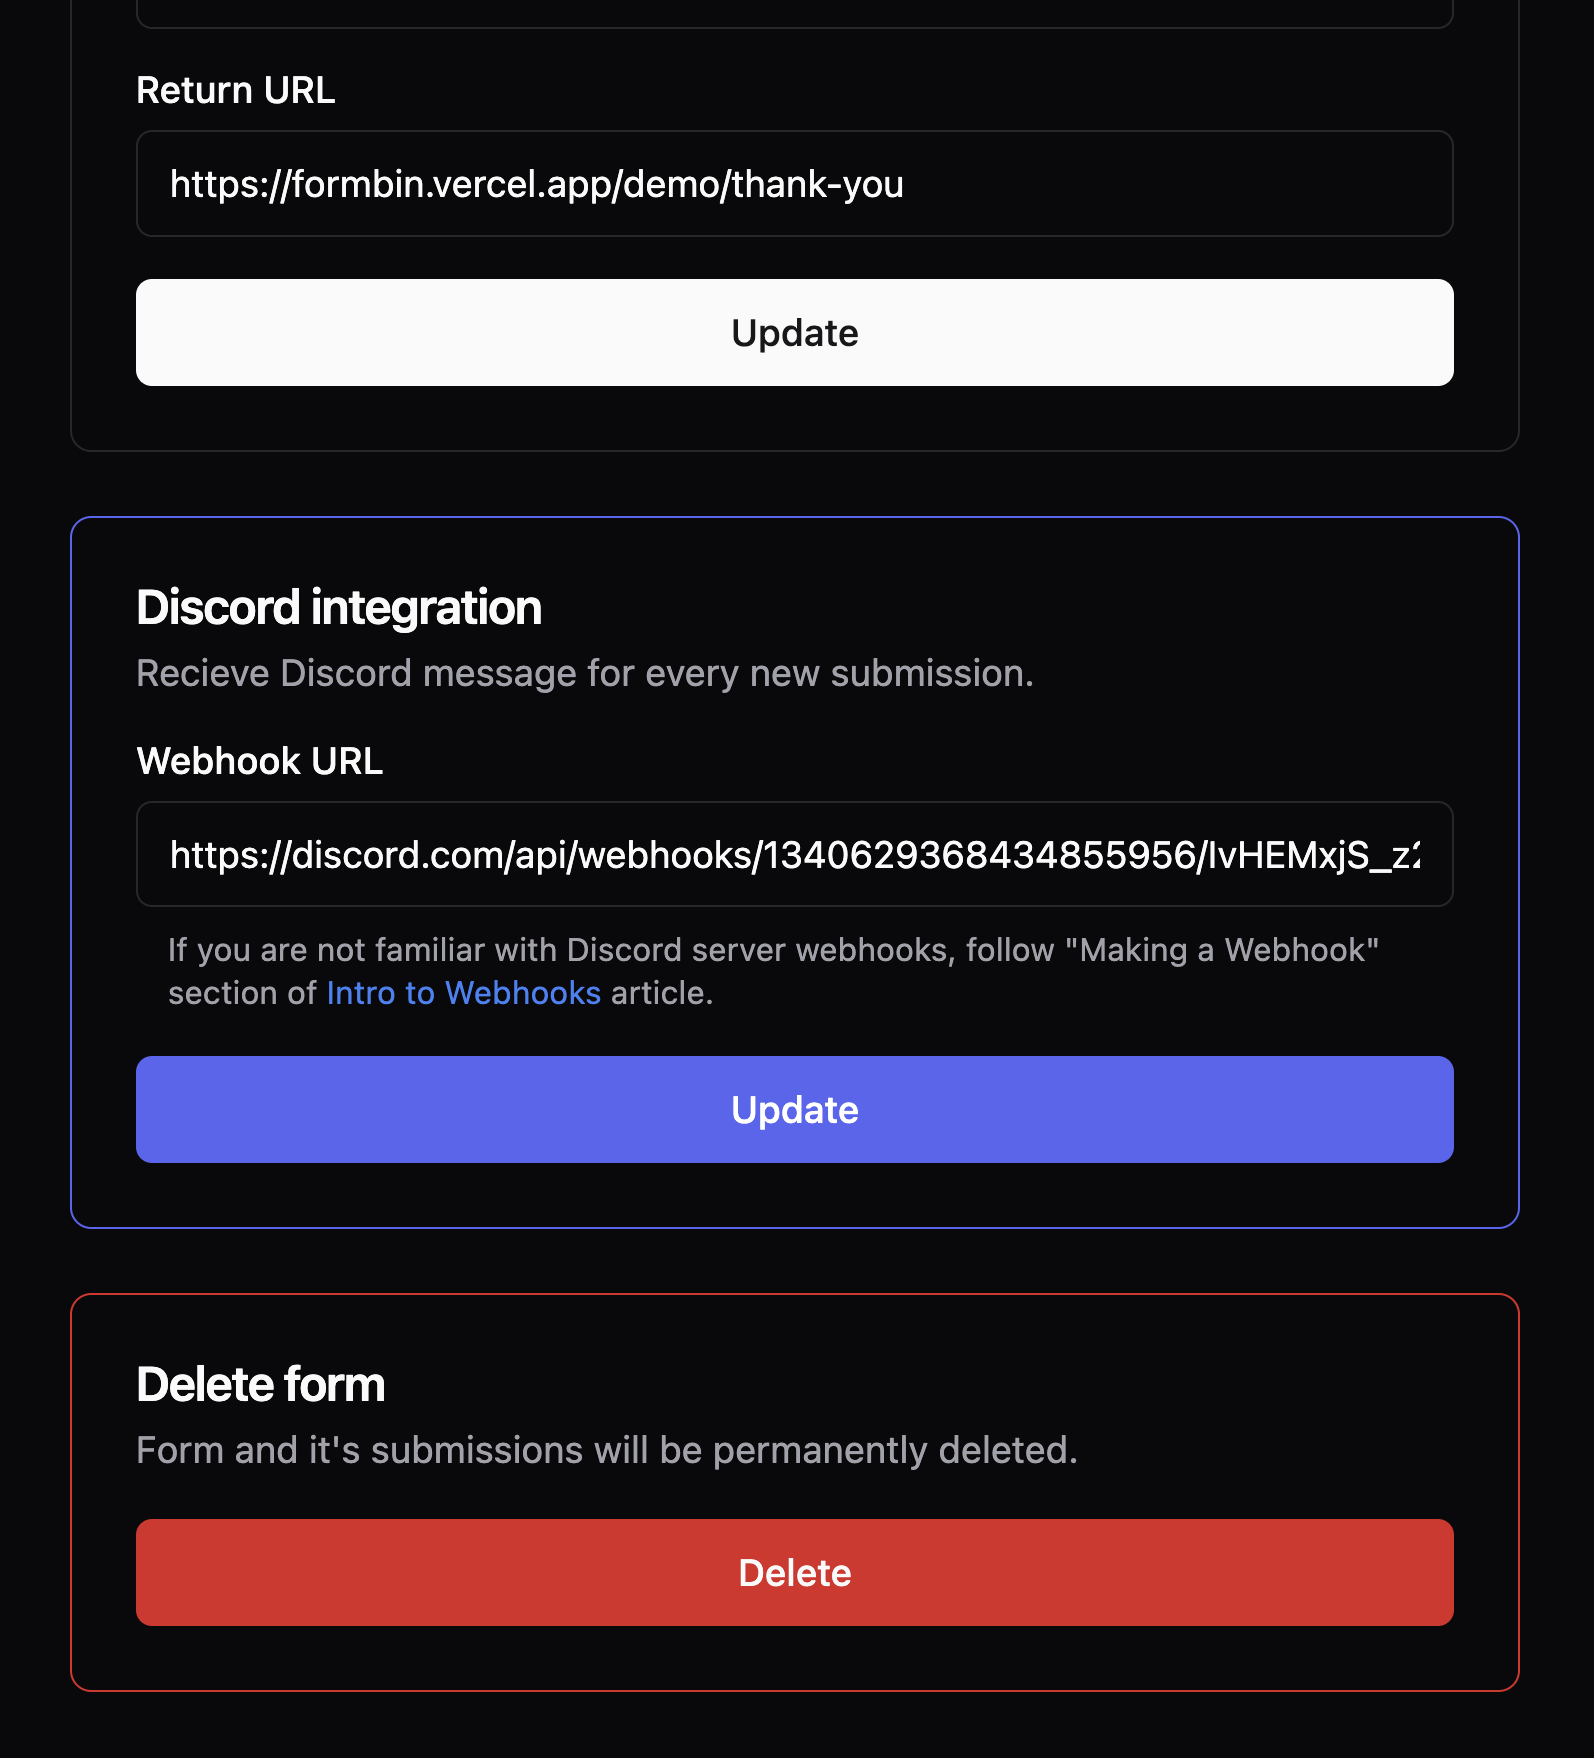
In form settings, developers can change its configuration, delete it, or integrate it with their Discord server's text channel. Discord integration links to Discord docs that explain how webhooks work, where to generate one, and how to use them.
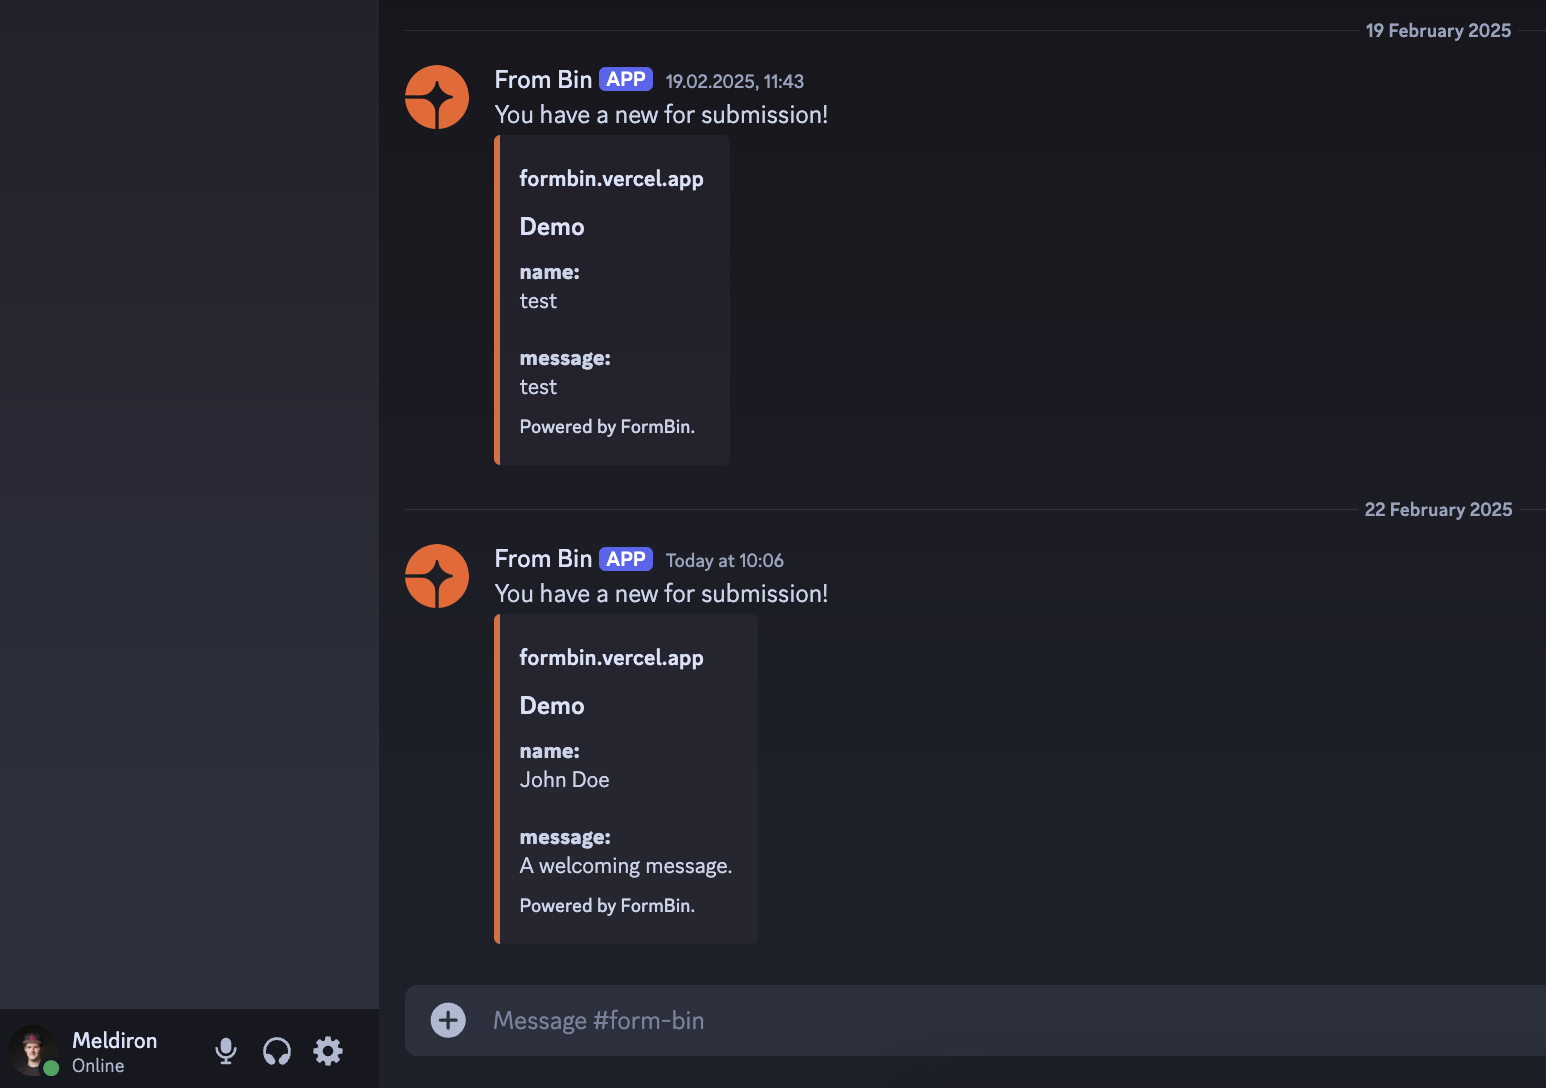
Once integrated successfully, all new submissions will be sent to the Discord channel with a branded design.
Last but not least, an account page shows the ability to log out from the account.

## Retrospective
The biggest learning point for me was focusing on the **onboarding flow**. From the first moment, I ensured to guide visitors through flows that feel simple and intuitive. A great example of this is the demo contact form with registration CTA afterwards. Simplicity of creation also goes a long way by hiding more advanced settings until later steps of configuring the form. Last but not least, I received amazing feedback about the onboarding screen itself and the validation given by checking for first successful submission. Having the flow guide dedicated users is amazing, but the ability to skip it is equally necessary for those who just want to click through the app and see what features it offers.
Building my first production application using **shadcn** gave me confidence with this UI library and strengthened my understanding of UI/UX design. While I don't feel like using it on every project from now on, I am glad it's in my "toolbox" and I can execute with it whenever needed.
"Thanks to" laziness, I was tempted to skip the **landing page** due to time constraints of the weekend hackathon. While I did manage to set it up at the very end, it provided me with great perspective. I used to set up the landing page first to make sure the design was impressive enough to attract users. Doing it at the very end was less focused on design and more on its features. While usually I force copy on the homepage to fill spots, doing it last makes copywriting insanely easy and serves as great validation that the product is exactly what I wanted it to be. I will surely continue in this spirit, building the homepage at the very end.
## Future plans
Thanks to community feedback, I plan to add the following features in the future:
- File and folder drag & drop support in form submission
- Captcha support by multiple providers to prevent spam
- SMTP integration for sending emails
- Improved submission design and ability for export
- Starters with popular frameworks
- Written documentation and video content
---
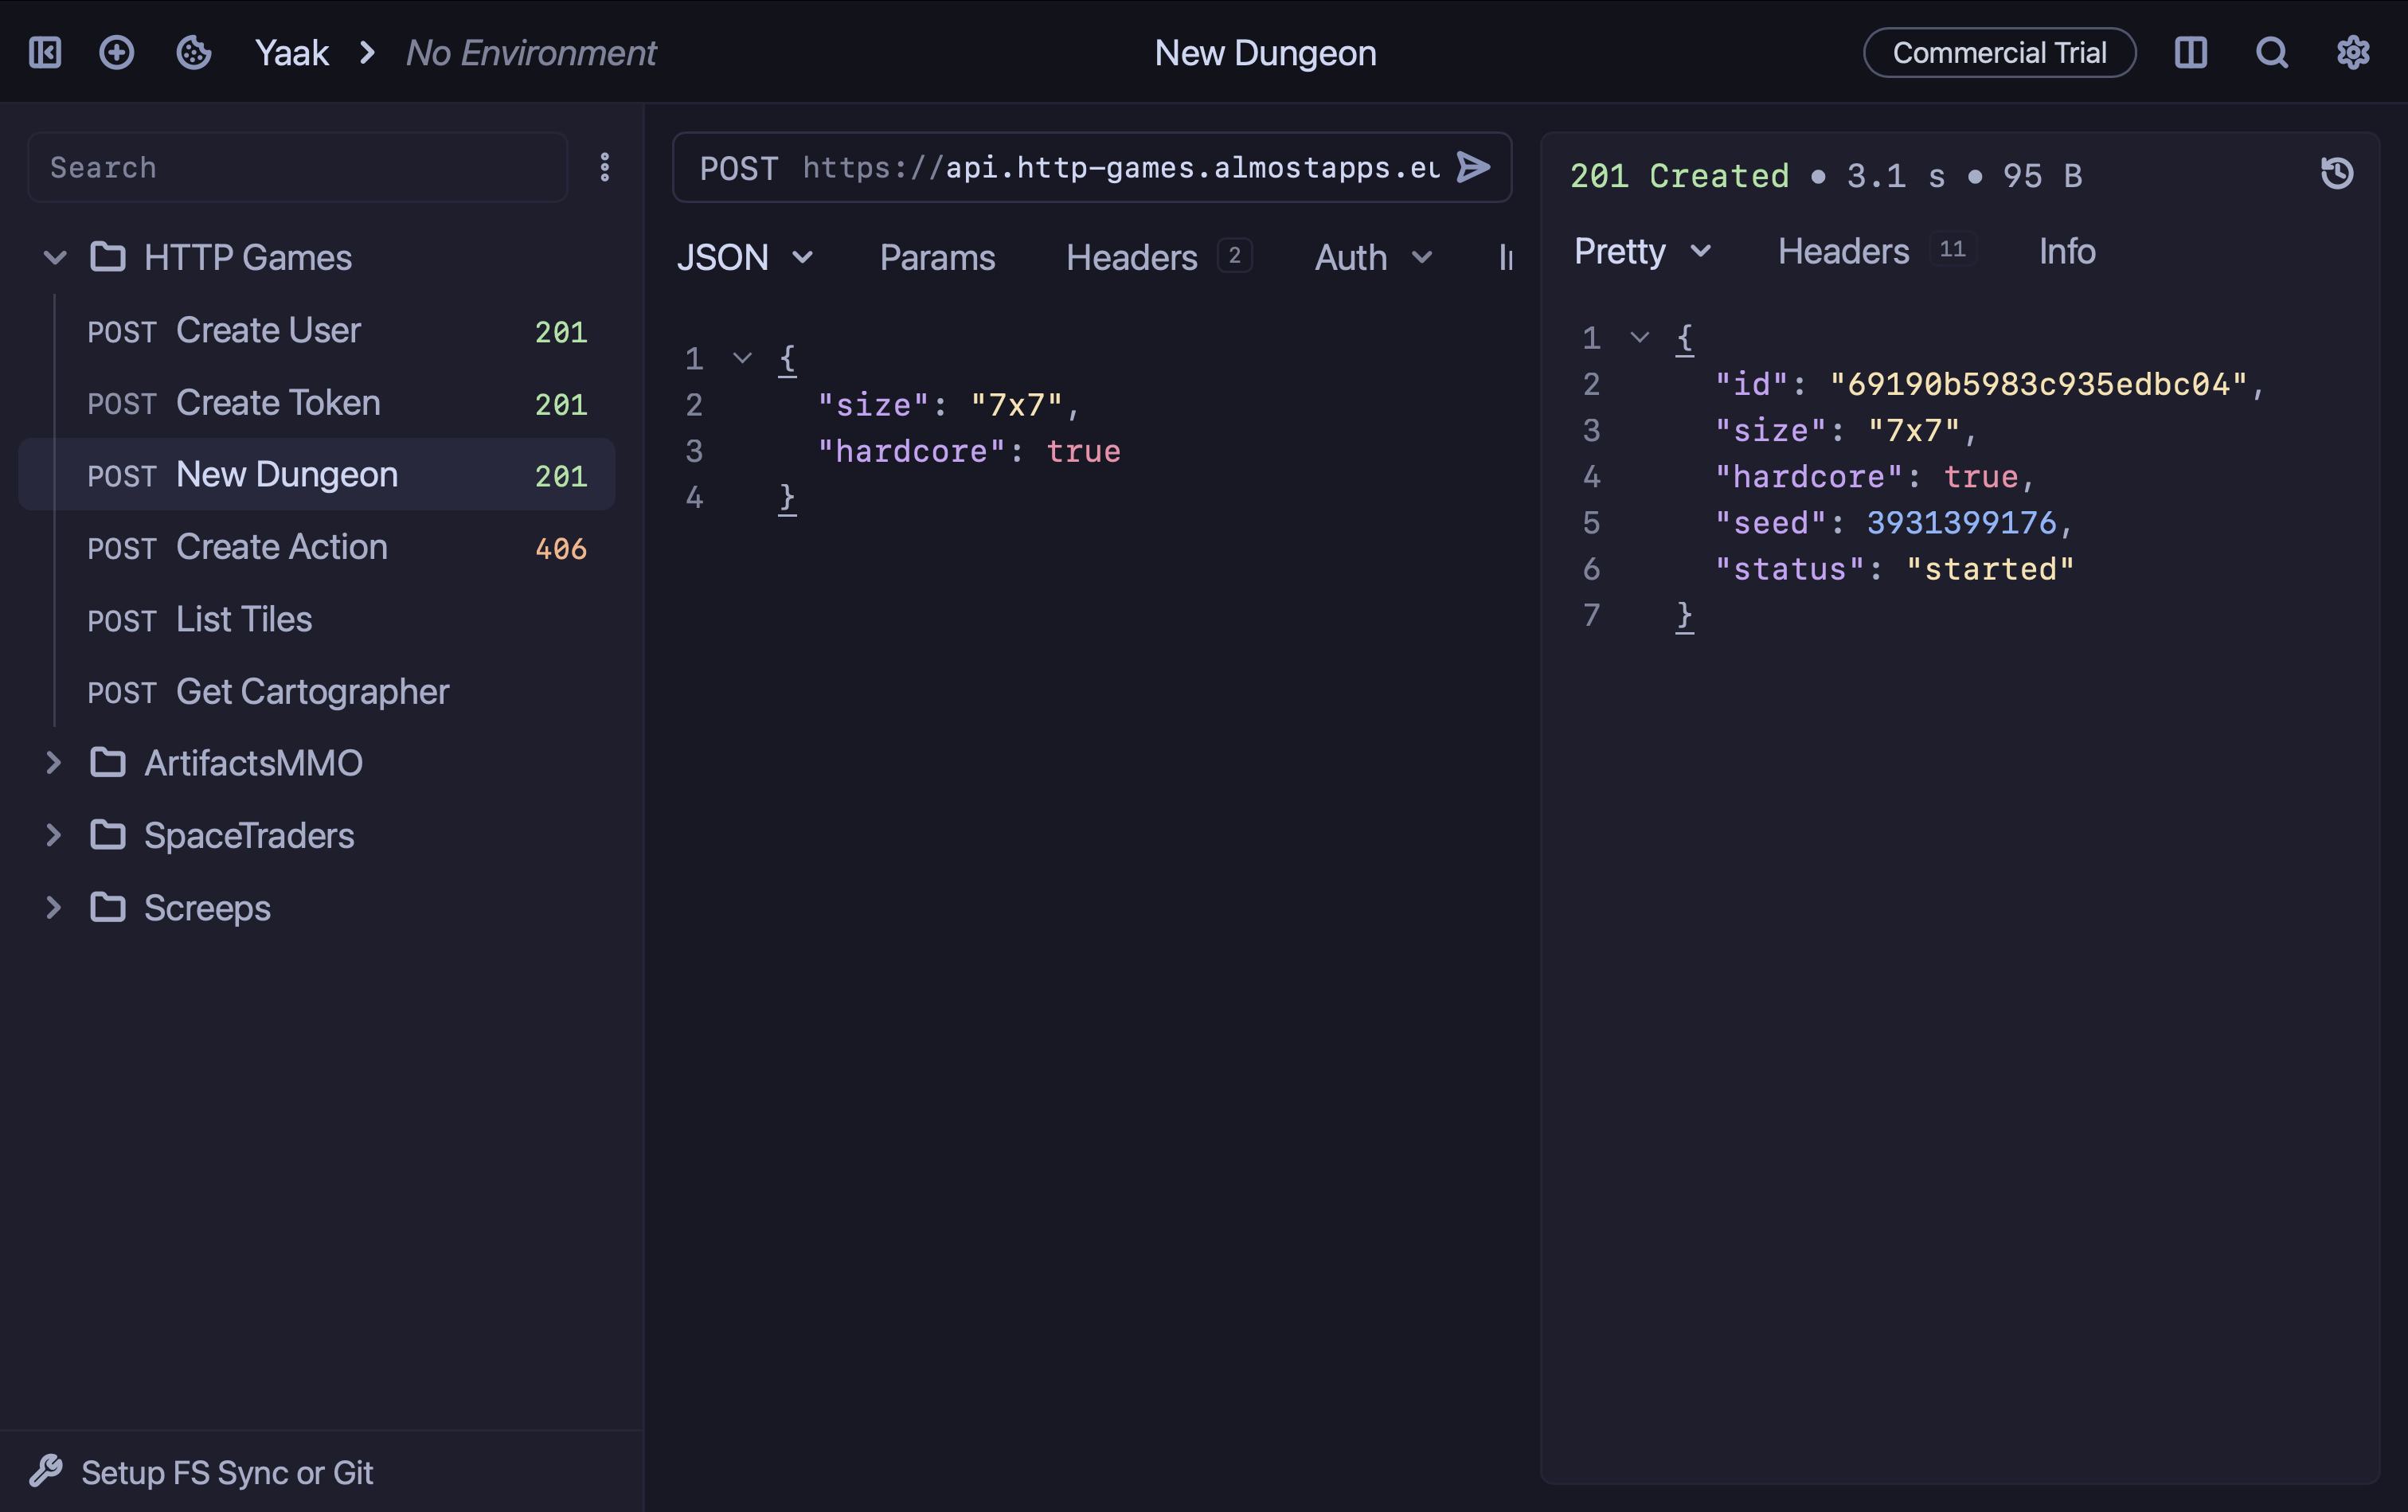
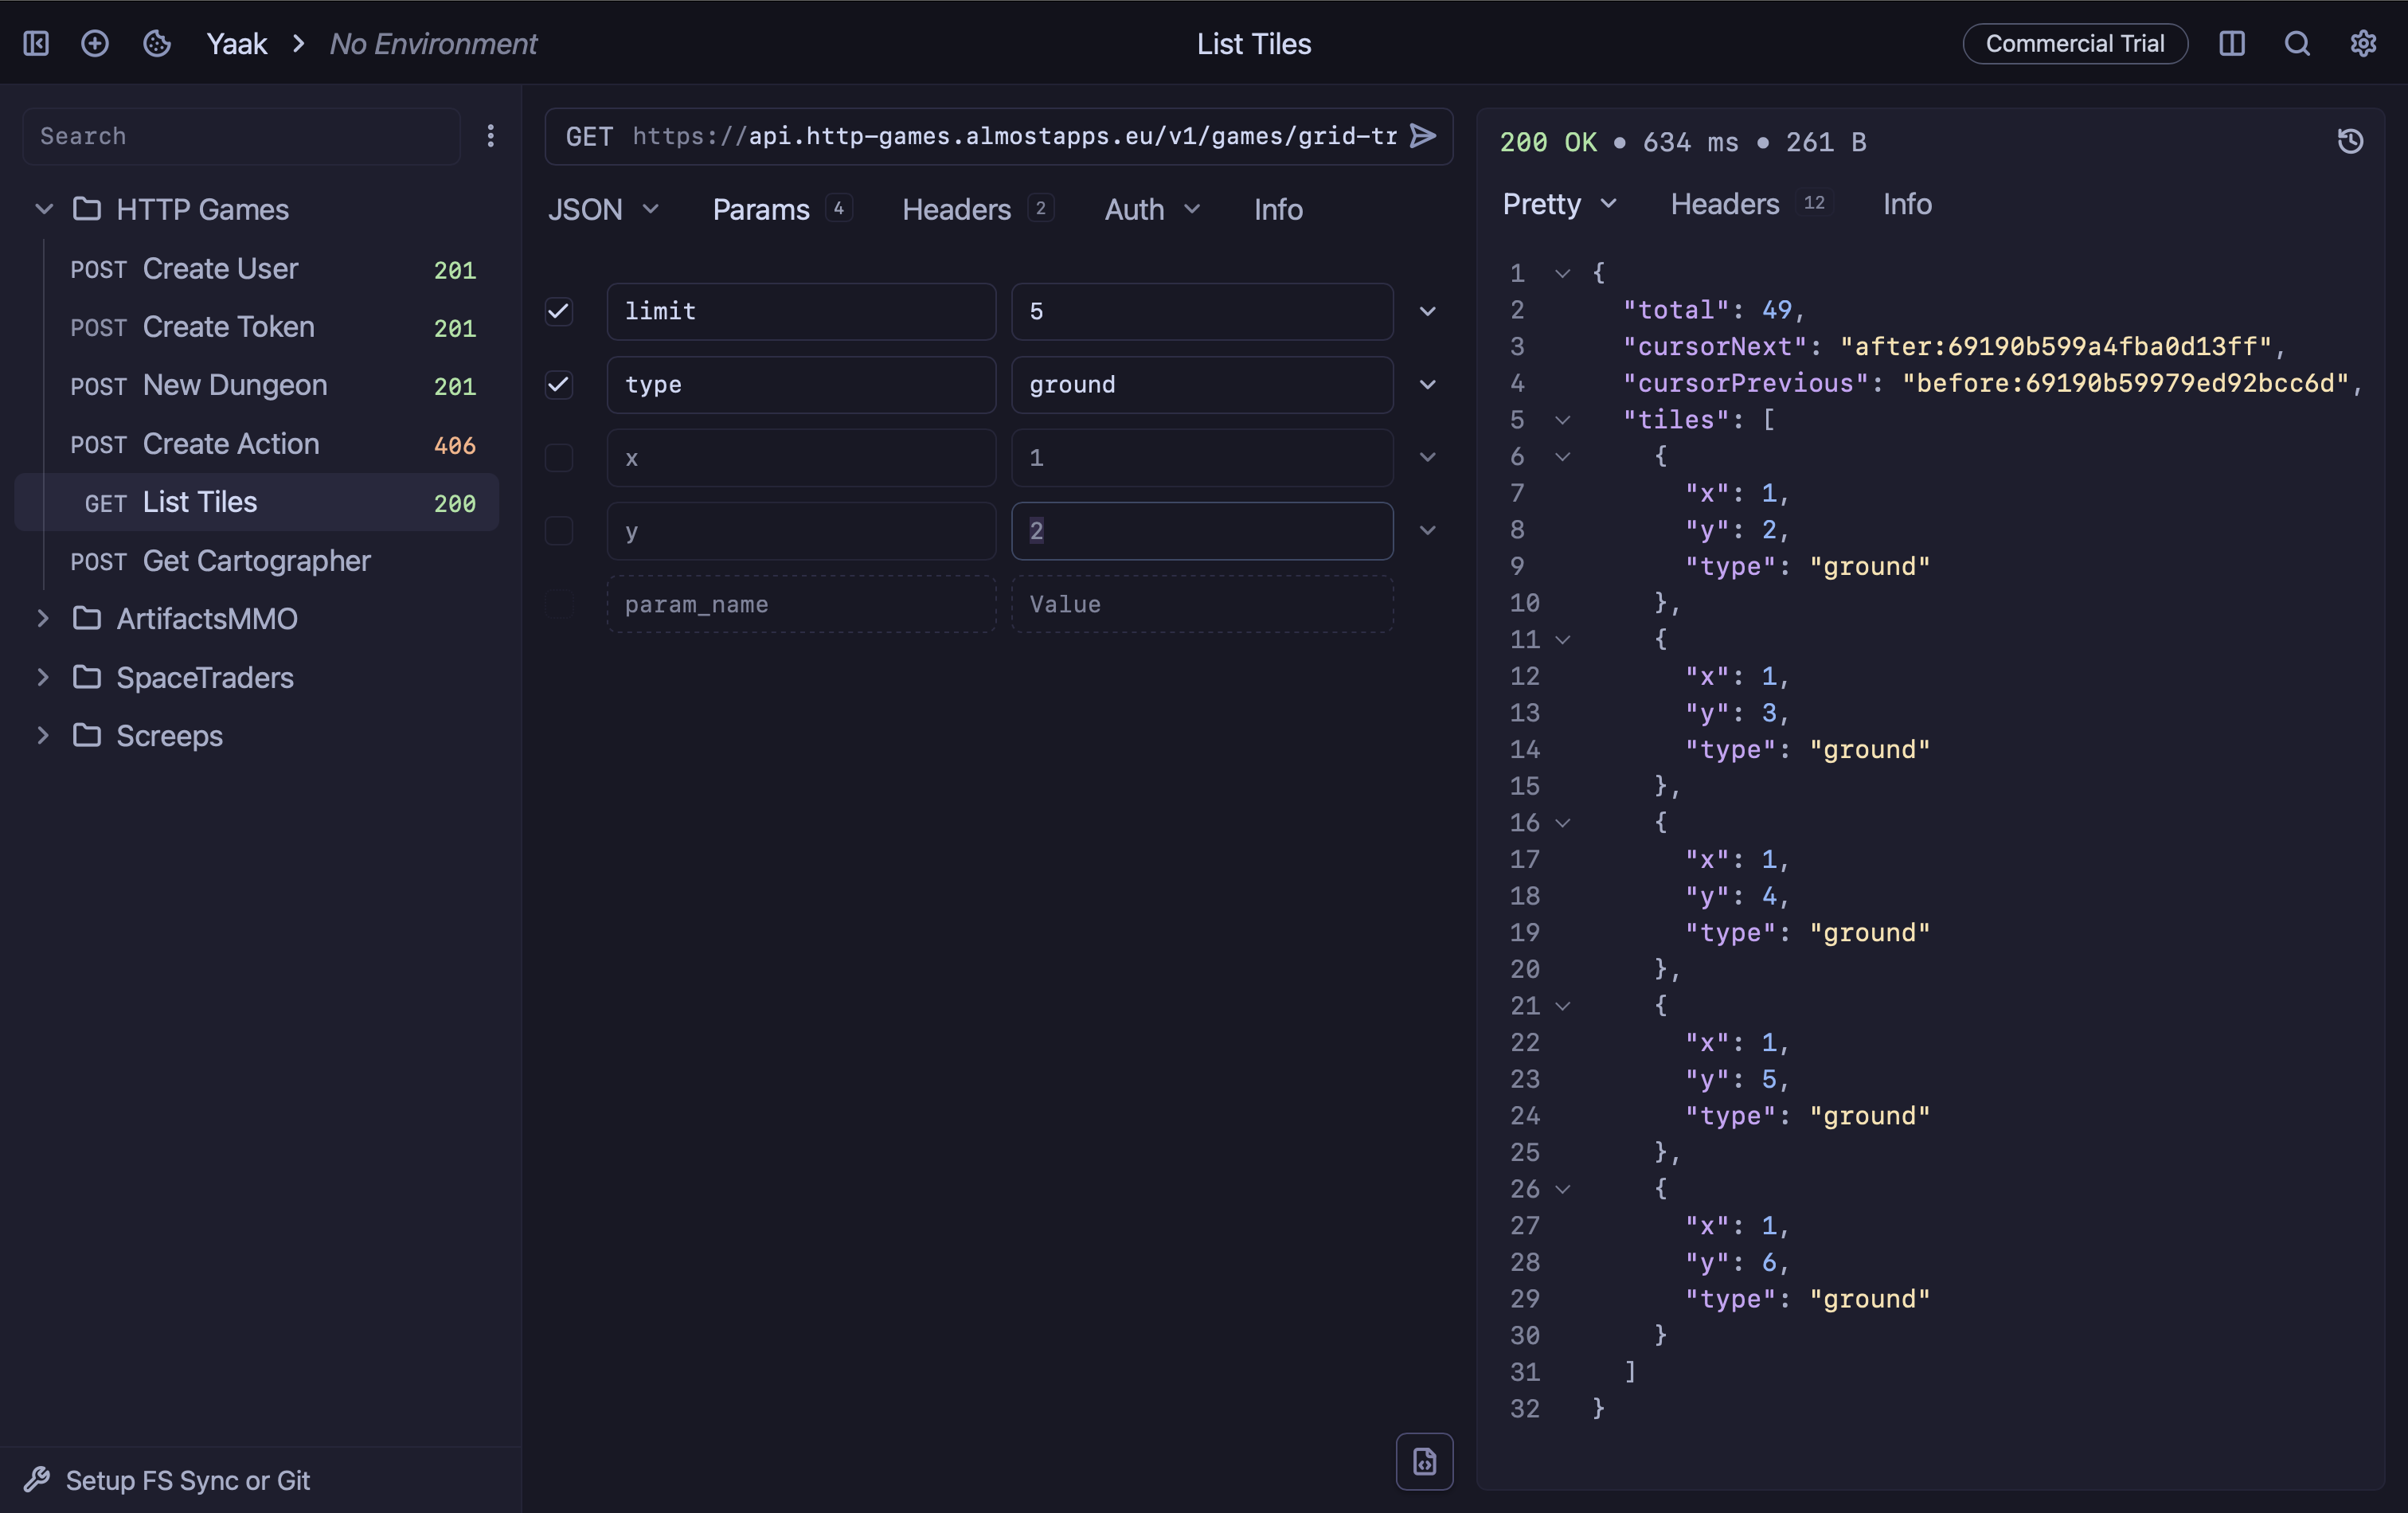
### Project: HTTP Games
Description: Play games by sending REST API requests.
Demo: http-games.almostapps.eu
GitHub: Meldiron/http-games
Published: 2025-11-15
## Vision
Over the last couple of years, I have been interested in game development on-and-off. So far, the biggest challenge I faced was creating the sprites, animation, music, sound effects... I built a few games with [PICO-8](https://www.lexaloffle.com/pico-8.php) due to its limiting nature when it comes to those challenges, but games I built still didn't feel as professional as I would like.
It got me thinking. So, what parts of game making am I good at? Are there any genres that utilize only this aspect? I decided to try and build a programming game - game that you play by programming. Like [Screeps](https://screeps.com/)!

But that still has visuals... So, `Screeps alternative` without visuals?
After some searching I found even better inspiration, [Artifacts MMO](https://www.artifactsmmo.com/). Similarly to Screeps, it's played by programming a script, but this time it utilizes HTTP REST API directly.
Yet, I still wasn't 100% sure... Visualizing seems to be important for playing it, it got a huge wiki and many MMO RPG aspects that would take months to get right. So, `Artifacts MMO alternative`?
As silly as this approach sounds, finding an alternative and looking for its alternatives always led me to discover new ones. Until my sight landed on [SpaceTraders](https://spacetraders.io/)!
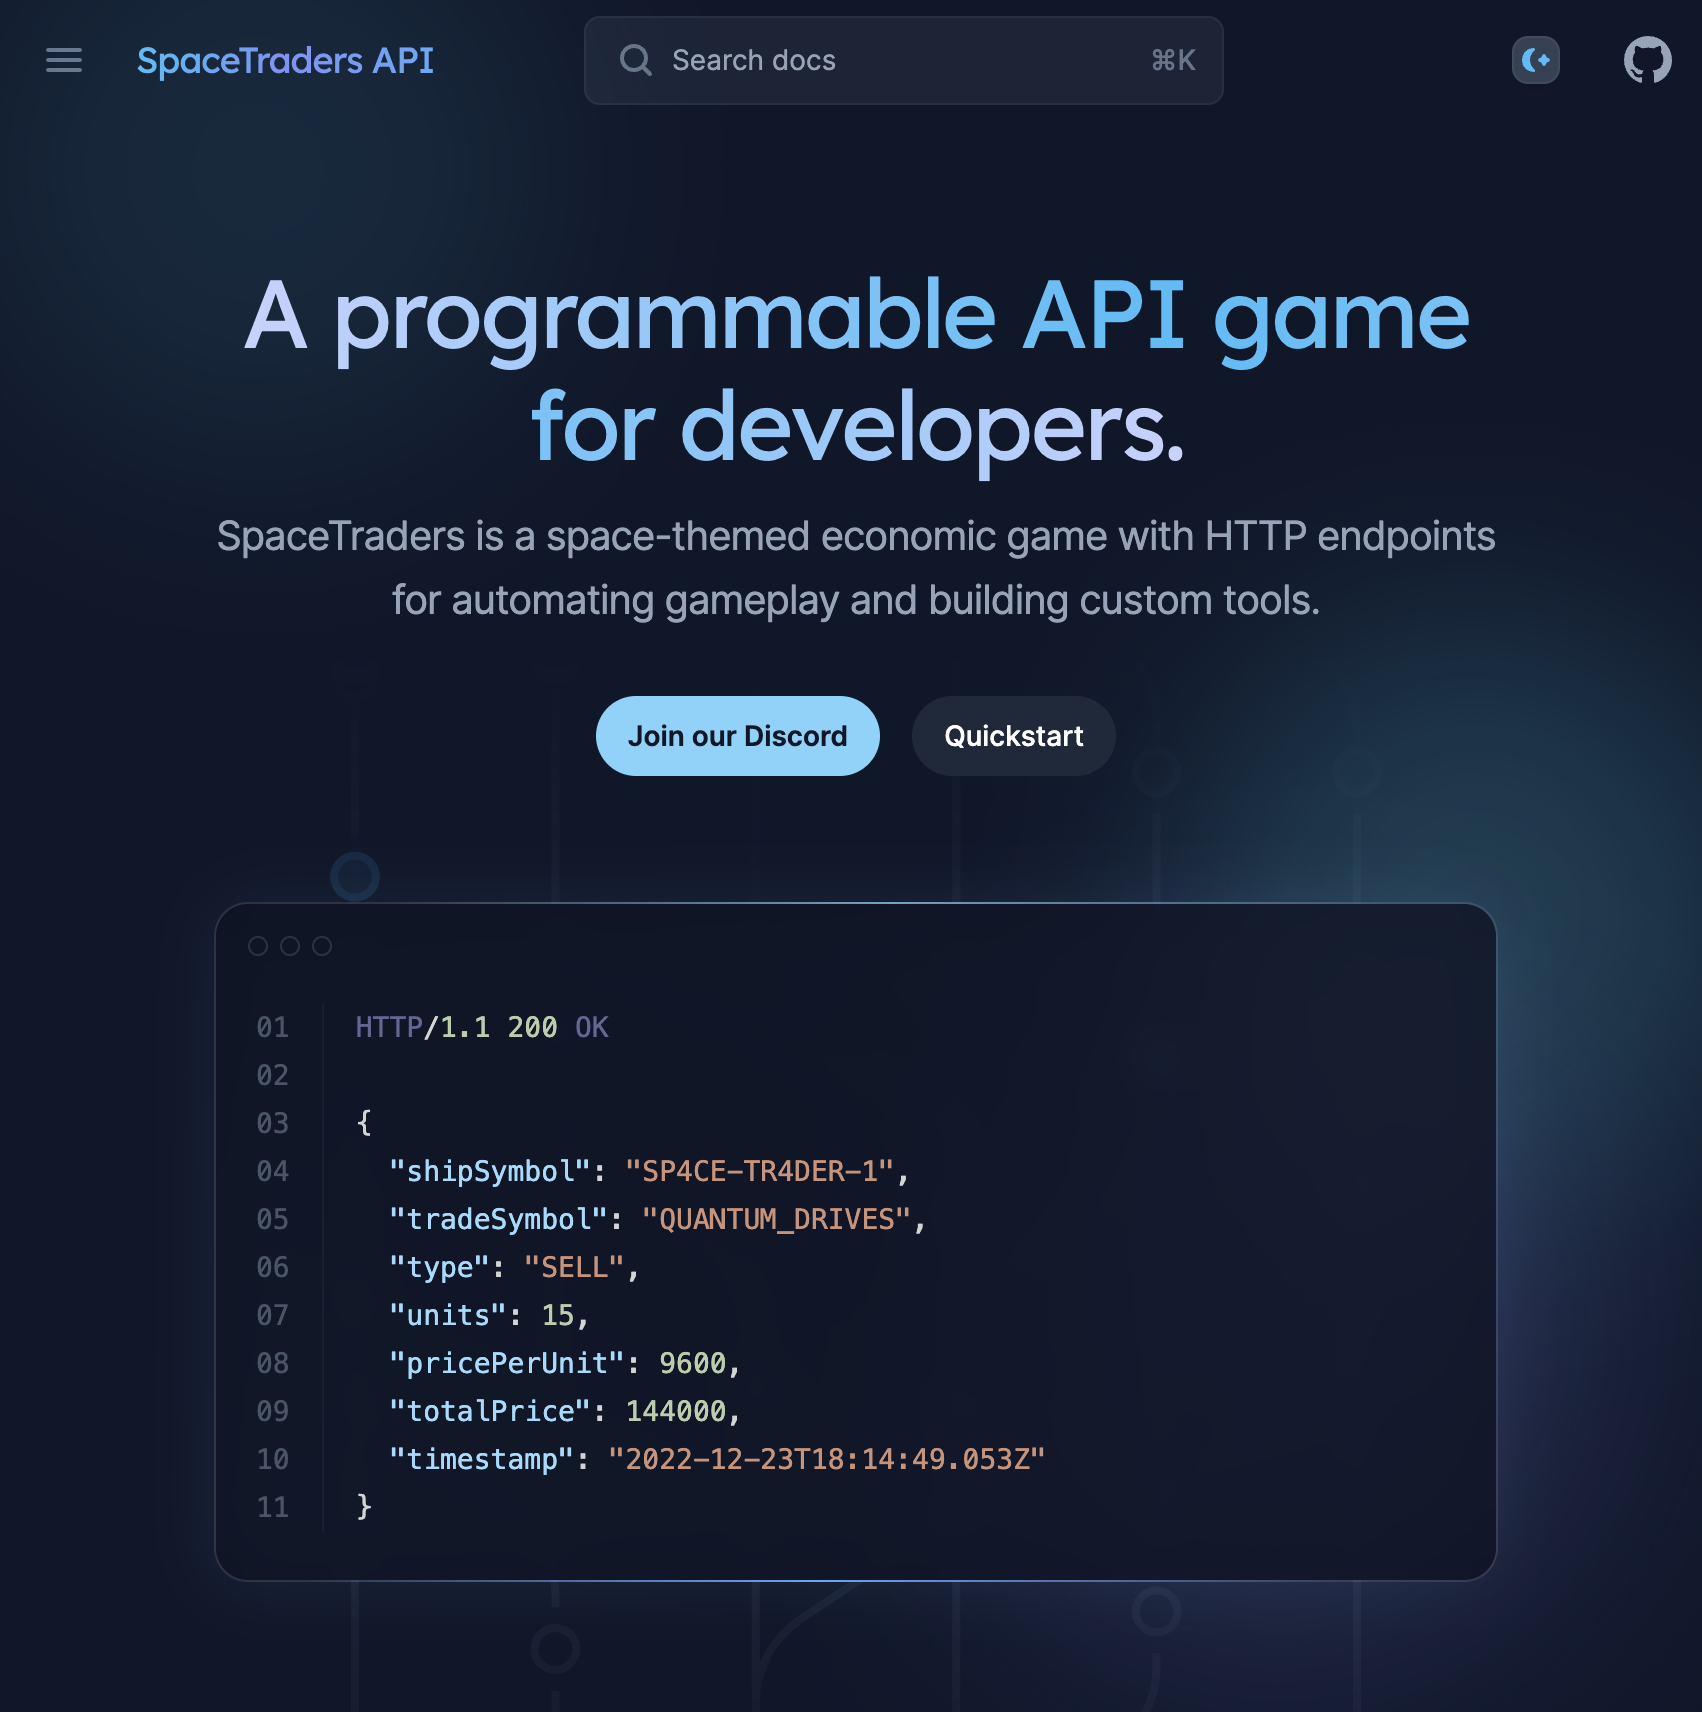
A game for programmers played entirely through HTTP requests. No visuals, no animations, no sounds. And so I found the genre I want to build, because it only utilized the skill I was most trained in, REST HTTP servers.
---
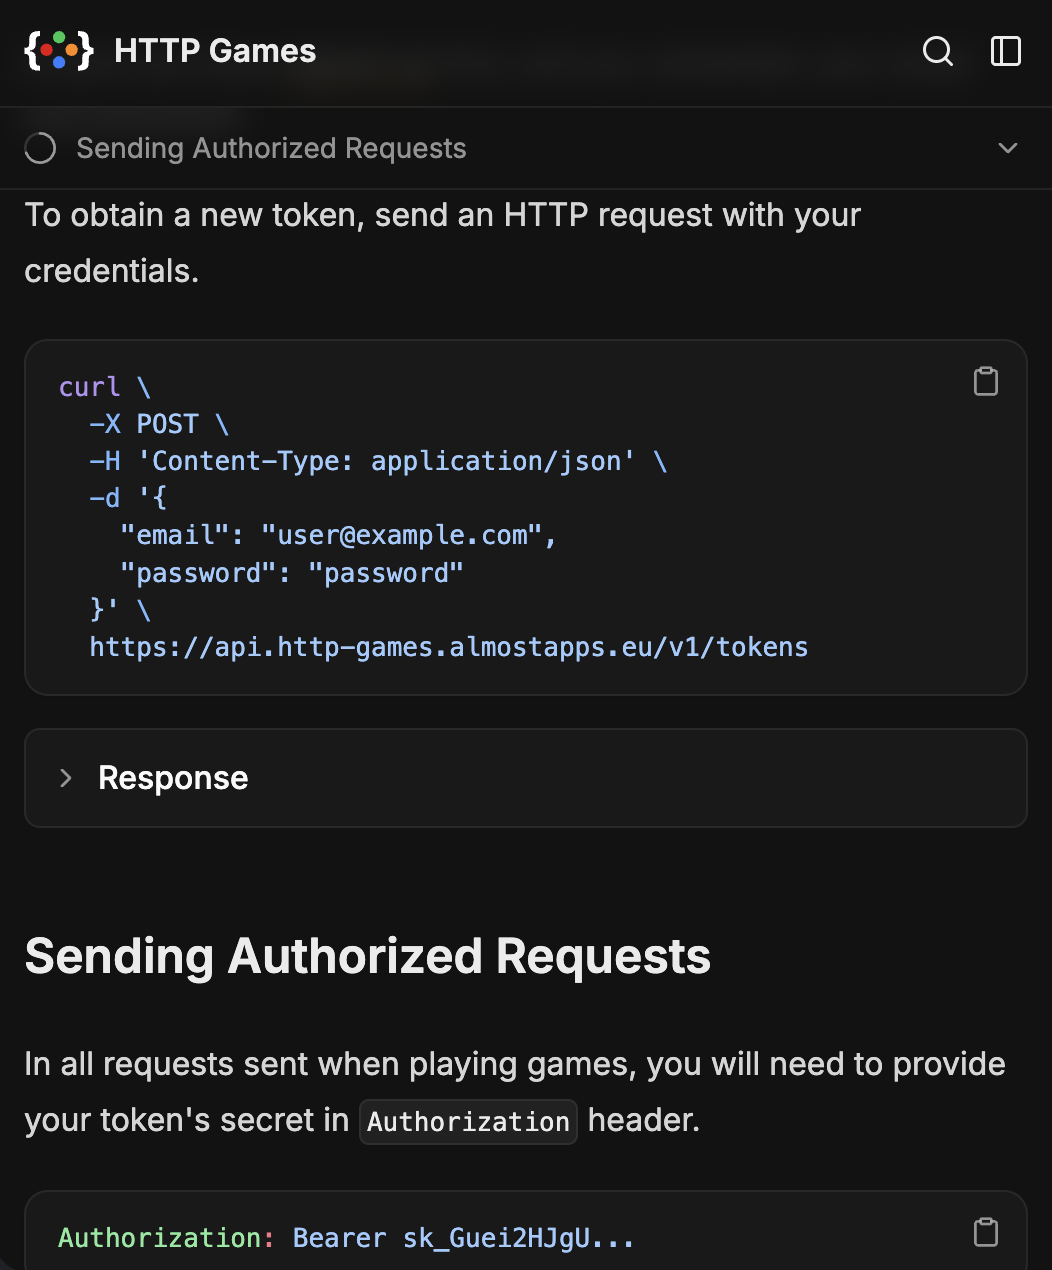
After trying SpaceTraders for some time, I quickly understood the most important part of such HTTP game* is documentation.
> * `HTTP Game`. At this point, I already knew what the project will be called.
I searched for go-to framework for building documentations, and there seems to be quite a few options. Most commonly mentioned were [Vuepress](https://vuepress.vuejs.org/) and its Vite alternative [VitePress](https://vitepress.vuejs.org/). From those two, I personally preferred Vitepress due to its more modern-looking design, and being framework agnostic.
There was also [Docusaurus](https://docusaurus.io/), [MkDocs](https://www.mkdocs.org/), [Docsify](https://docsify.js.org/), and many more, but they all lacked modern UI and UX I was hoping for.
By pure chance and luck, I came across [Fumadocs](https://fumadocs.dev/) which had exactly what I needed:
- Modern-looking UI similar to [shadcn/ui](https://ui.shadcn.com/)
- Mobile responsiveness with neat components
- Both light and dark mode
- Searching functionality
- `llms.txt` file generation
It was built with [Next.js](https://nextjs.org/) and [React](https://reactjs.org/), so technologies familiar to me, and similar to other docs frameworks, all content was written with Markdown. Specifically, [MDX](https://mdxjs.com/), a combination of Markdown for content and JSX for components.
## Technologies
- [Appwrite](https://appwrite.io/)
- Databases (TablesDB) for storing relational data and key-value cache
- Sites for deploying the webapp to the internet
- Functions for deploying the HTTP REST API
- [PHP](https://www.php.net/) with [Pint](https://laravel.com/docs/12.x/pint), [PHPStan](https://phpstan.org/) and [FrankenPHP](https://github.com/frankenphp/frankenphp)
- [Utopia.php](https://github.com/utopia-php) to build the HTTP server
- [Fumadocs](https://fumadocs.dev/) for modern-looking documentation
- [Hurl](https://hurl.dev/) for E2E tests of REST API
- AI. Bunch of AI. Like.. 80% AI
Most of my AI chatting and vibe-coding was made with [Zed AI](https://zed.ai/) and [Raycast AI](https://raycast.com/).
## Screens
Well, no visual, right? So not much to show...
Documentation page got a typical setup with left side to navigate pages, middle side for content, and right side for sections on current page. One neat feature Fumadocs offered was sidebar dropdown, allowing me to have separate docs sidebars for each game.
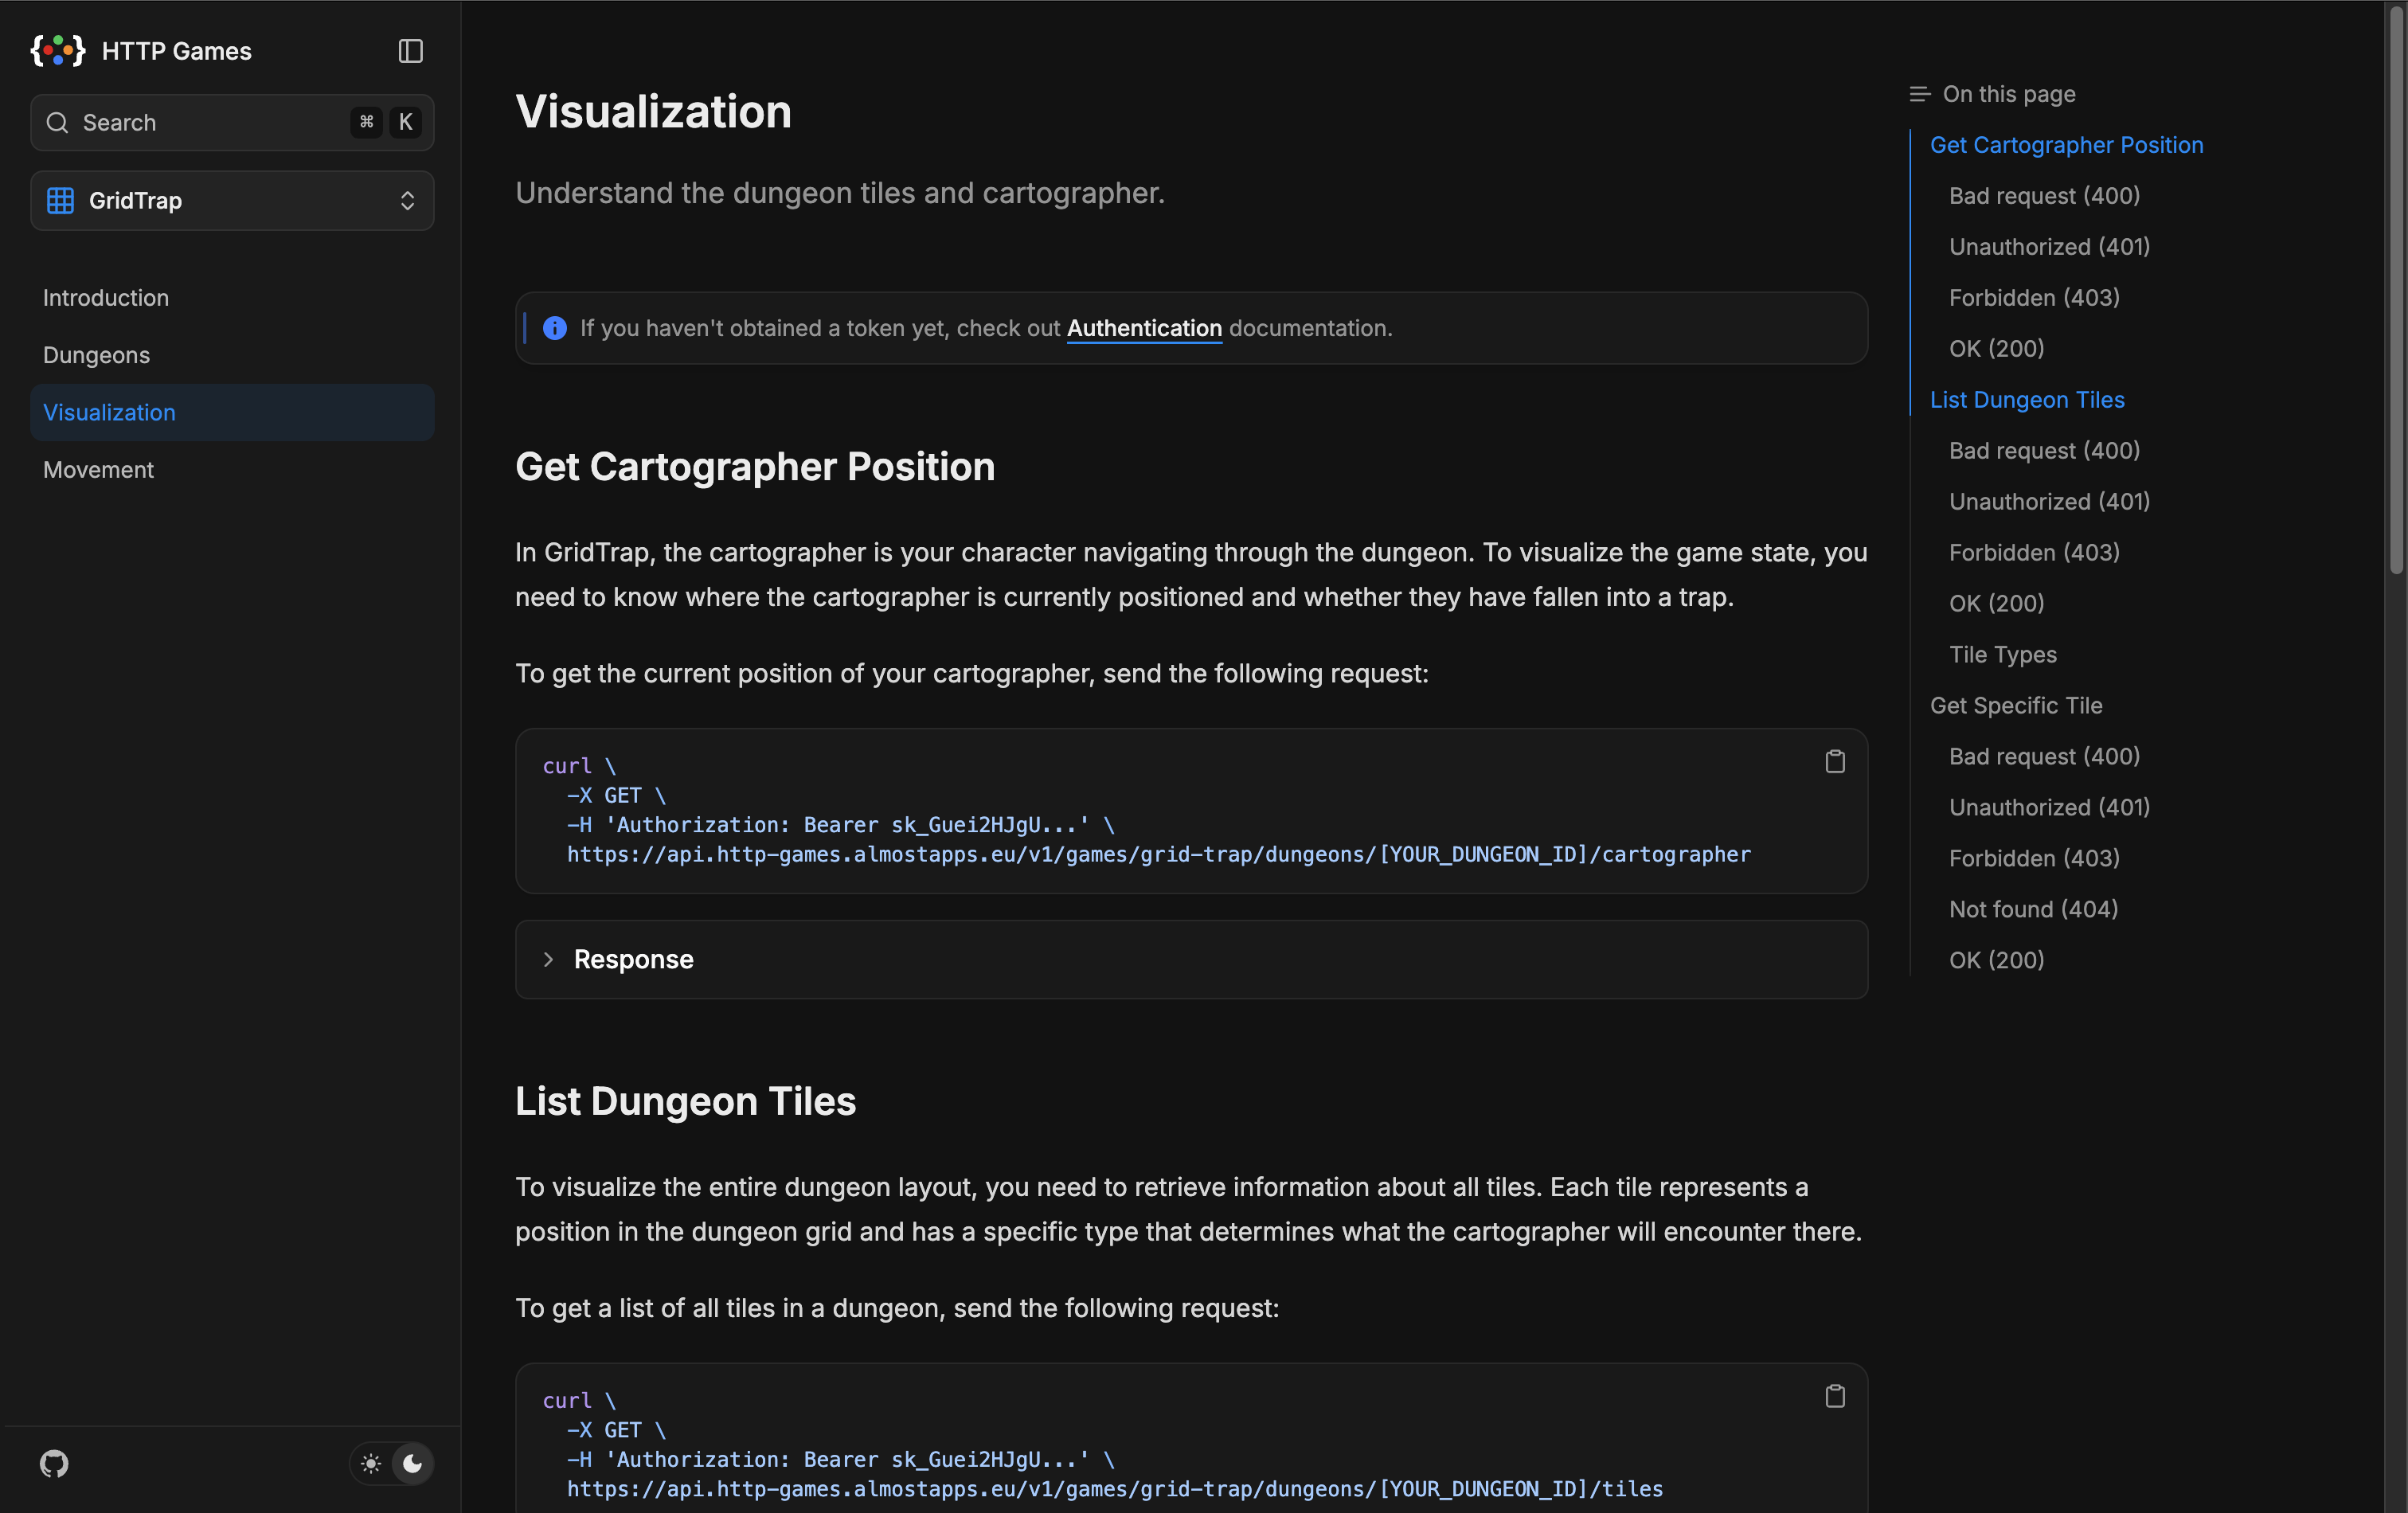
The docs are also nicely responsive on mobile device. I really liked detail of having circular progressbar as I am scrolling through sections of the documentation.
And as far as searching goes, indexes were created during the build, and so even without SSR, searching worked flawlessly. I also never required any Cloud services, which amazes me. Until now, I was always scared of searching capabilities and relied on [Elastic Search](https://www.elastic.co/search) or [Algolia](https://www.algolia.com/).
Since there isn't any UI to showcase, I highly recommend checking it out yourself! I tried the game myself using [Yaak](https://yaak.app/) HTTP client, and later automated it with [Bun](https://bun.sh/) script.
## Future plans
While developing the app, I left `TODOs` throughout the codebase. I wanted the prototype and first game to be finished very quickly, so I could give it to a few friends for feedback. And so I cut corners here and there, such as unoptimal looping, missing E2E tests, or ugly patches for loading environment variables. I wouldn't consider it a priority to resolve those, but I am very glad I noted them so I can get back to them easily.
One game is not enough! I will brainstorm more ideas of games that can be added, and motivate community to contribute.
Once the community grows enough, the addition of profiles, challenges, leaderboards and achievements is a must.
---
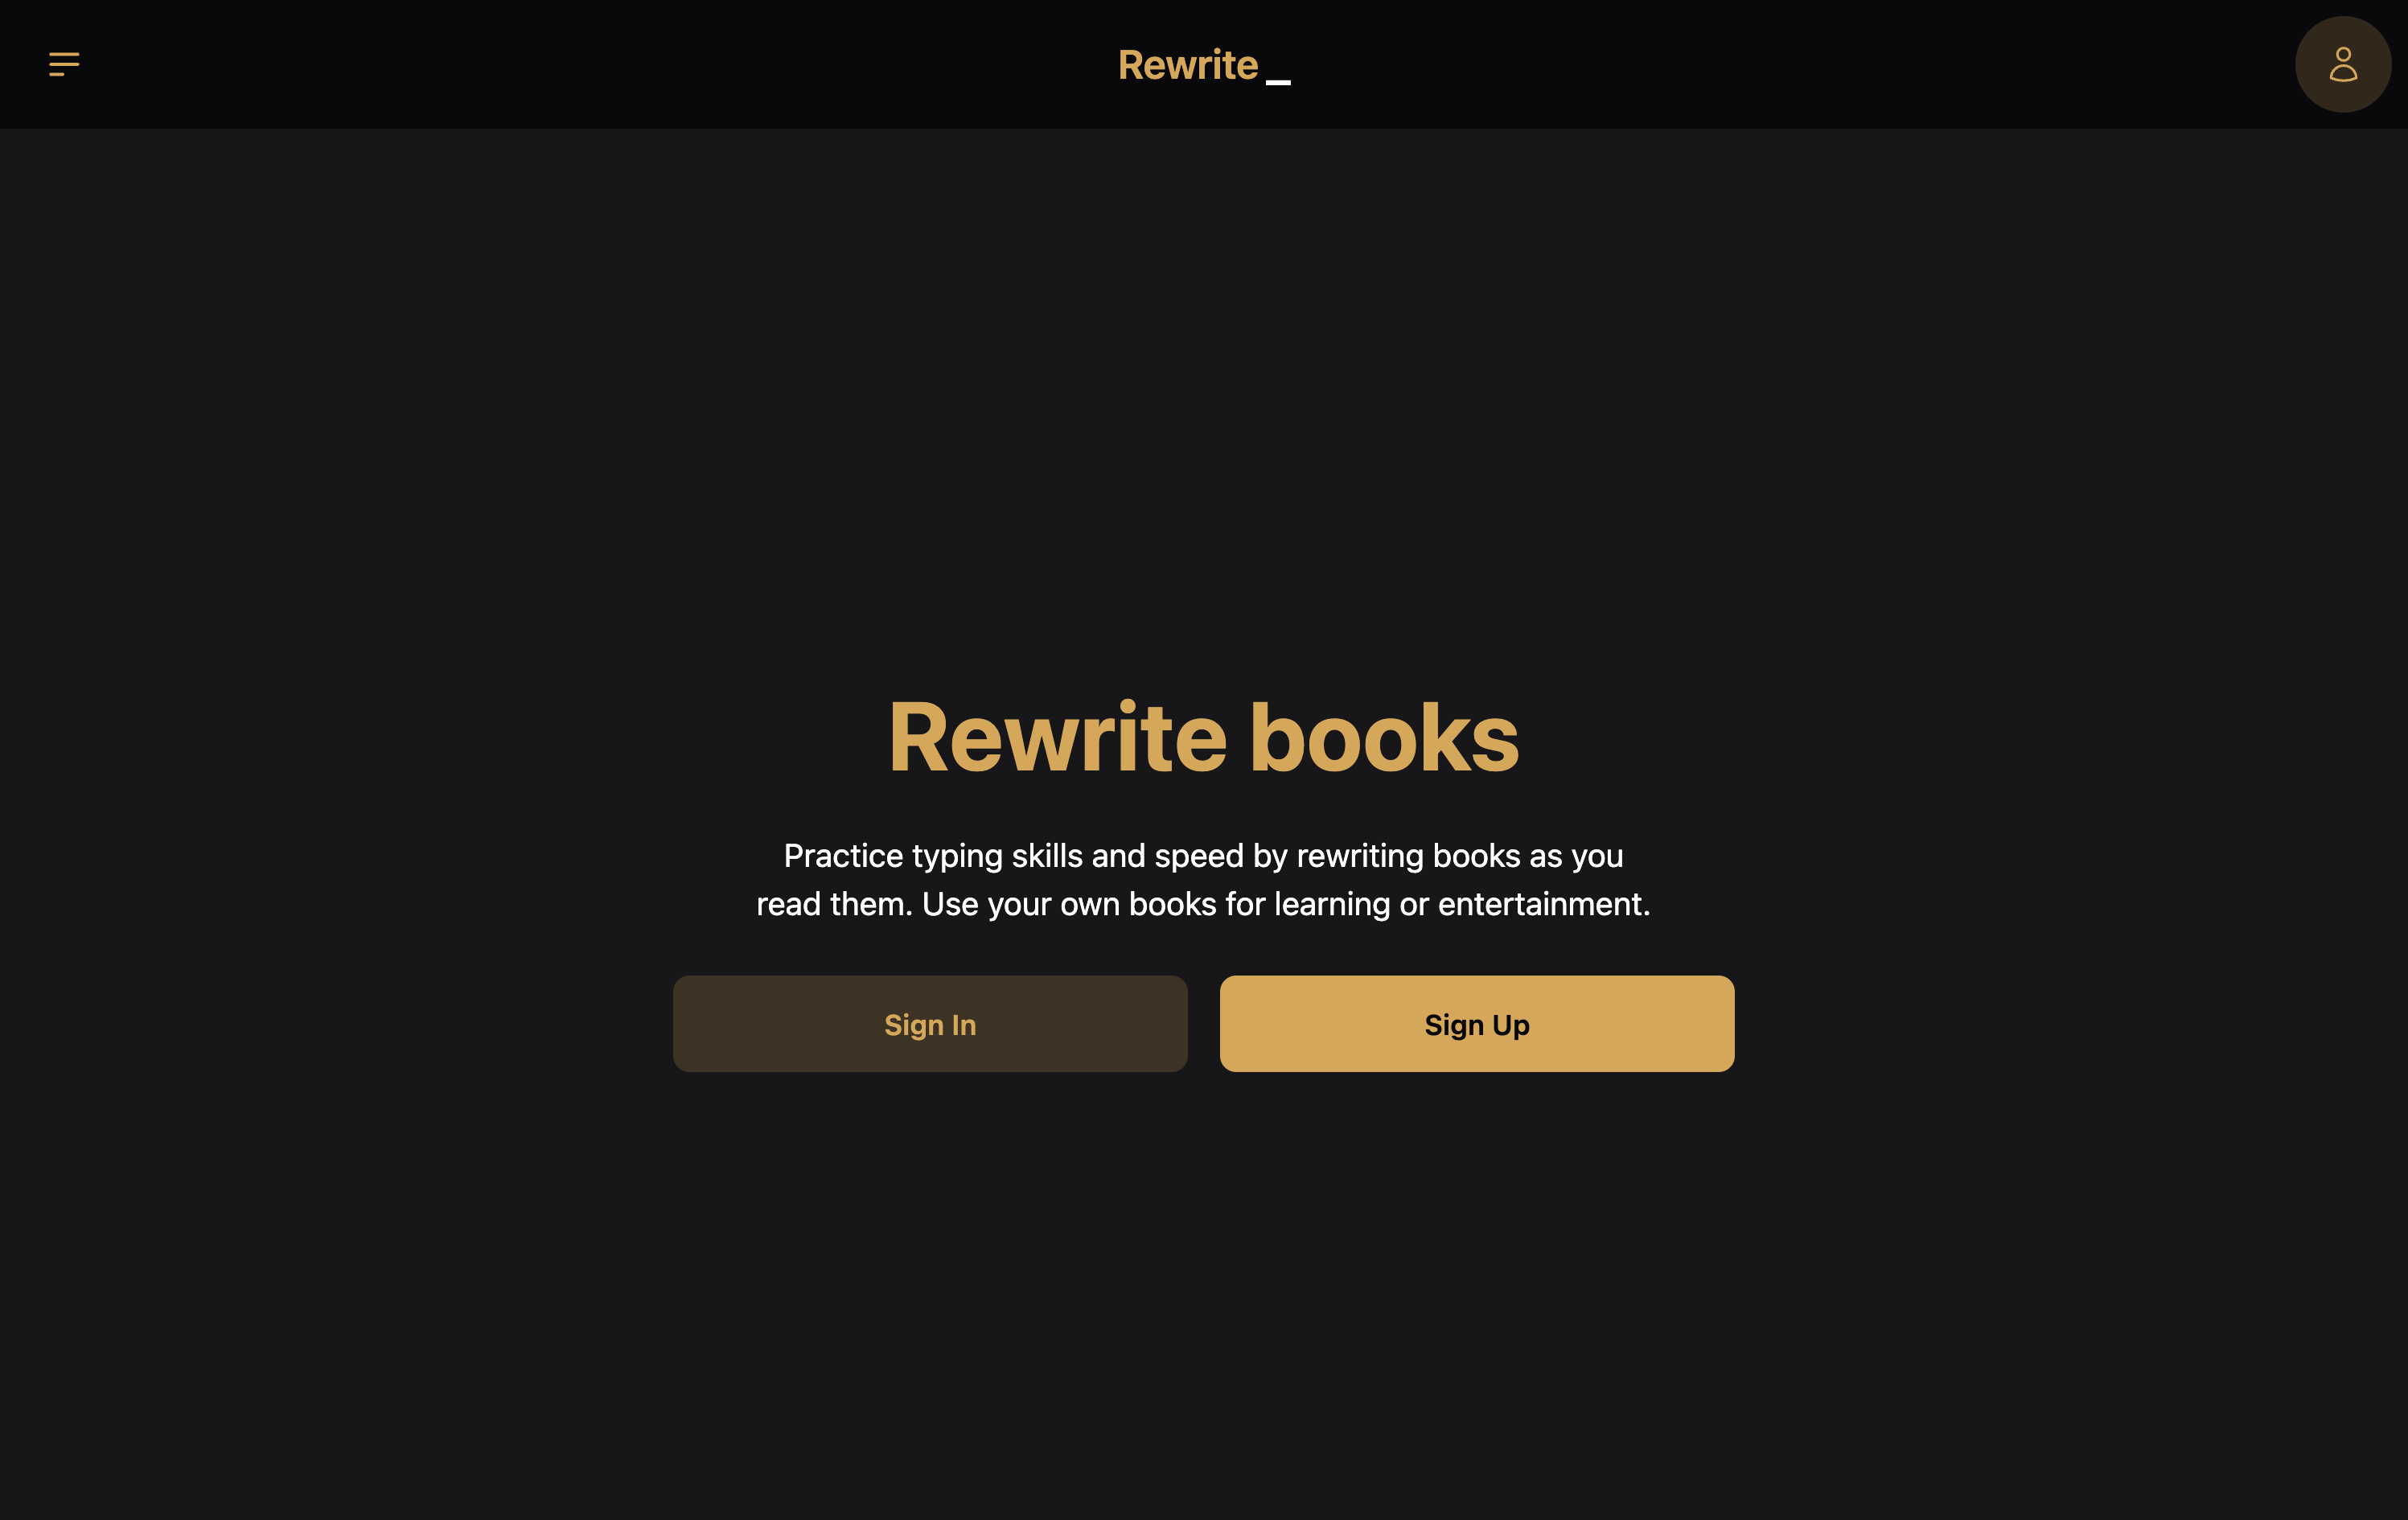
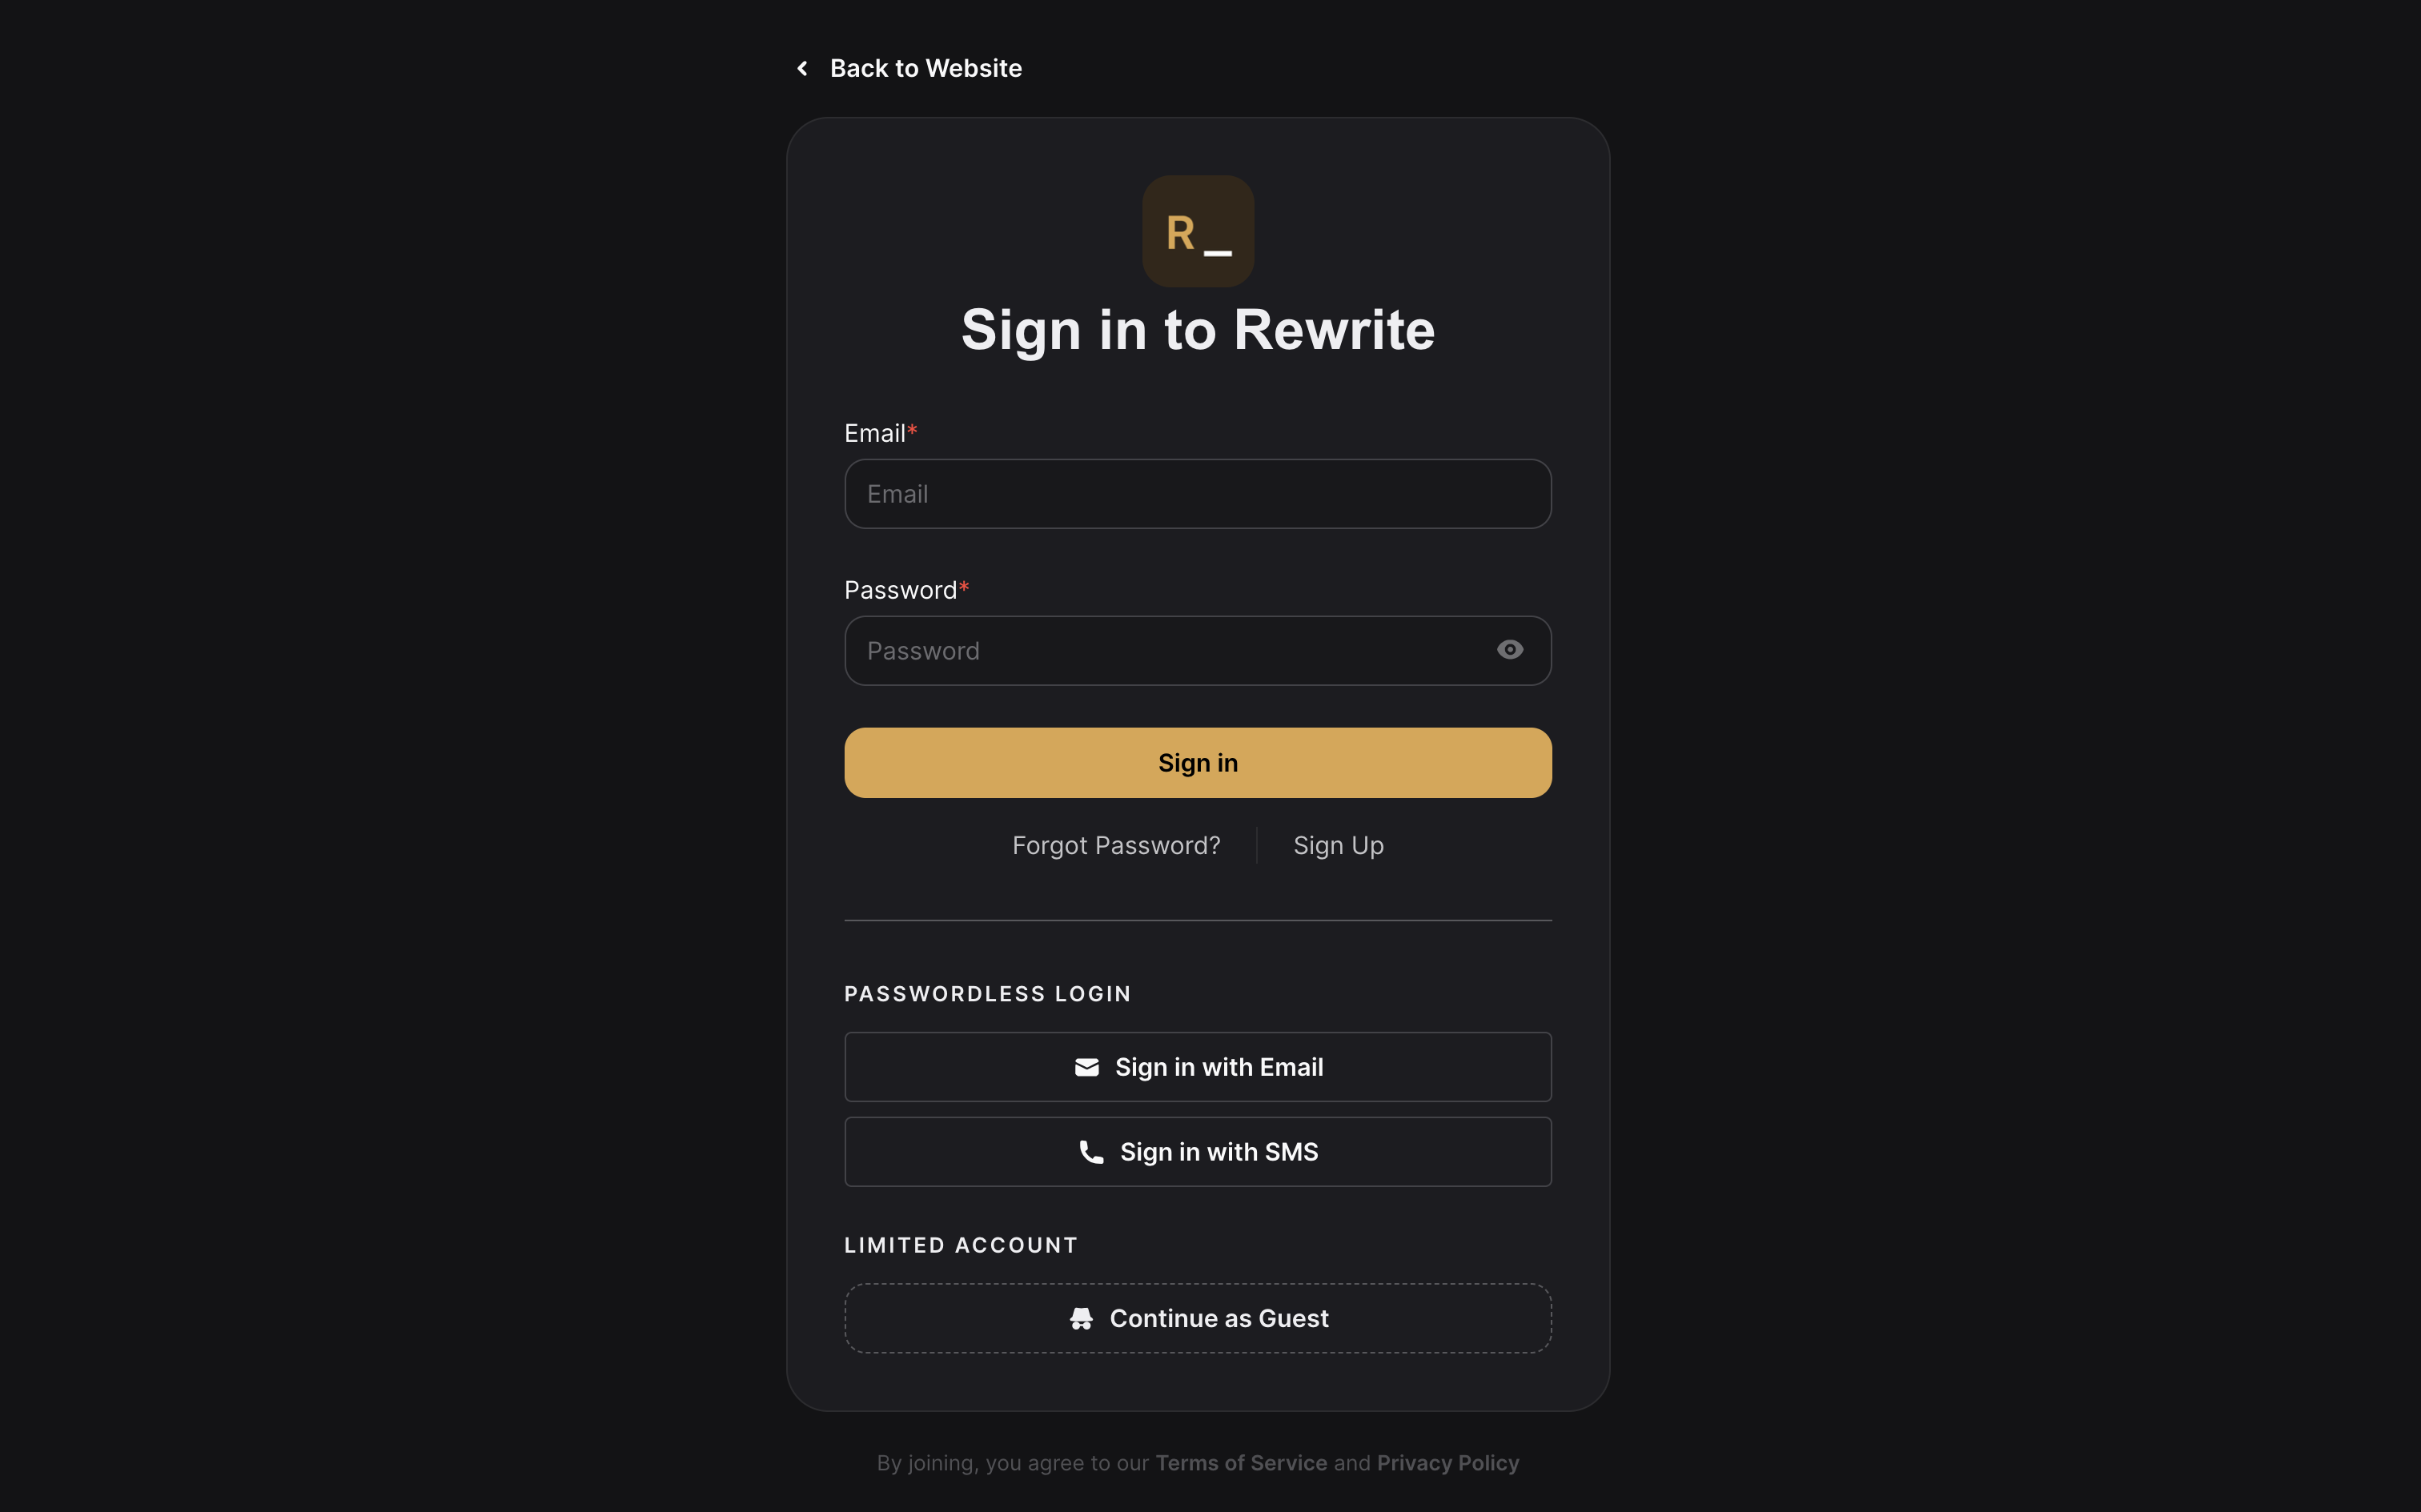
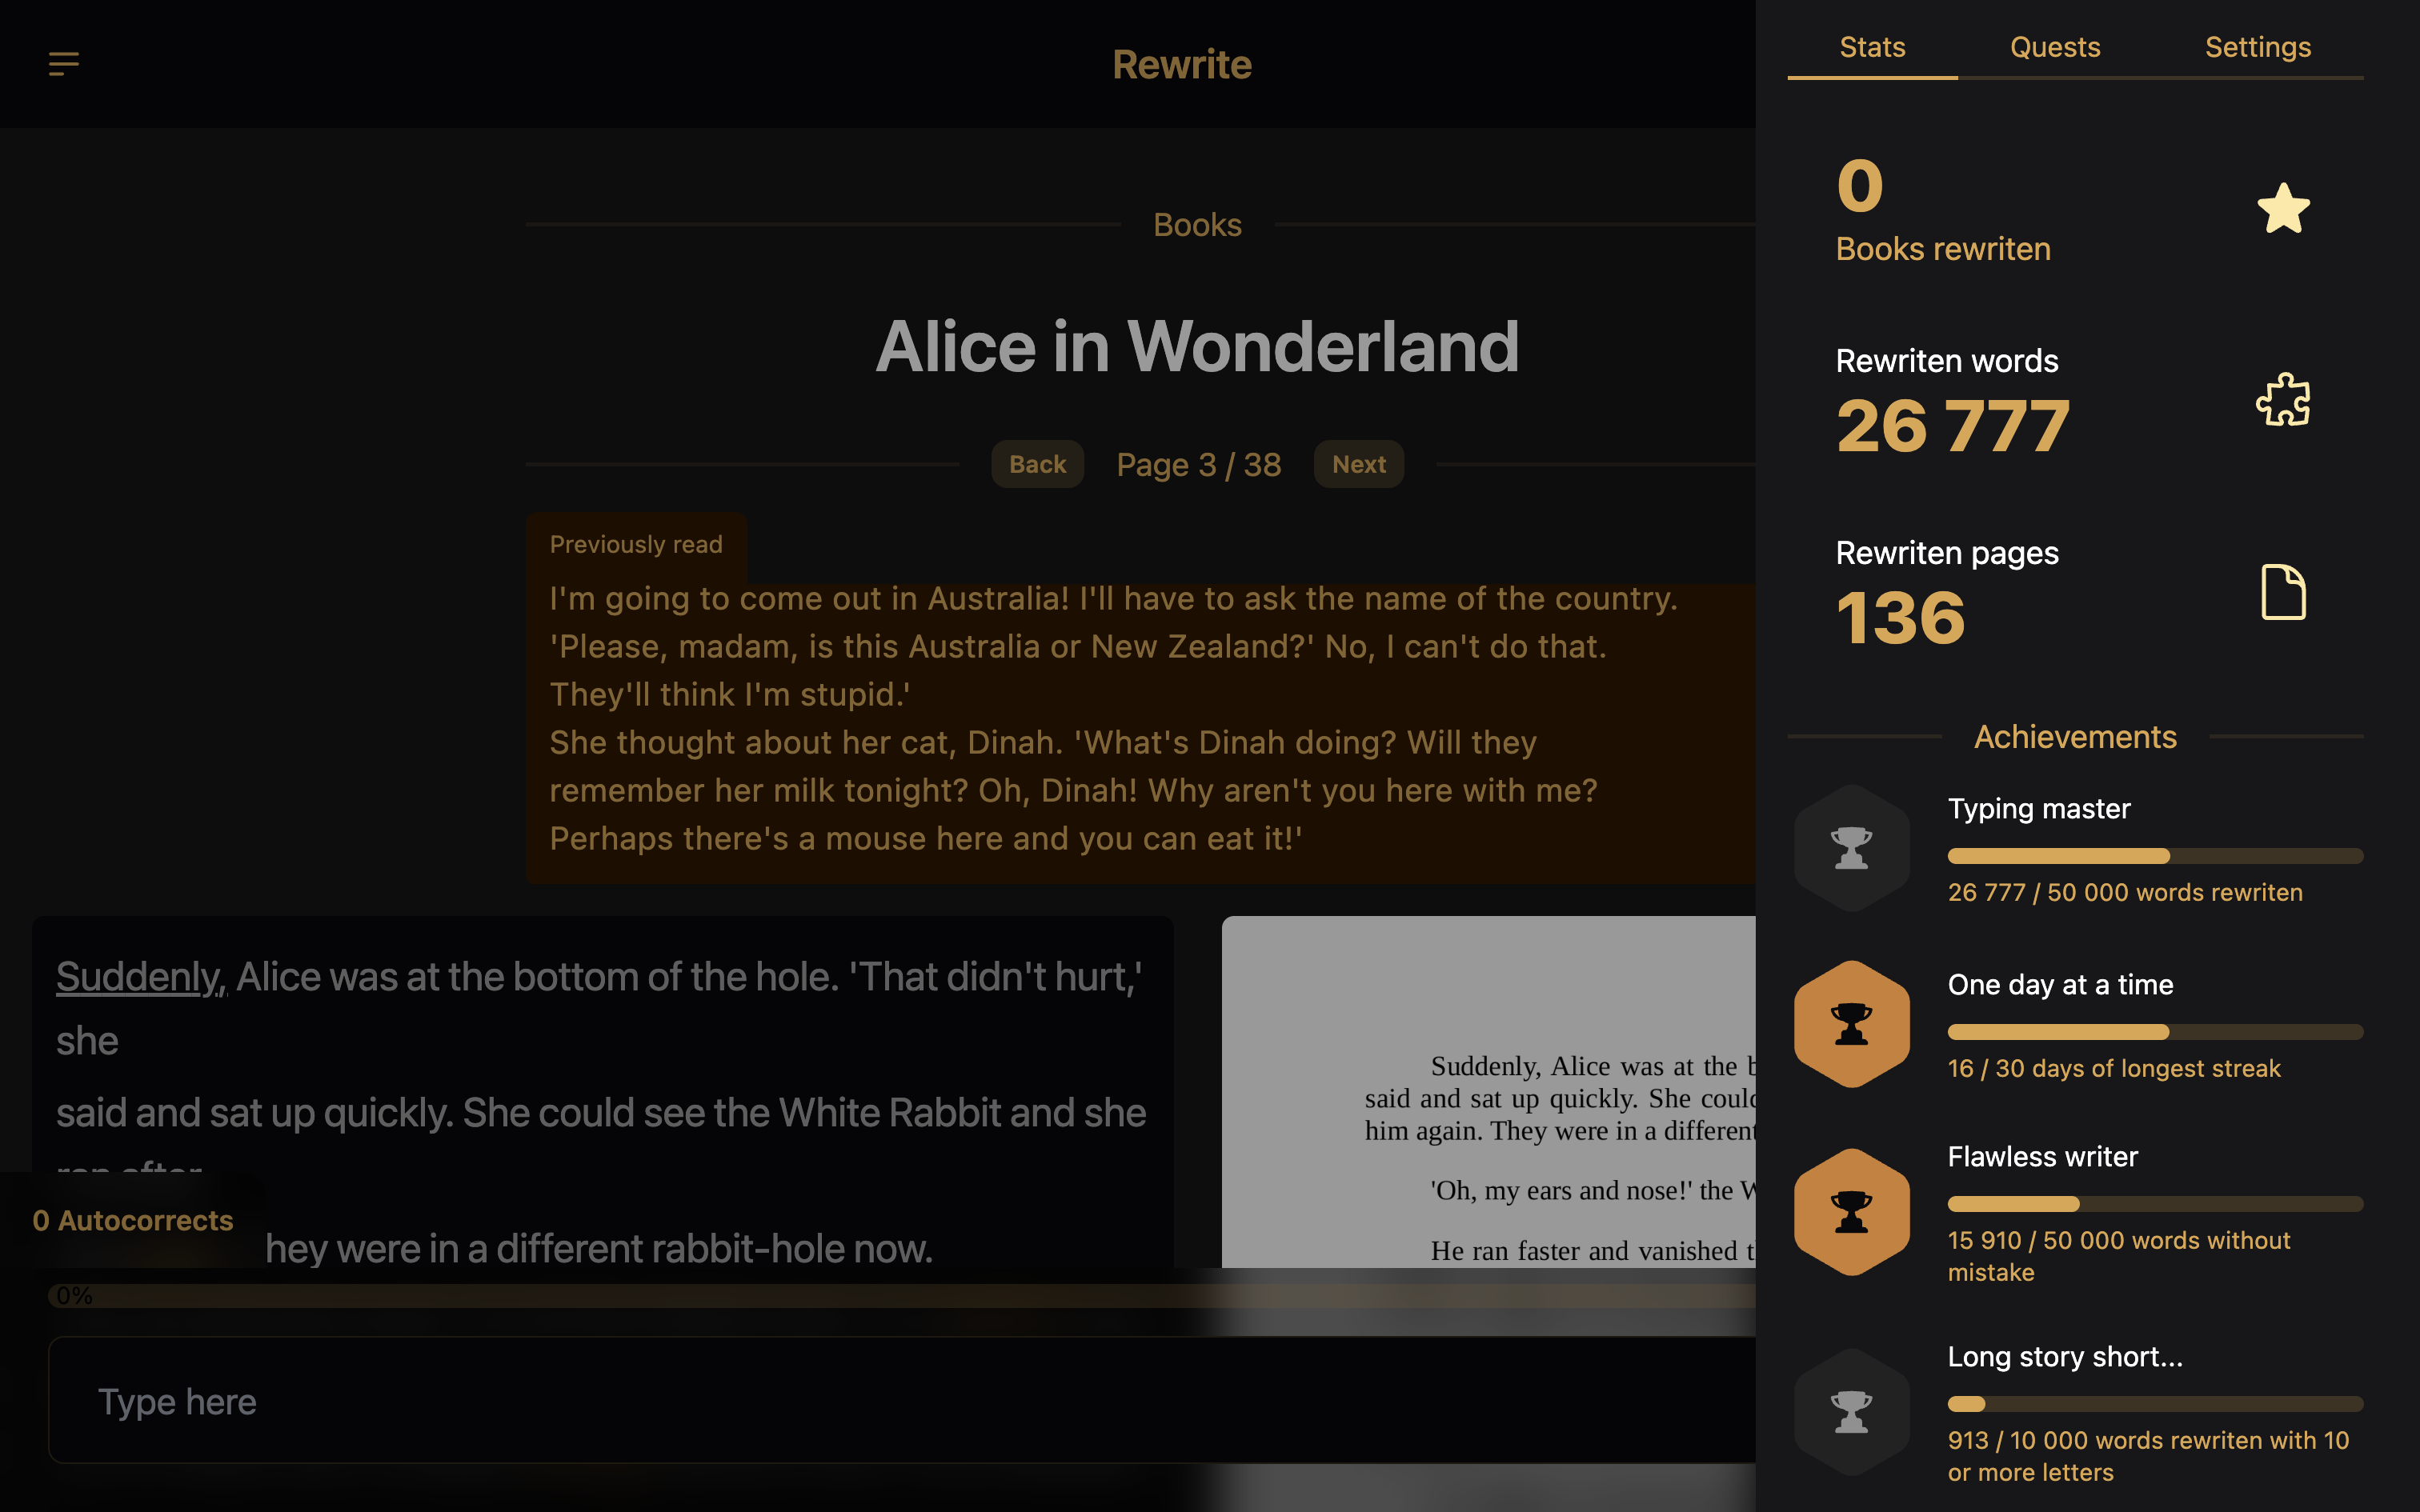
### Project: Rewrite_
Description: Practice typing by rewriting books as you read them.
Demo: rewrite.almostapps.eu
GitHub: meldiron/rewrite
Published: 2024-05-11
## Vision
The website [TypeLit](https://www.typelit.io/), which I used for a couple of weeks, required a paid subscription to add custom books. I upgraded, but soon realized the website was missing many features such as accent configuration, book page screenshots, gamification, and more.
When on a train, after finishing a page, TypeLit couldn't save my progress due to unstable internet connection, and there was no local backup. Instead of rewriting the page again, I decided to build my own application for it - Rewrite.
## Technologies
- Svelte and SvelteKit
- daisyUI with TailwindCSS
- Appwrite Databases
- Appwrite Functions using Node.JS
- Auth UI
- Google Cloud APIs
- EPUB.to APIs
## Screens
A simple homepage invites visitors to sign in before using the platform. To allow quick-play, users are welcome to create anonymous (guest) accounts with 1 click.
Authentication flows powered by [Auth UI](/projects/auth-ui), supporting many different authentication methods such as magic URL, phone OTP, email & password, OAuth, and more.
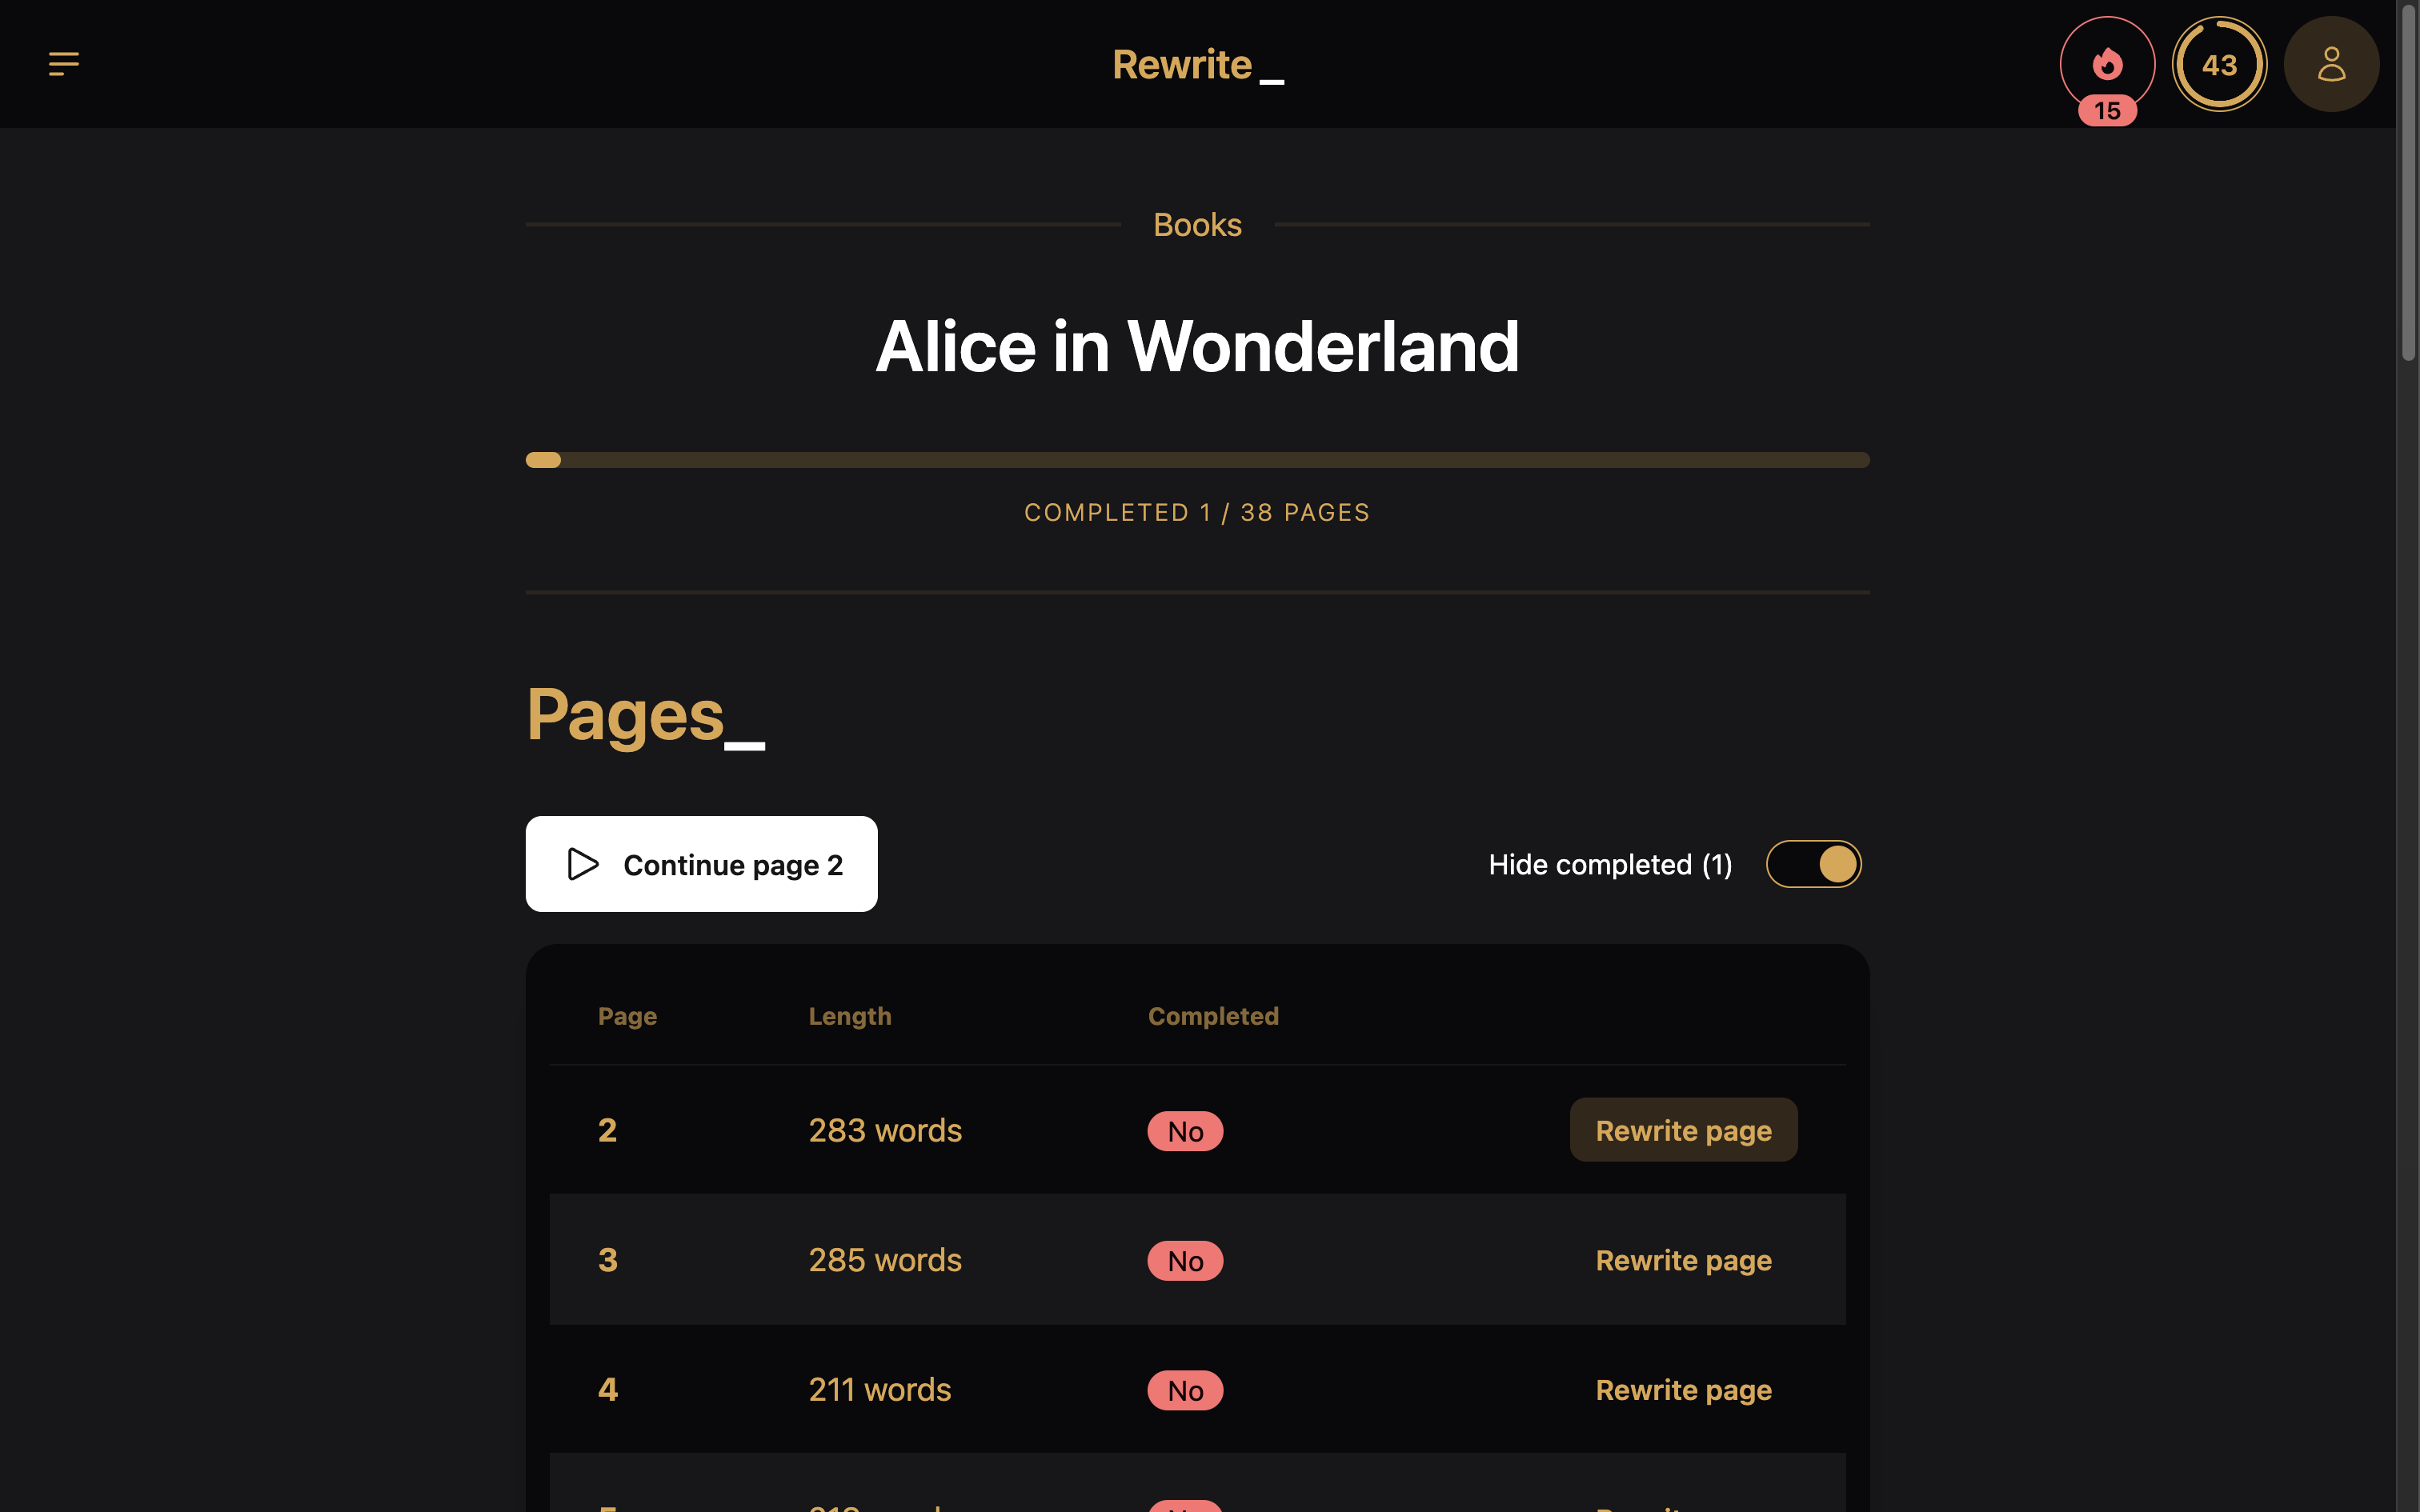
Logged-in users can visit a library containing books. They can pick from many pre-uploaded books, or upload their own `.epub` or `.pdf` books.
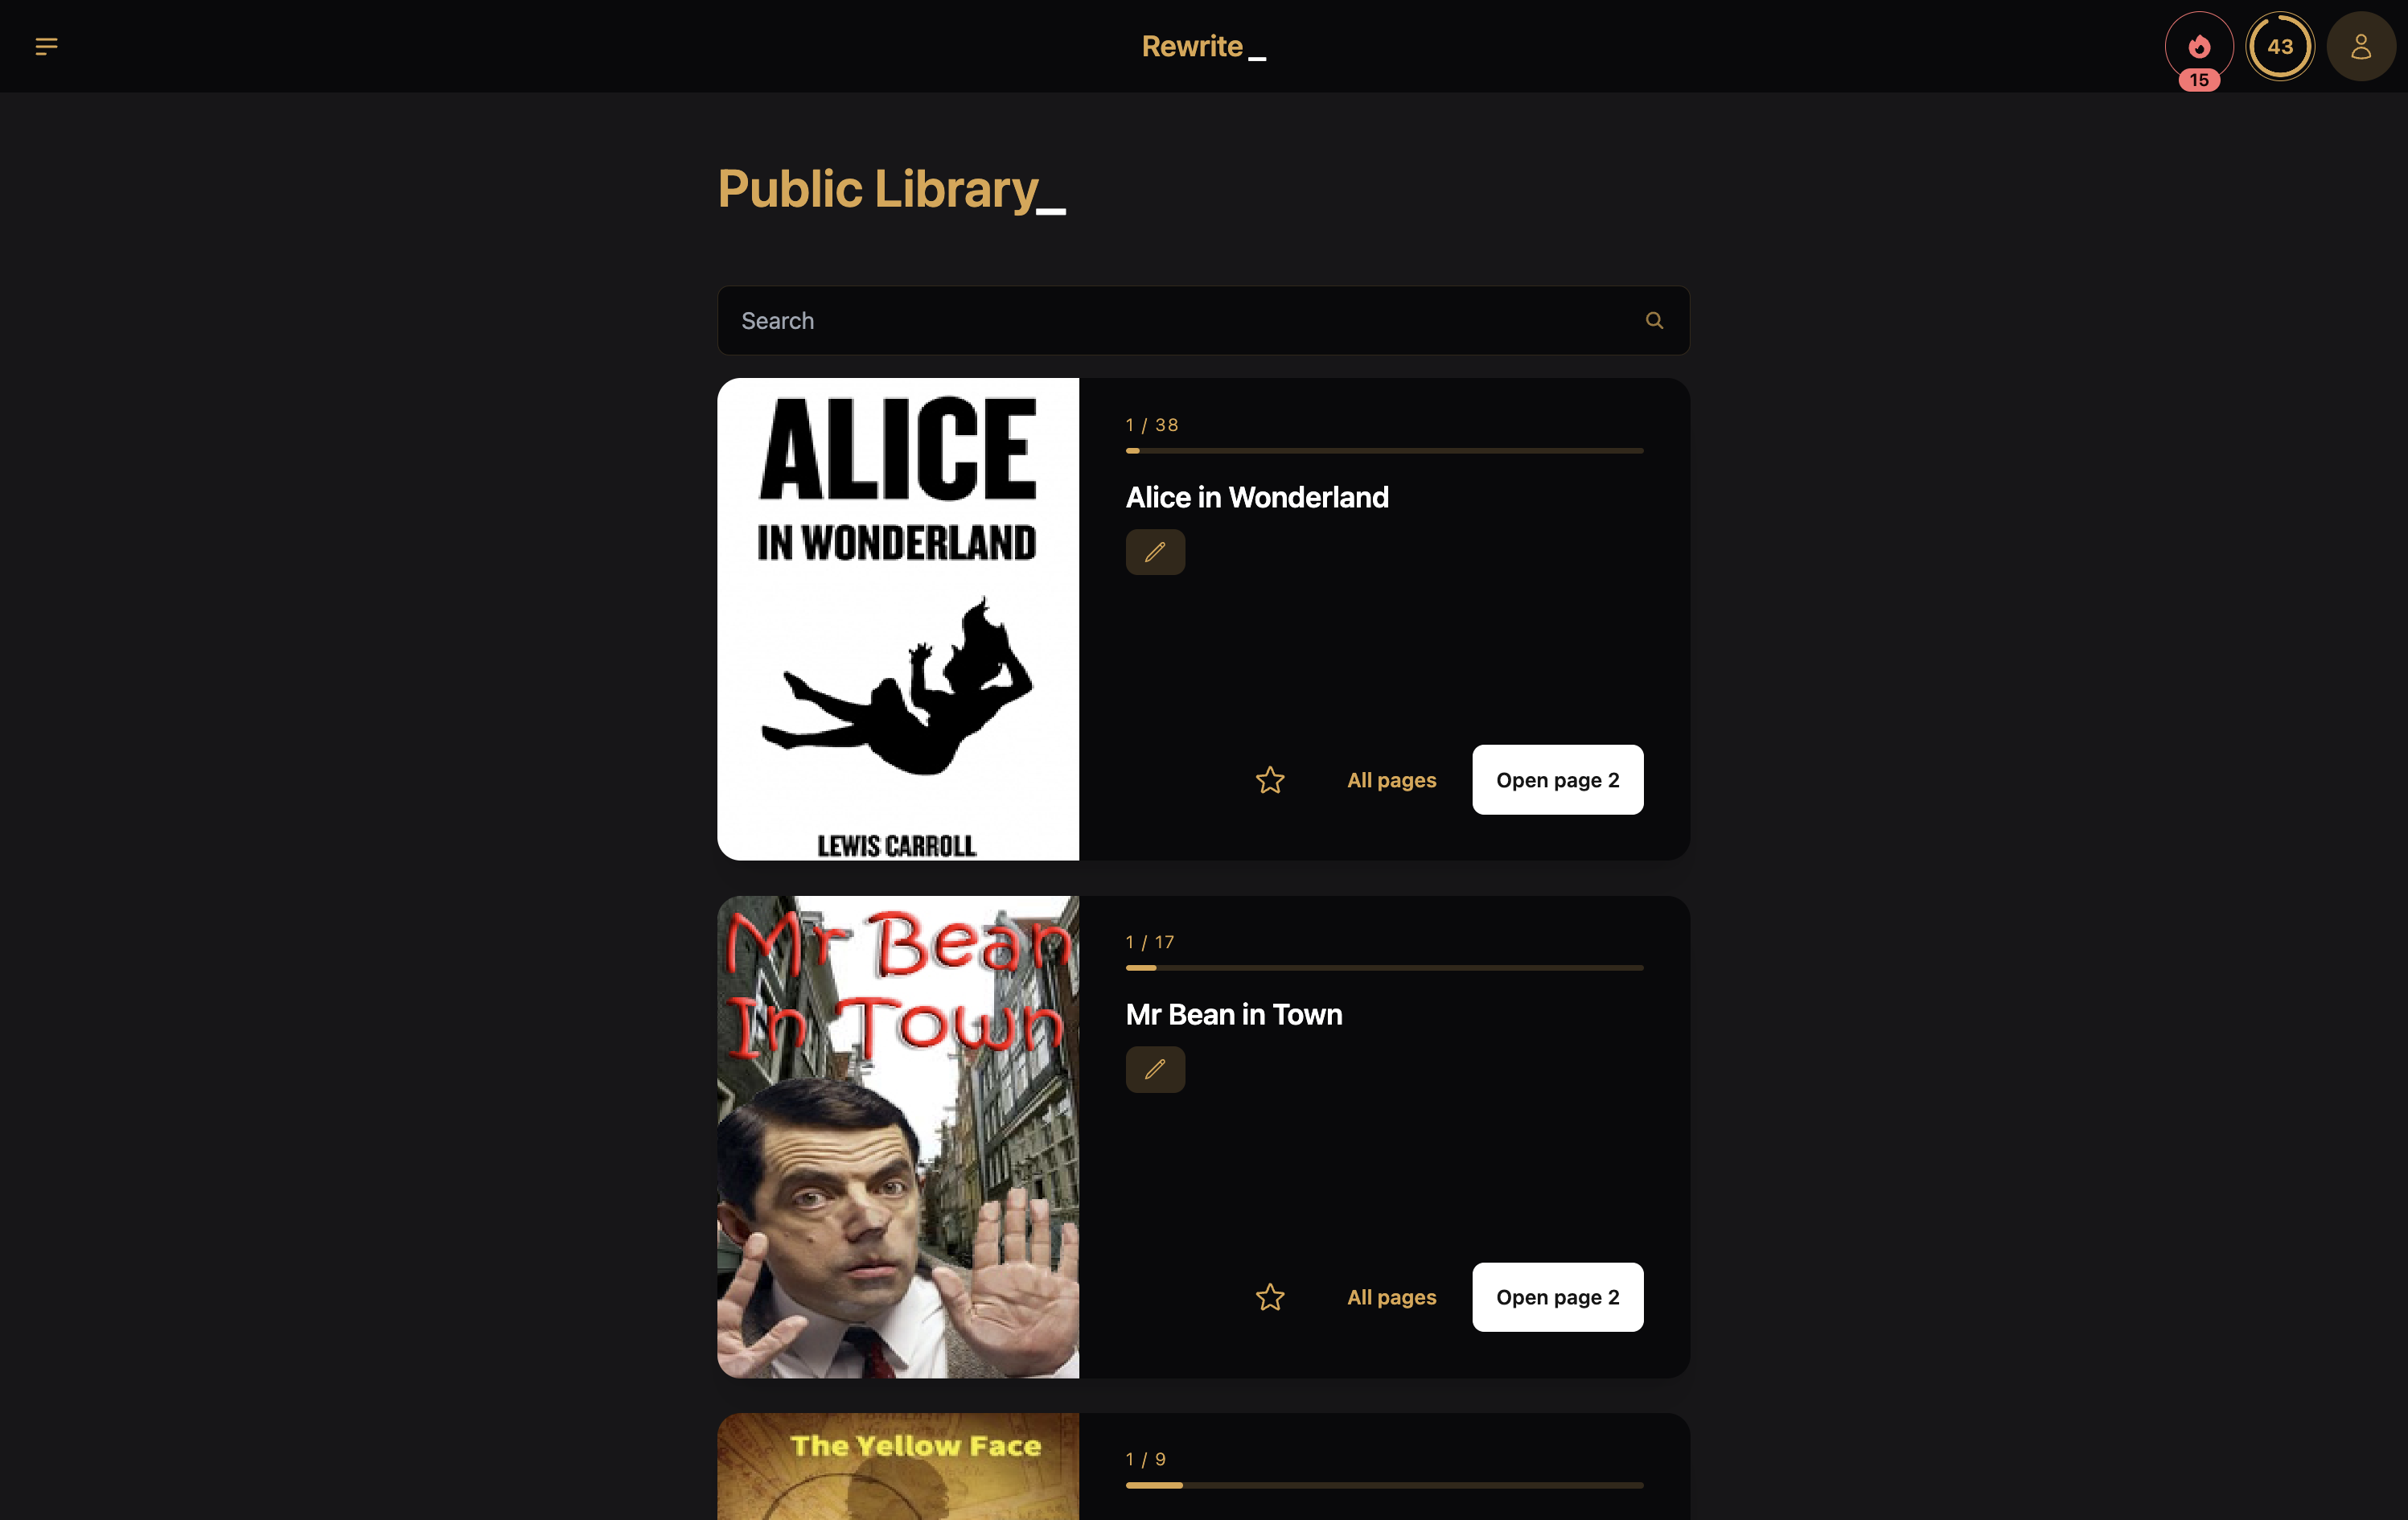
Once a user picks a book, they can select which page they want to rewrite. The table smartly filters out already finished pages, and sorts the rest in ascending order.
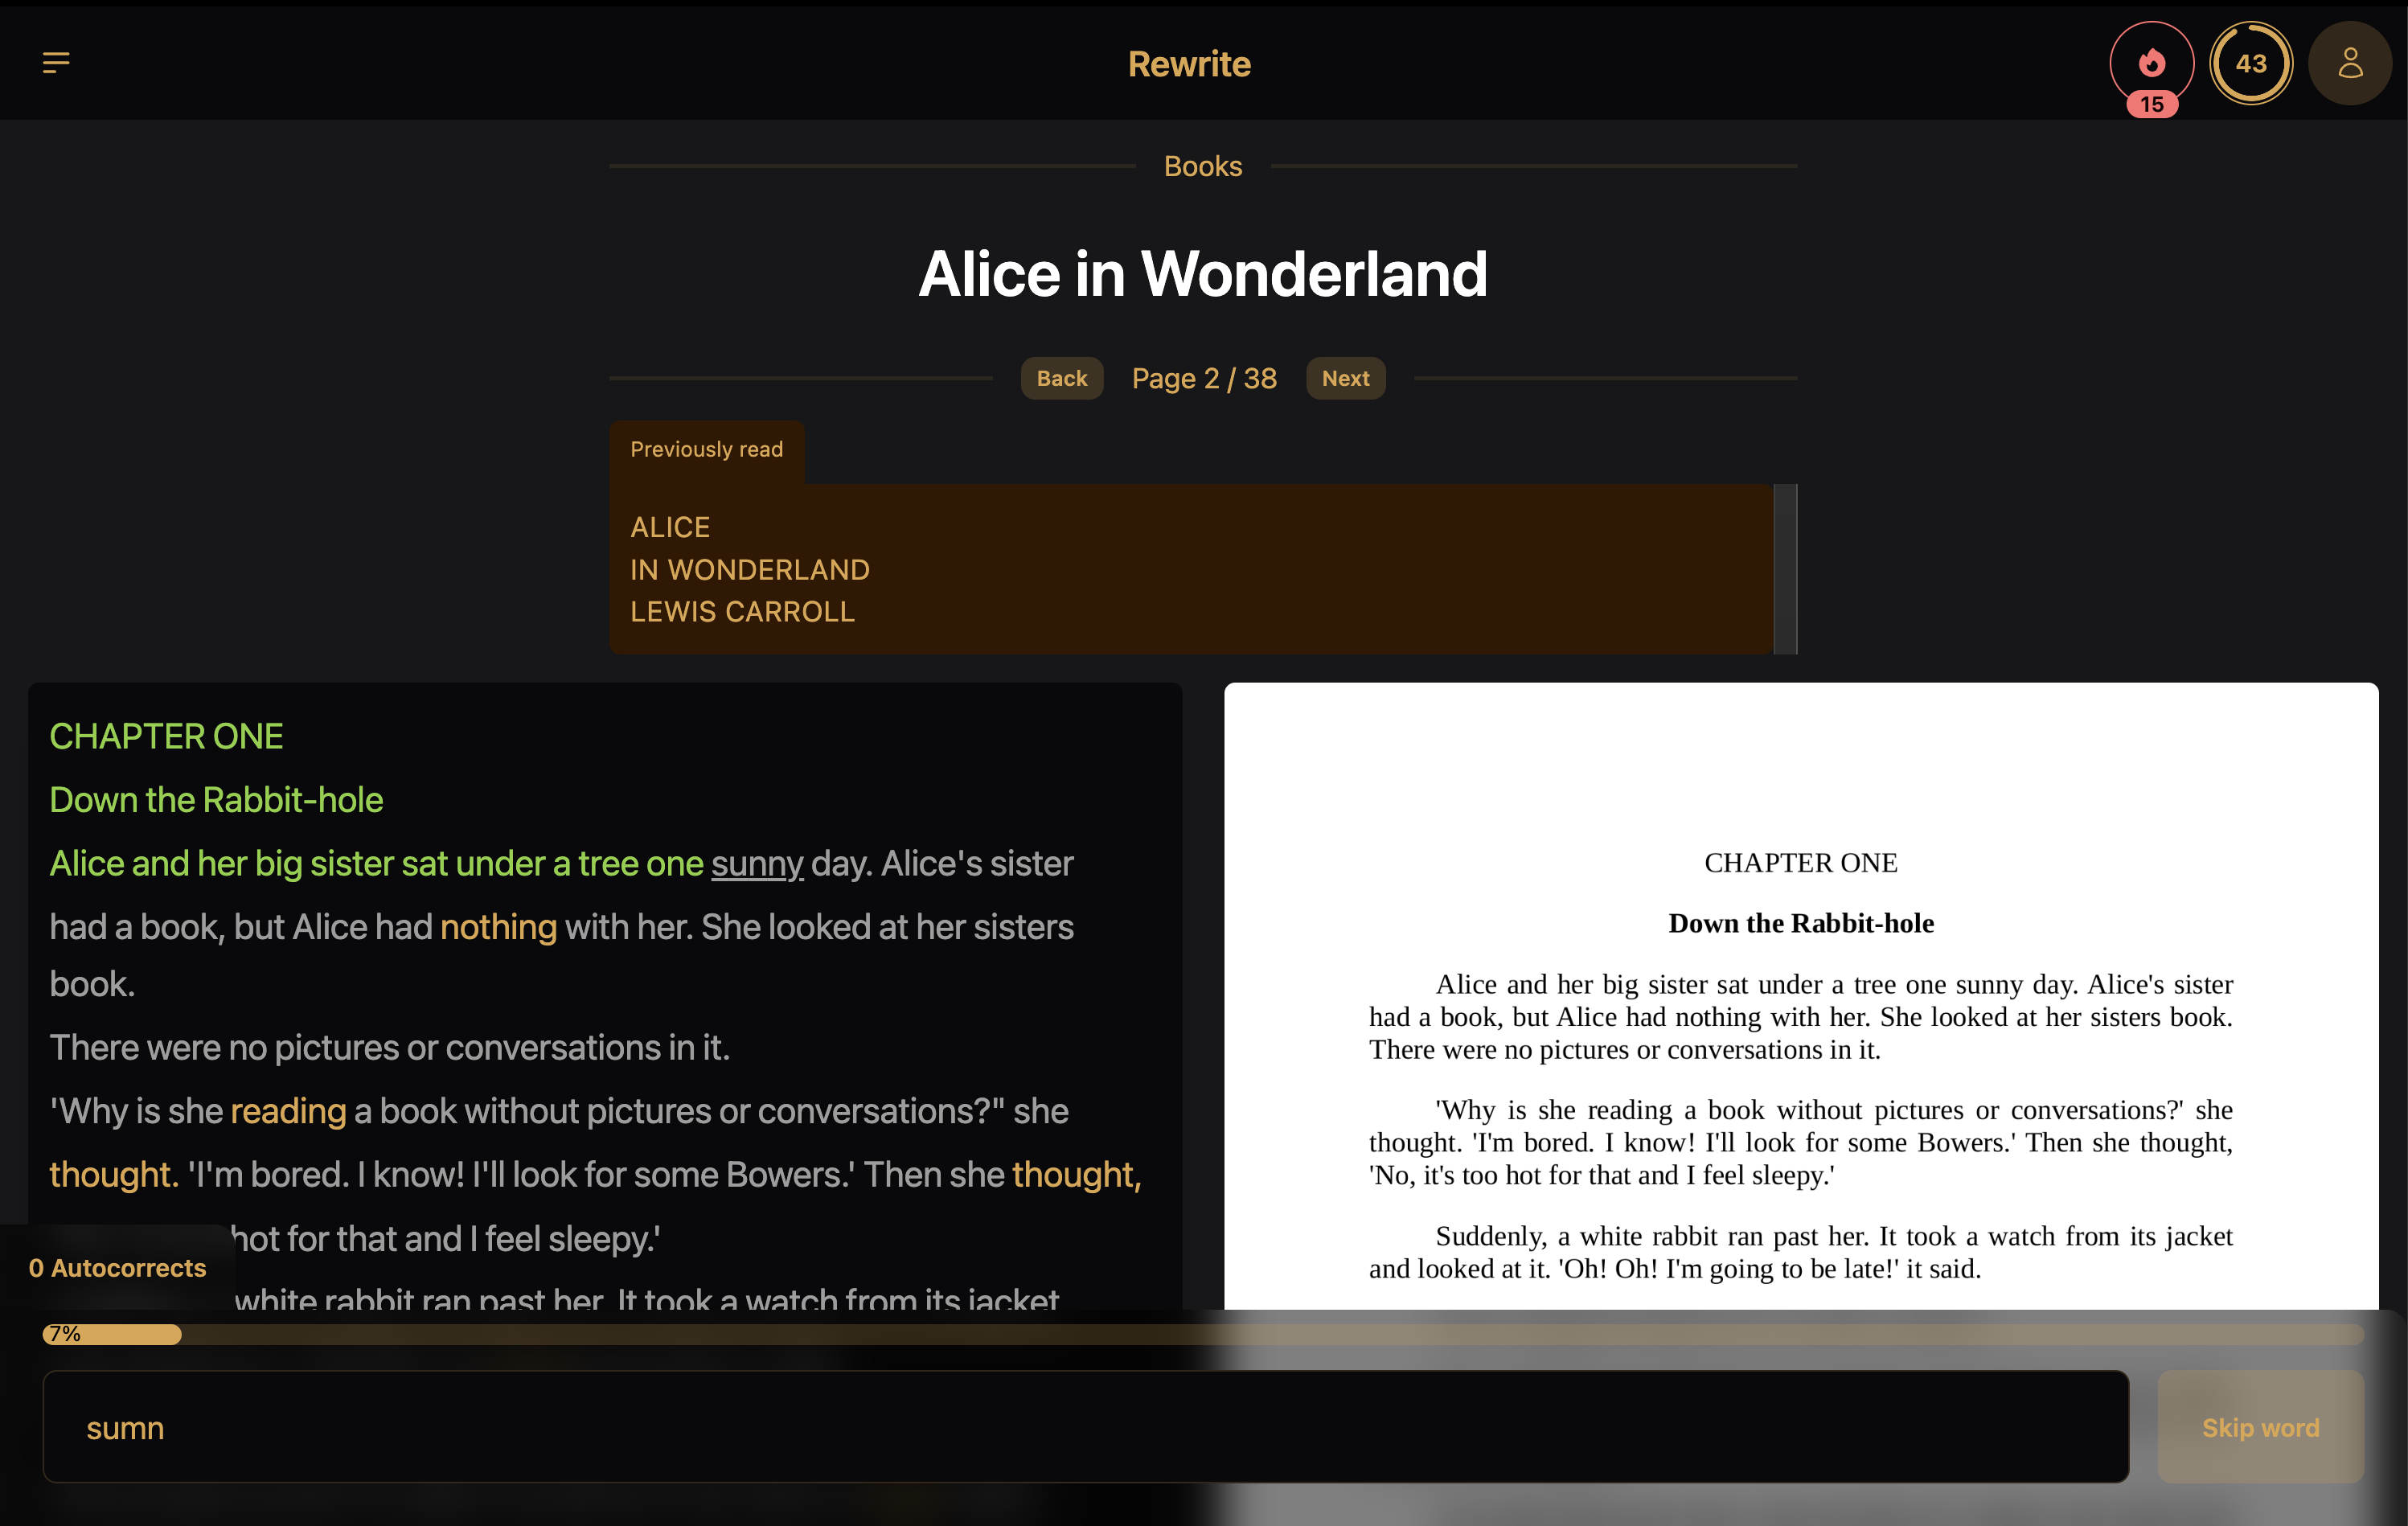
Rewriting a page of a book is the main view of this application. The user is given input and book's text. The goal is to rewrite the page without making mistakes - mistakes must be corrected.

If books include illustrations, users can also toggle page-view and see the book's original page design.
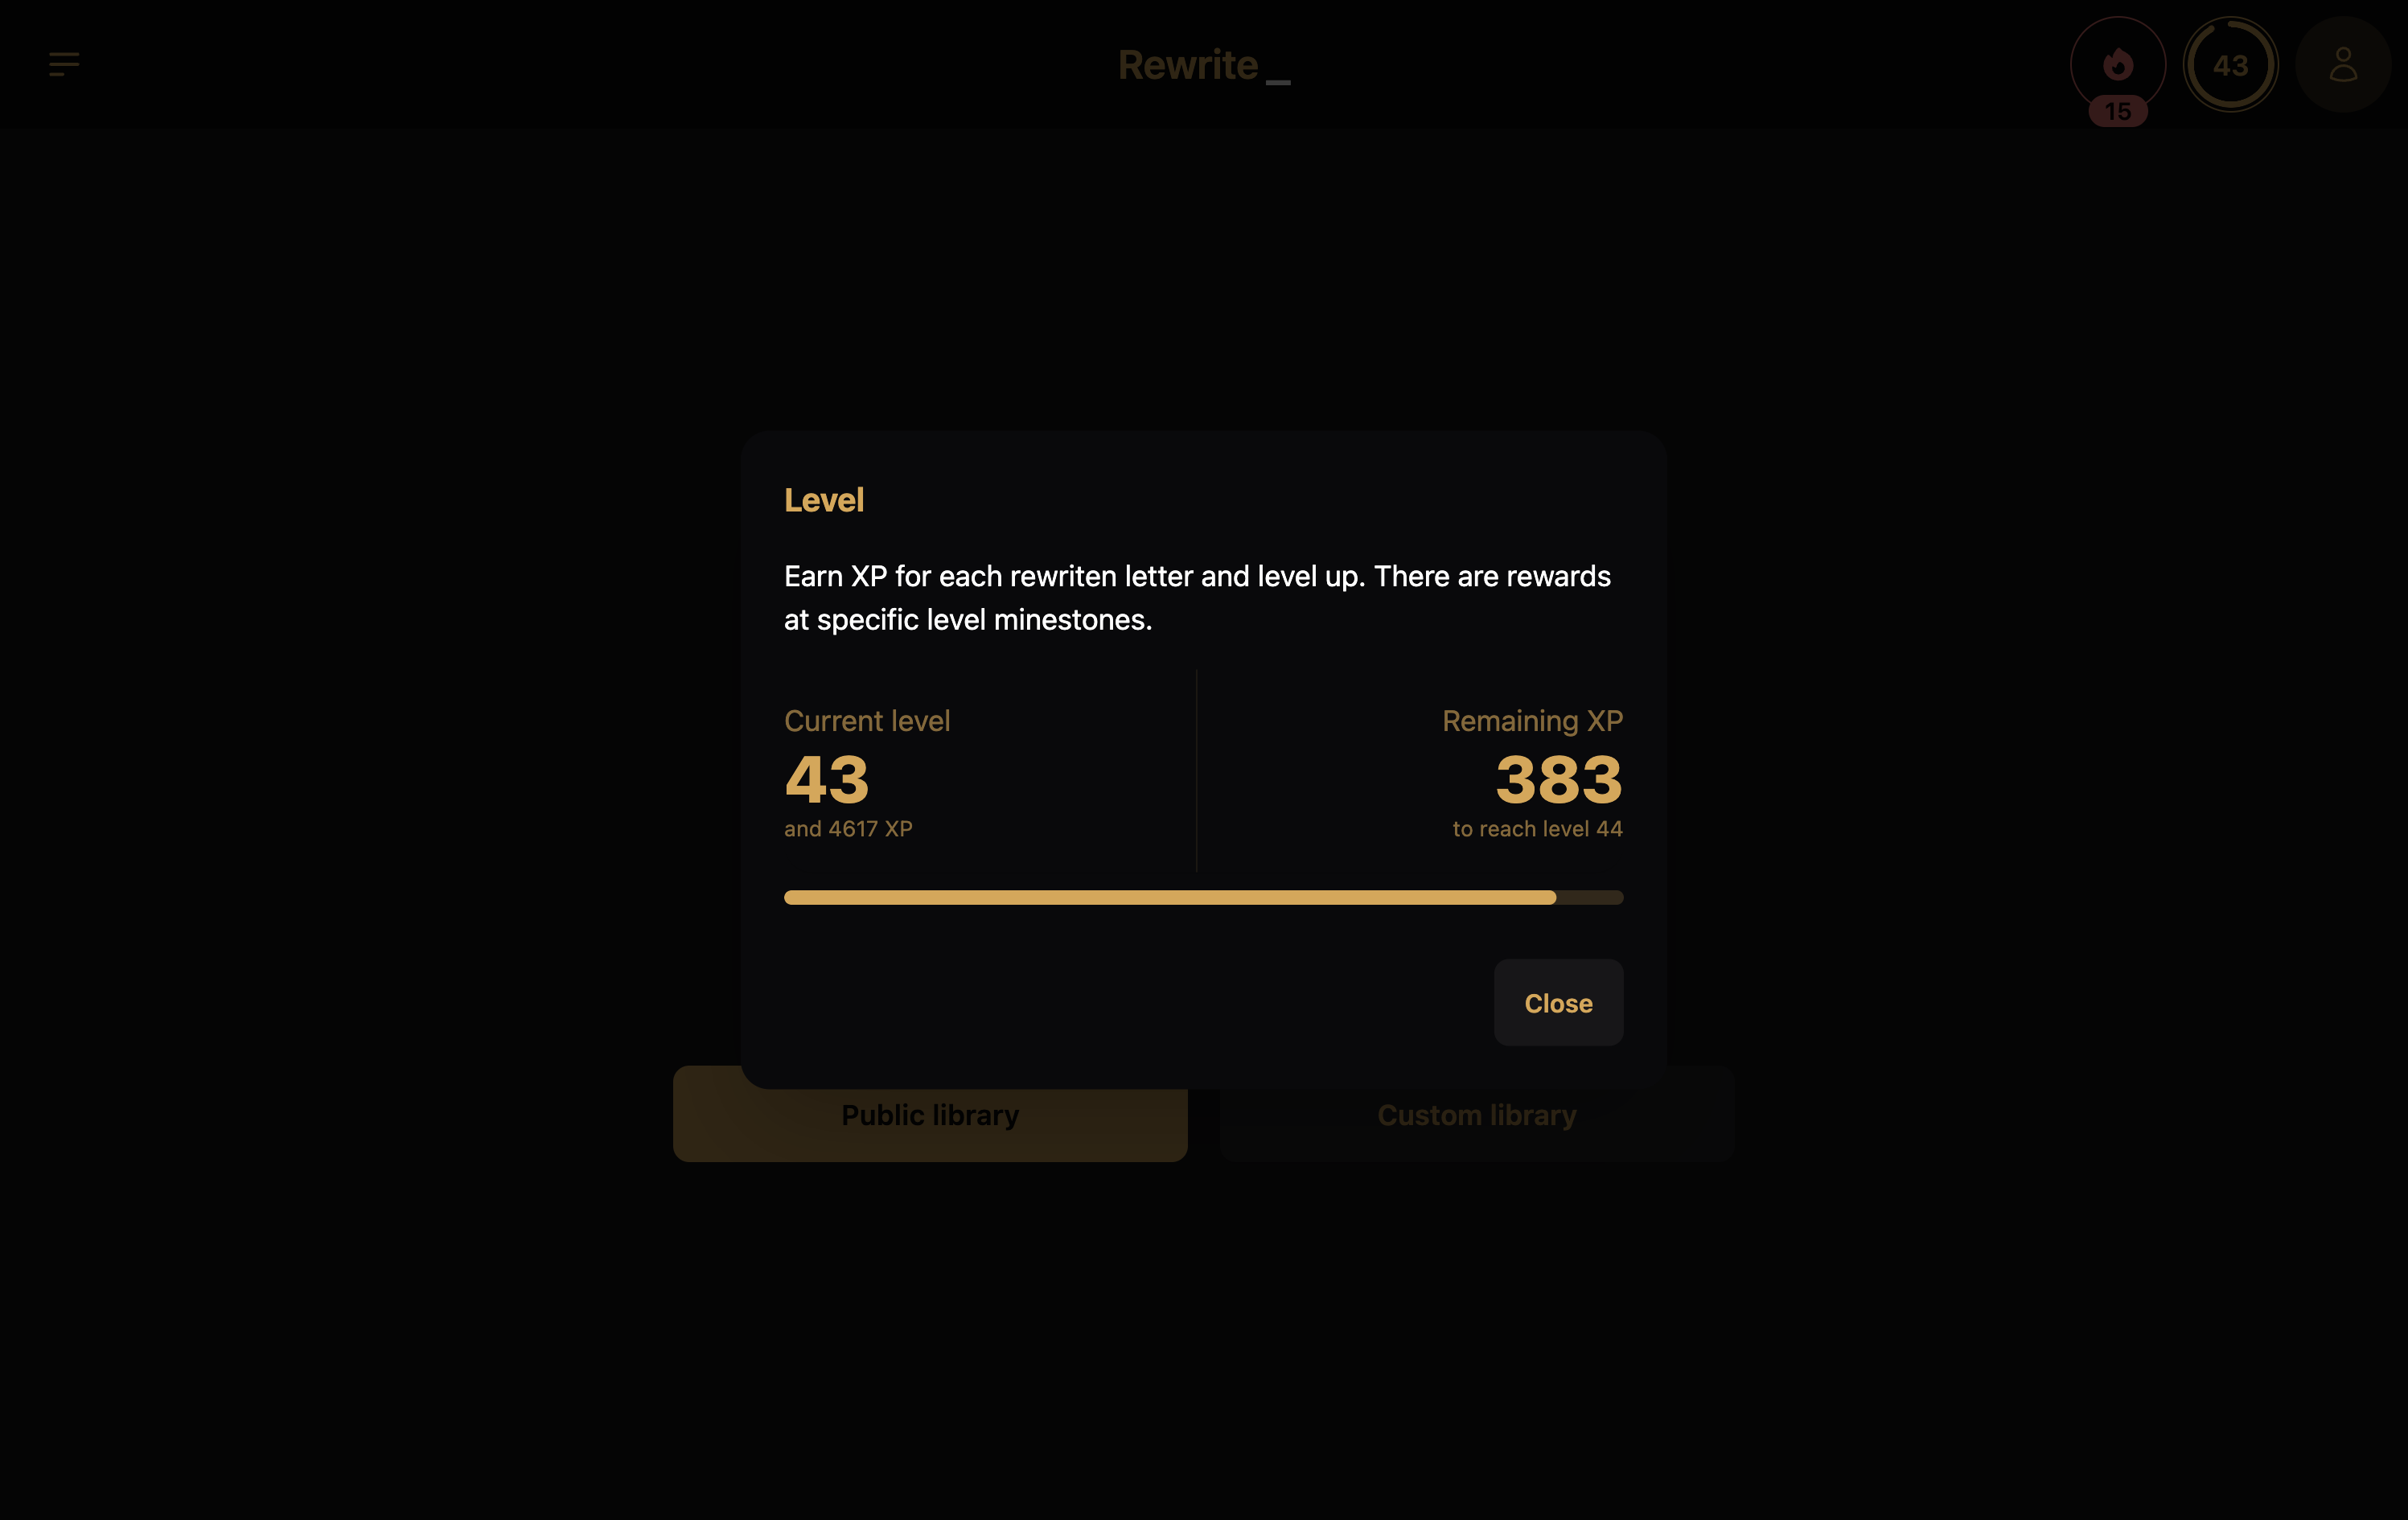
Completing a page grants users experience points, and invites them to continue to the next book's page.
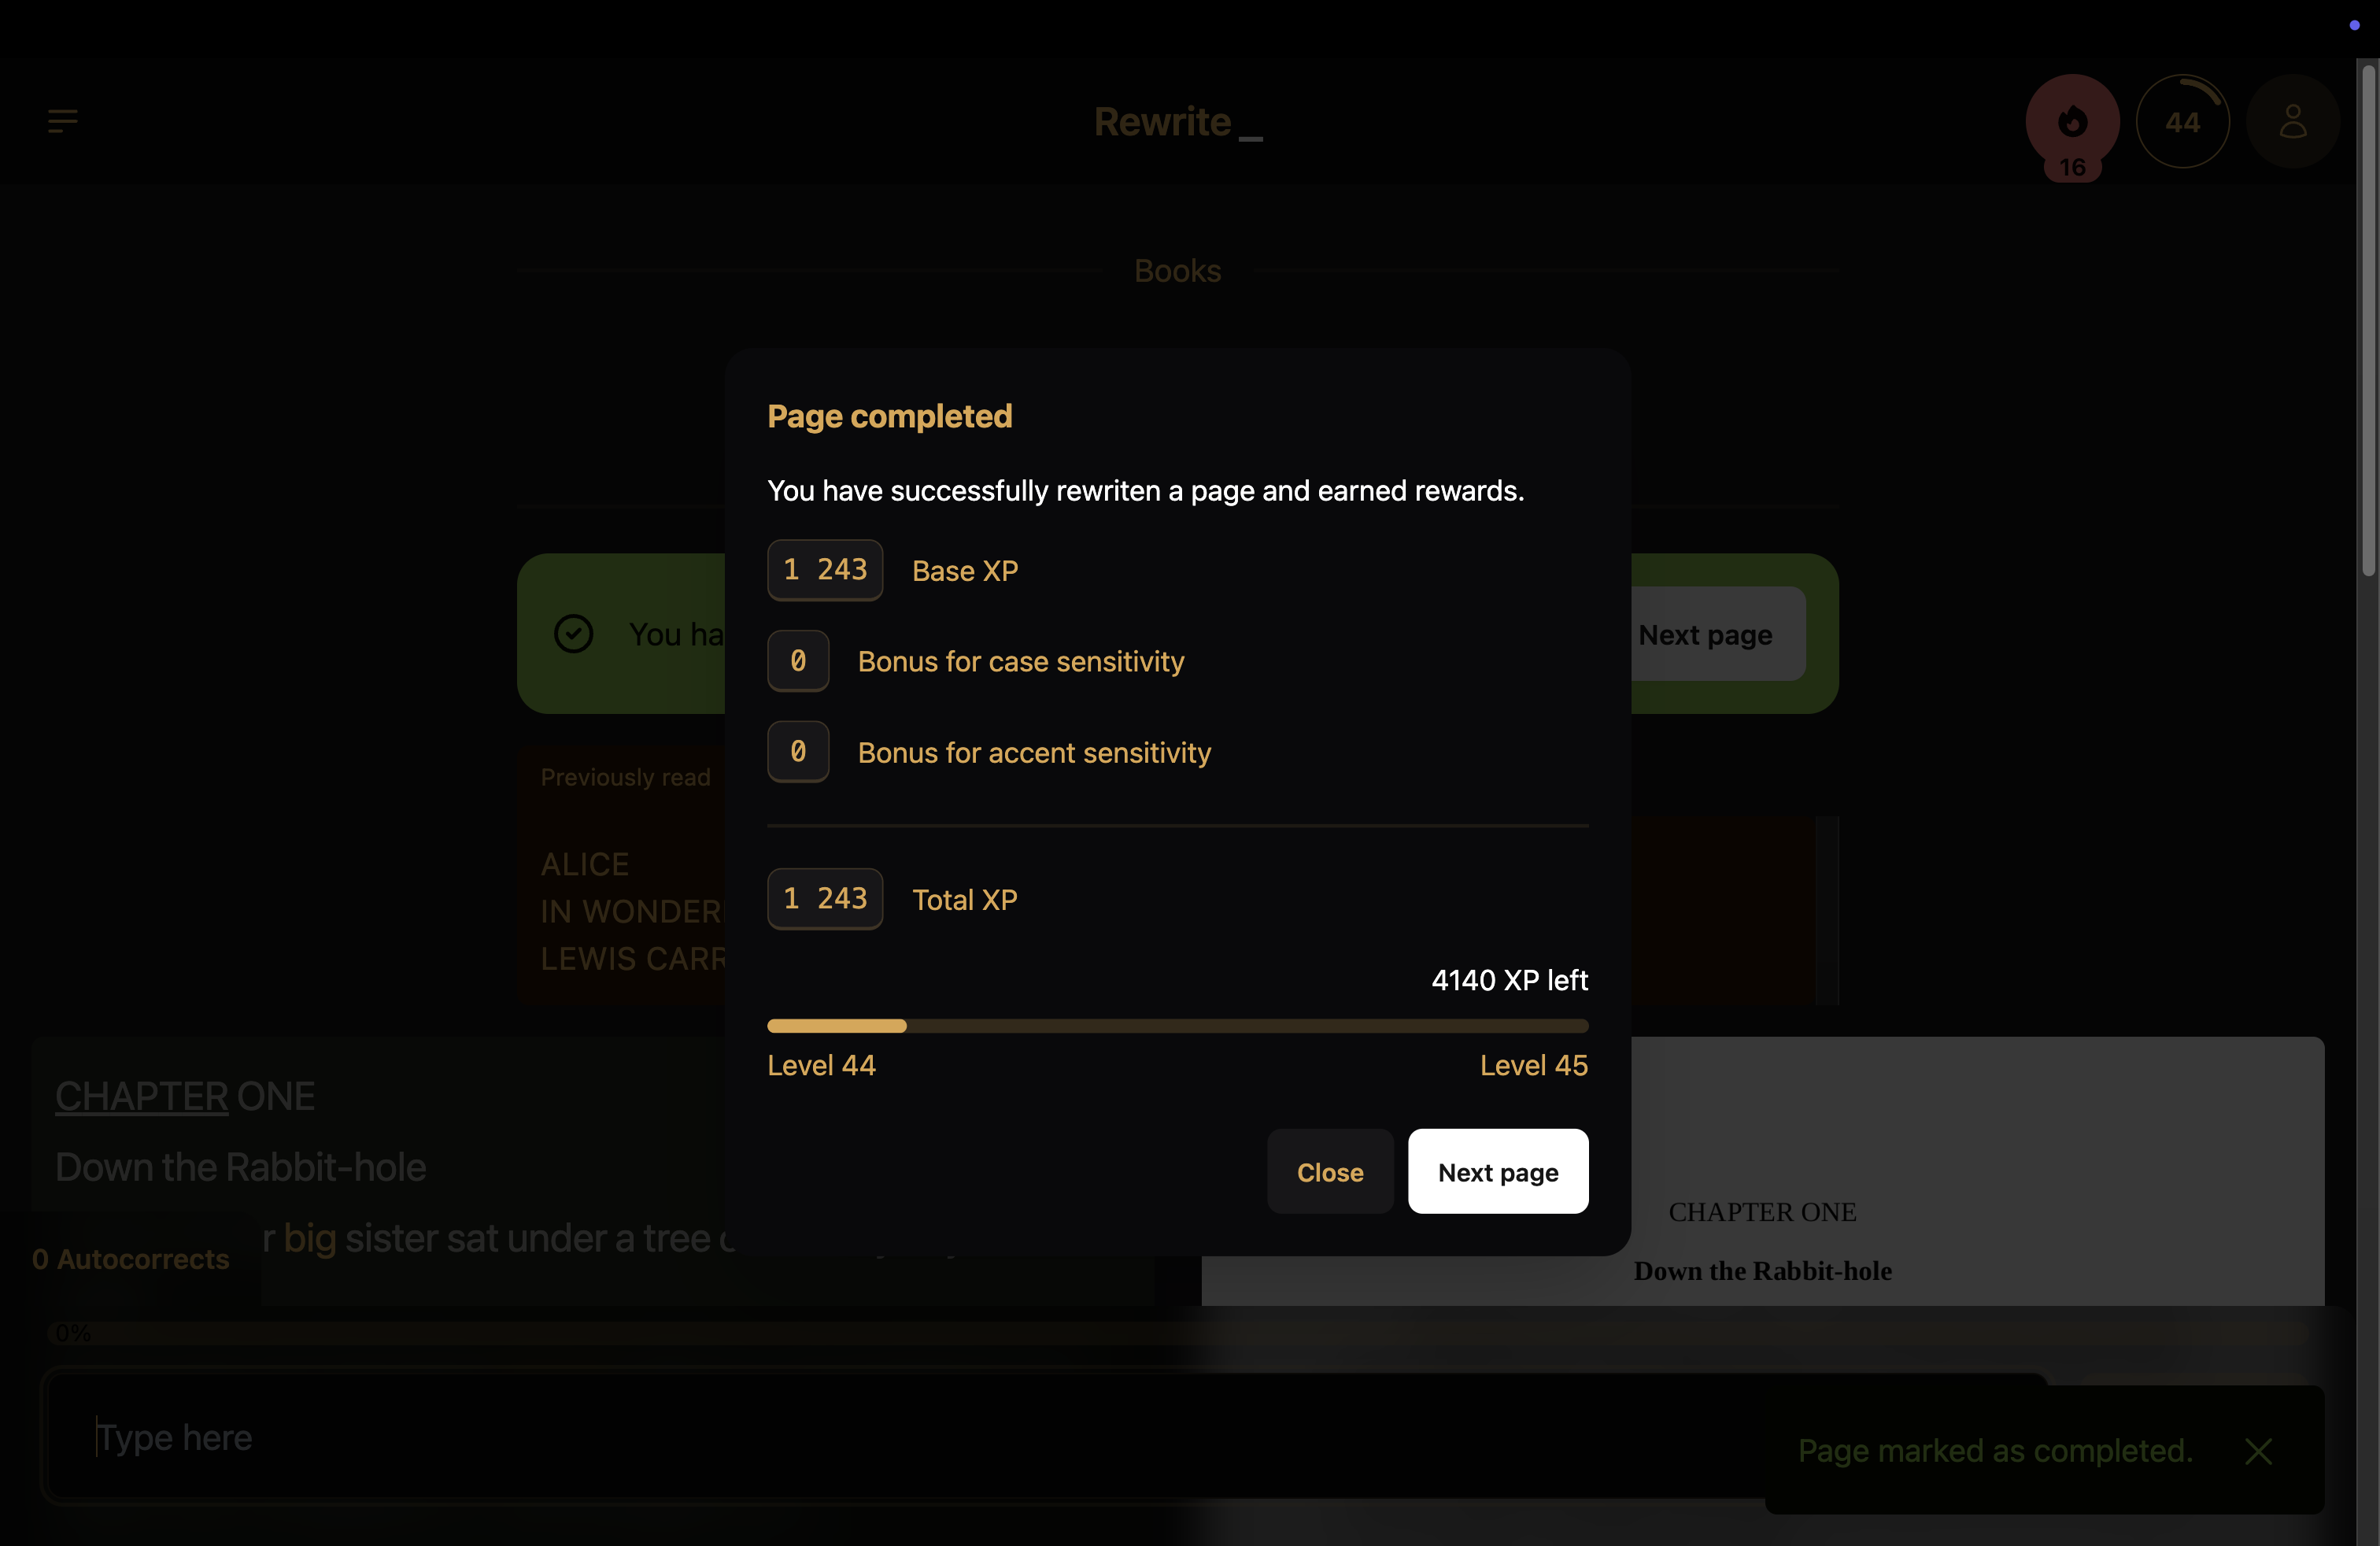
Current level progress and experience remaining can also be found in a level modal.
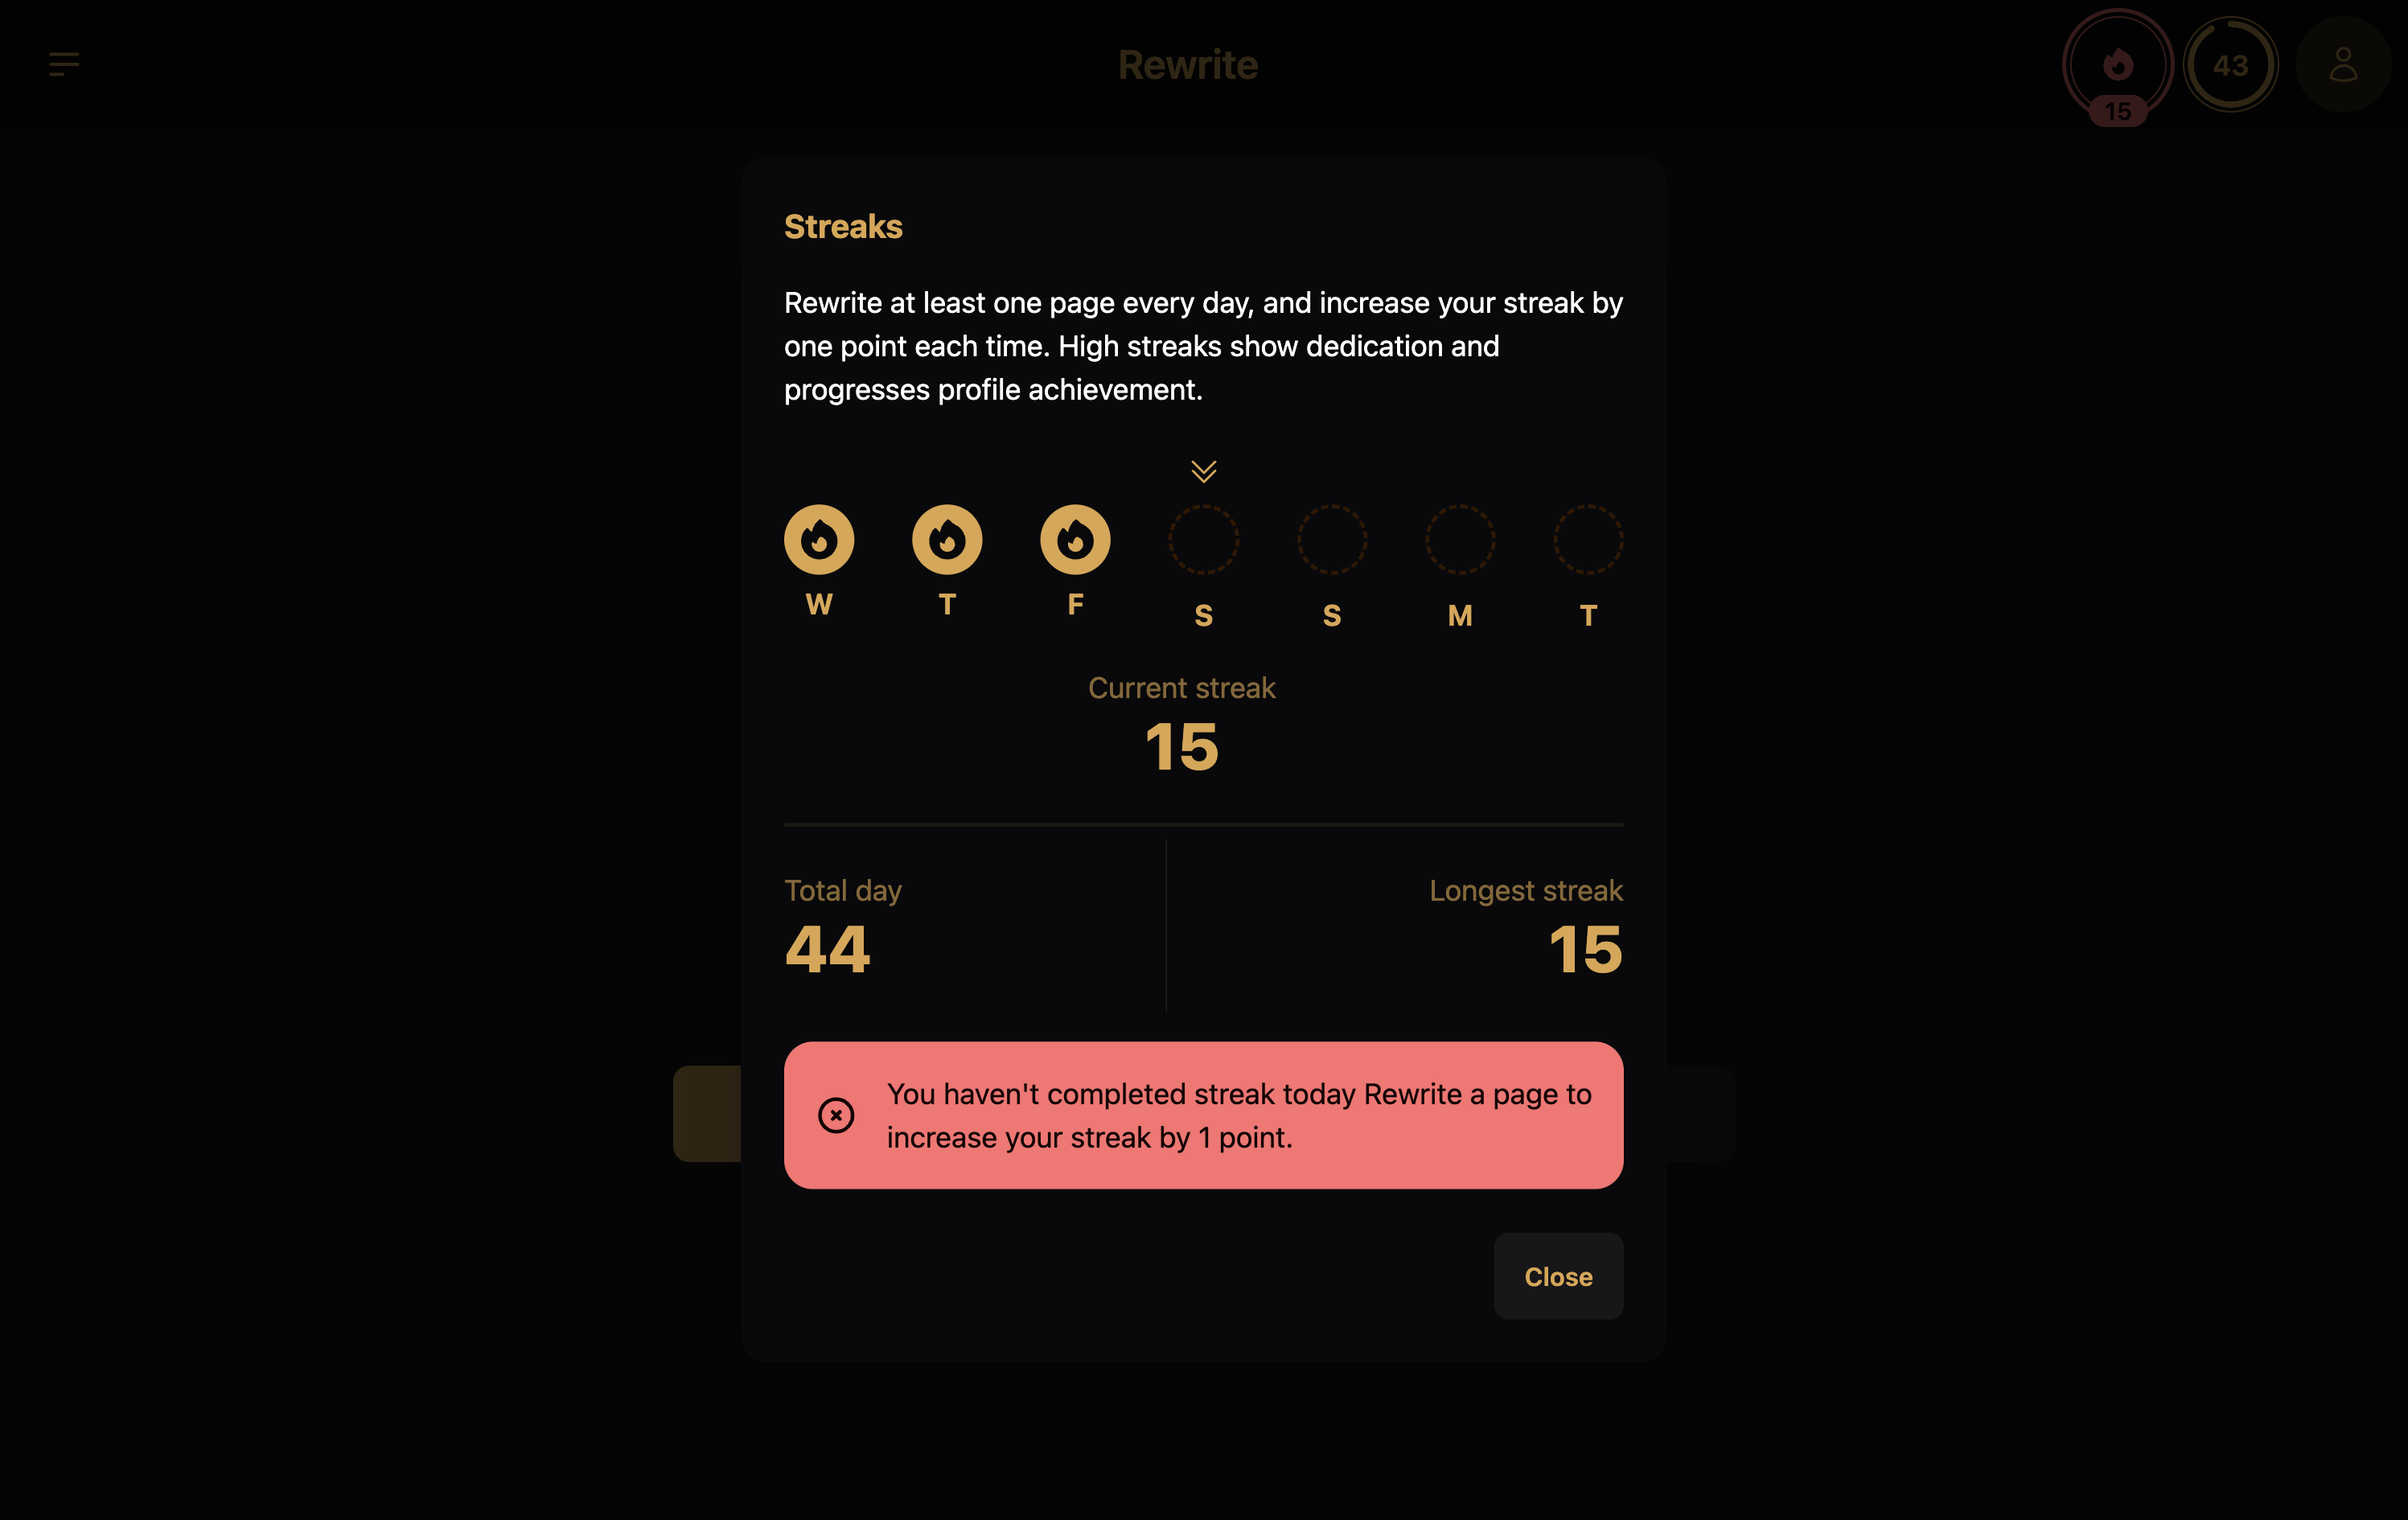
Alongside leveling up the account, users can also maintain their streaks, and see how long they can go without missing a day of rewriting a page.
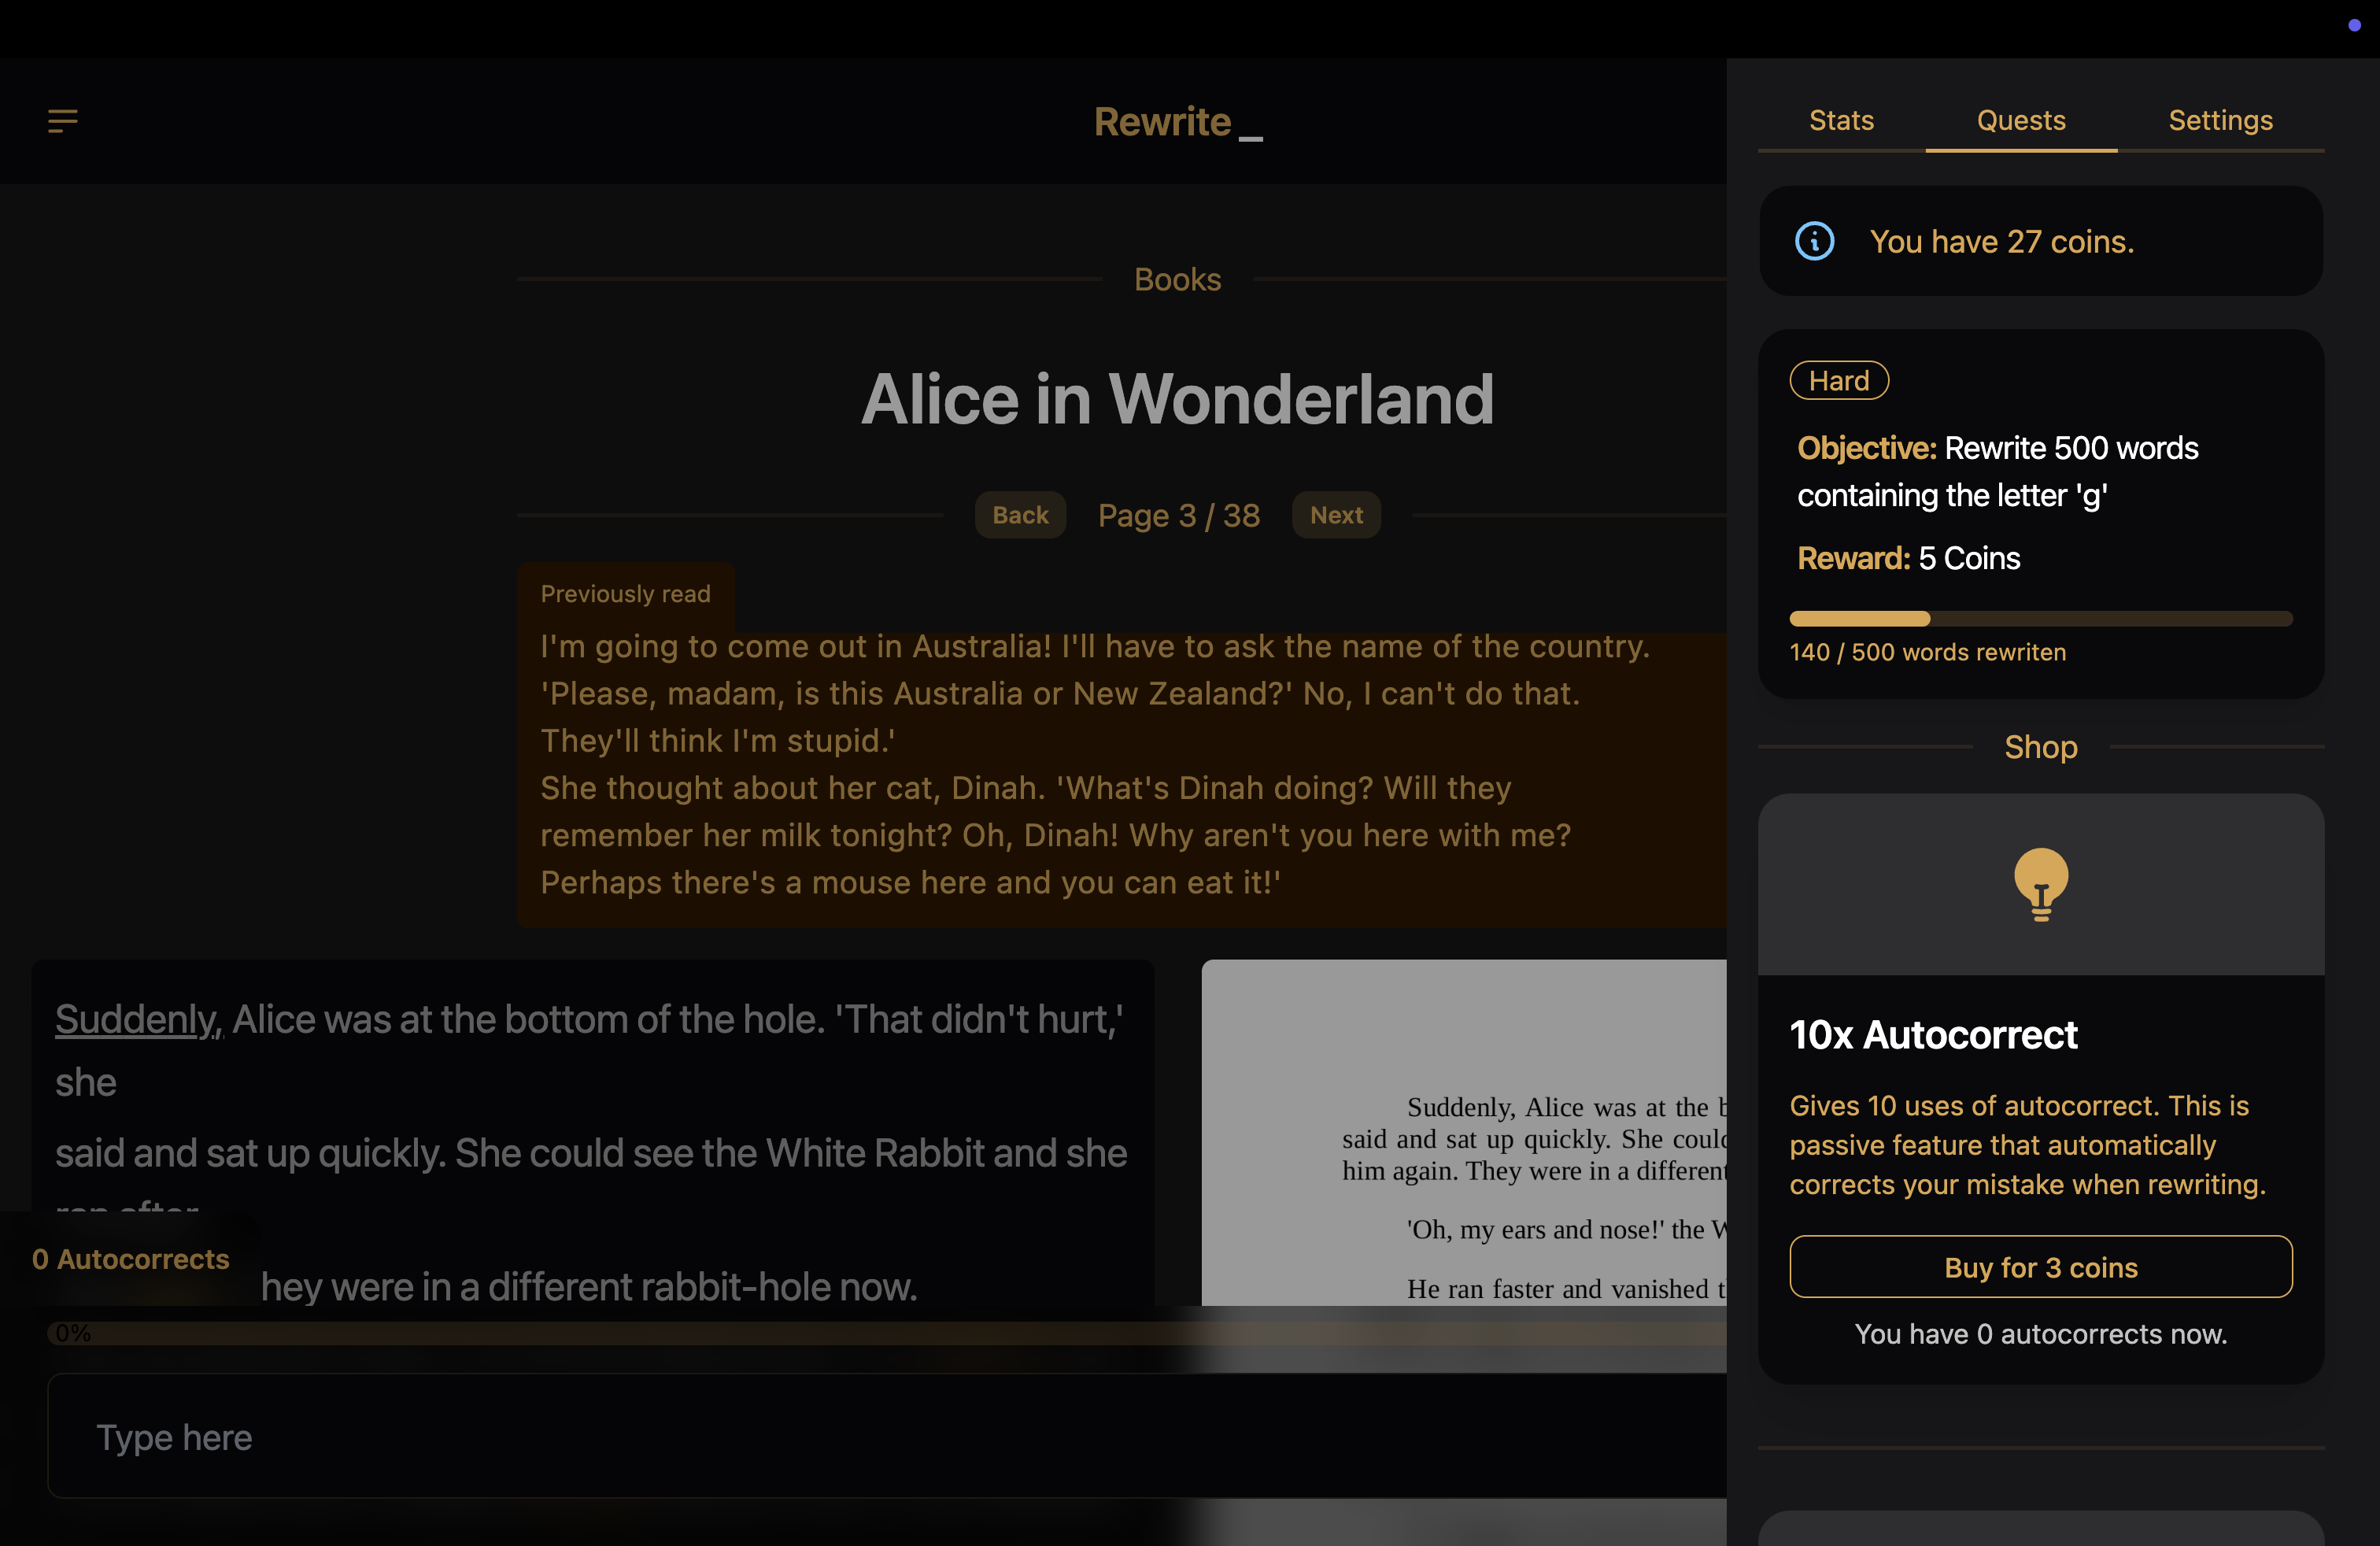
You may have noticed golden words in the page; those were words needed to finish a quest. Doing quests grants coins that can be used for cool abilities.
Users can also look at their profile statistics and complete set of achievements.
## Retrospective
The project gave me the confidence to develop further apps with daisyUI to support dark theme and theming out of the box. I also experienced the implementation of many gamification features, which can serve as a stepping stone to making a proper gamified self-improvement platform in the future.
While working on this project wasn't much of a learning experience, it became an amazing free alternative to its paid competitors, providing all the features that they do. Since I used it myself, I was able to improve and maintain it for over a year.
One of the most interesting problems I faced was creating a self-explanatory interface while books were being processed, so users wouldn't be left hanging, not knowing what to do next.
## Future plans
Since the app serves exact purpose it was meant to, I don't plan to update it in near future. With that said, following are some features what I can see as an improvement:
- Dependency-free e-book parser
- Streak calendar
- Rewards for levels
- Sharable public profile
- 0 Trust server validation
- Community events and goals
---
## Blog Posts
### Blog Post: I Found Perfect CMS after Years of Trial and Error
Published: 2025-04-02
Description: The best CMS for developers, freelancers, and small agencies
Reading Time: 14 min read minutes
As a freelancer, I always looked for ways to create admin panels for my clients. It gives them control, and makes me money. It was impossible to find something simple, free, and privacy-friendly. After a fair share of experience with dozens of systems, I finally found one that aligns with my expectations.
## Finding the Perfect CMS
Every CMS is useful. All of them exist because they have a target audience that is willing to pay, since it provides them value.
After years of searching, I created a set of rules that define the _"Perfect CMS"_ for static sites.
1. **Own my data**. Don't store my content, and don't become a dependency for my projects.
2. **Extendable**. Allow me to add custom components. Ideally open-sourced too, for ease of learning.
3. **Framework agnostic**. Don't tell me to use Angular. Integrate with any framework, and without a framework.
4. **Free**. Don't limit the amount of projects, clients, or features. Don't rely on paid users to keep the product alive.
5. **Self-hostable**. Don't require Cloud for authentication. Don't vendor lock-in access to CMS.
On top of those points, CMS must be simple to use, quick to implement, and nice-looking. Those all make it easier to convince clients they need a CMS.
### Choose Wisely, Choose Git-based CMS
> **Own my data**. Don't store my content, and don't become a dependency for my project.
The biggest difference between Git-based CMS and API-based CMS is complexity. Complexity can be beneficial to large blog platforms or e-commerce platforms, but that is not a typical project of freelancers. Much more common is a landing page, personal website, or community platform.
Simple websites don't benefit from API-based CMS, and get all the downsides. One must use an SDK, or send raw HTTP requests to fetch the data. One must implement caching to make their application quick again. And most importantly, one must have fallback behavior if CMS ever goes into downtime.
Git-based CMS solves all the pain points above. All data is stored in a file defined by you, whether it's JSON, YAML, TOML, or Markdown. Data is always accessible during the build step, so importing it directly gives you access with code auto-completion, and no delays when rendering the website. Data is stored directly as part of your source code, and doesn't create any direct link with the CMS that is used to edit them.
A significant downside of using Git-based CMS is the speed at which changes are reflected. Since a re-build is required after each change, it can take a couple of seconds (or up to a few minutes, depending on which framework you use) to apply changes on production. This can be a bit frustrating, but a typical freelancer's client doesn't mind. If one would honestly need changes instantly reflected on a website, they are at size when they benefit from API-based CMS anyway.
Thankfully, there are many Git-based CMS such as [Decap CMS](https://decapcms.org/), [TinaCMS](https://tina.io/), or [Crafter CMS](https://craftercms.com/).
### Component Library is Not Enough
> **Extendable**. Allow me to add custom components. Ideally open-sourced too, for ease of learning.
Basic components are enough for the first iteration of your CMS. As client's business grows, so do their demands. Coloring data based on importance, or adding map picker to visually represent location, may sooner or later become highly important for CMS users efficiency.
When that happens, your CMS should provide you with docs on how to extend it, instead of asking you to submit a feature request. Relying on maintainers is the worst outcome when it comes to custom components in CMS.
Many providers such as [Directus](https://directus.io/), [Appsmith](https://www.appsmith.com/), or [Budibase](https://budibase.com/) all have ways to fully customize the viewing and editing experience of each field.
### CMS Doesn't Live in My Application
> **Framework agnostic**. Don't tell me to use Angular. Integrate with any framework, and without a framework.
You likely experienced this before. You find an amazing UI library, you decide to use it in your next project, and moments later you realize it only supports Next.js. You find an amazing PDF library to generate great-looking invoices, only to realize it's for PHP. You find ...
Next.js and PHP are great. But it's my decision if they are great for the project I work on. If CMS provided support only for a specific framework, either you can't use it for every project you build, or you throw yourself into a framework you may not be familiar with, or even worse, it may not be the right choice for the job. CMS is there to assist you, not to throw logs under your feet.
[Payload](https://payloadcms.com/), a CMS powered by Next.js, or [Sveltia CMS](https://github.com/sveltia/sveltia-cms), a Decap CMS alternative using Svelte, are examples of CMS that I recommend to avoid until they become framework agnostic.
### Save Money to Make Money
> **Free**. Don't limit the amount of projects, clients, or features. Don't rely on paid users to keep the product alive.
Limits and free tiers are foundation stones of every commercial platform. It may remain open sourced, or a version 2.0 may be released with cloud-only support. It could remain free for unlimited projects, or it could change the limit to 3 projects over the weekend. It's also a matter of trust whether a Cloud doesn't change pricing from $5 per month to $15.
When picking a preferred CMS for simple sites, it should not limit the amount of projects, collaborators, fields, or rows. Allowing pricing to affect you eventually creates expenses, which lower your income from long-term clients.
[Sanity](https://www.sanity.io/), [Contentful](https://www.contentful.com/), and [Hygraph](https://hygraph.com/) are a few examples. Very often a CMS has a pricing page, but is also open-source, and has docs on how to self-host it for free. A great example of that is [Directus](https://directus.io/), and there is no need to avoid those CMS.
### Authentication, a Bait for Headless CMS
> **Self-hostable**. Don't require Cloud for authentication. Don't vendor lock-in access to CMS.
Git-based CMS often provide Cloud authentication to simplify process of setting it up. This is perfect for development, and initial integration to ensure everything works well together. As soon as application goes to production, it's a great risk to keep using the Cloud offering.
Primary problem is the fact you are authorizing someone's else GitHub application, not yours. This means maintainers of the Cloud offering of the CMS can see contents of your repository, do changes, and possibly even more. This creates potential for security risks, makes app less likely to comply with strict privacy regulations, and can create helpless situation during authentication gateway downtimes. Such Cloud authentication can also sunset at any moment.
## Honorable Mention: Outstatic
Until now, my favourite CMS was [Outstatic](https://outstatic.com/), a CMS for Next.js applications. It's fully open source project that can be self-hosted, and focuses on keeping your data inside your git repository. It's simple-looking interface is amazing for any small CMS, and AI integration for text generation can be a great plus for some projects.
Downside of Outstatic is limited collaboration features, since it doesn't come with database, so only authentication method is GitHub OAuth. This can be limiting, as explaining to clients what GitHub is and why they need the account can be hard. Additionally, it's SDKs tightly couple you to use Next.js.
## Why Pages CMS is the Best CMS
Considering all of the above, the best CMS is [Pages CMS](https://pagescms.org/), a modern Git-based CMS with a focus on static sites. With a single configuration file, in matter of minutes, it allows you to manage your content and its media files through an intuitive UI. Pages CMS support all collaboration features you or your client might need including MagicURL login, history of changes, and more. It comes with a responsive design to let your client do changes from their phone.
Pages CMS keeps all your contents inside your repository, and only requires a single configuration file to be set up. What's even more, it's framework agnostic and can be used with Astro, Next.js, SvelteKit, or any other framework. Because of the nature of Pages CMS, it doesn't integrate with a framework, and only looks at files containing your data such as JSON, YAML, Markdown, or TOML.
It supports 9 file formats and 13 built-in field types. While this is more than enough, Pages CMS can be forked, self-hosted, and extended with custom components. Doing this requires basic understanding of React, but detailed documentation and existing field types serve as great starting points.
The entirety of Pages CMS is free and open sourced, including its Cloud platform. Cloud offering has no limits on the amount of collaborators, projects, or content. Developers of Pages CMS even announced `Free forever` as part of their [1.0 release notes](https://github.com/pages-cms/pages-cms/discussions/128).
## Let's Integrate with Pages CMS
As with any CMS I come across, I try to use it with an application. This time I decided to use [Astrolink](https://github.com/alamguardin/Astrolink), a minimal alternative to [Linktree](https://linktr.ee/). You can check it out on a [demo page](https://astrolink.vercel.app/), or see it's details in [Astro theme catalog](https://astro.build/themes/details/astrolink-template-to-share-about-yourself/).

## Prepare the Website
Initial observation shows Astrolink already sources all of the page data from a single file [src/data/user.json](https://github.com/alamguardin/Astrolink/blob/main/src/data/user.json). This means, Pages CMS will only need access to this file, and I don't need to make any adjustments to source code.
> If you want to use Pages CMS with your project, and you have your data inside components or JavaScript/TypeScript files, I highly recommend moving data to JSON files first. Many frameworks have ability to import JSON files directly into components. Those that don't can store JSON files in public assets folder, and be loaded with a `fetch()` request.

Getting Astrolink live was matter of a few very simple steps:
1. Fork GitHub repository
2. Deploy website to Cloud ([Vercel](https://vercel.app/), [Netlify](https://www.netlify.com/), or others)
3. Connect custom domain using DNS
Once deployed, it was time to configure Pages CMS.
## Connect with Pages CMS
To get started with [Pages CMS](https://pagescms.org/), I visited their [Cloud platform](https://app.pagescms.org/), and signed in with GitHub. Through this process I authorized with Pages CMS OAuth application, and gave their GitHub application access to my repositories, including read and write access.
> Pages CMS can be self-hosted **very easily**, and they have a step-by-step guide on how to do that. I highly recommend self-hosting Pages CMS and authorizing your own GitHub application for security and privacy reasons.
Once my GitHub was connected, I saw my newly forked Astrolink repository in the list of Pages CMS projects.
The project was not ready to be used yet, because Pages CMS needs a `.pages.yml` configuration file that will hold all the Pages CMS configuration. Frankly, I didn't need to know that. A nice-looking error page explained it all, and provided a button to create an empty configuration file to continue.
Afterwards, I spent a couple of minutes reading [Pages CMS documentation](https://pagescms.org/docs/), more specifically [Configuration](https://pagescms.org/docs/configuration/) and [Examples](https://pagescms.org/docs/examples/) pages.
While fields in YAML file were not any standard knowledge developers usually have, it was very easy to understand. I am nowhere near knowing the exact schema by heart, but I already feel confident setting up a configuration file for any kind of data thanks to its highlighting, and schema validation directly in Pages CMS.
Below you can find configuration file I used for the Astrolink project:
```yaml
content:
- name: user
label: User
path: src/data/user.json
type: file
fields:
- name: name
type: string
- name: profession
type: string
- name: links
label: Links
path: src/data/user.json
type: file
fields:
- name: links
type: object
list: true
fields:
- name: title
type: string
- name: description
type: string
- name: icon
description: Icon names can be found at www.remixicon.com
type: string
- name: url
type: string
pattern: ^(https?:\/\/)?(www\.)?[a-zA-Z0-9.-]+\.[a-zA-Z]{2,}(\/[^\s]*)?$
```
As I saved the configuration file, new options appeared in the left side menu. Inside, I found my schema applied in a simple interface of inputs and buttons. What's even more interesting, all data was already loaded, indicating the connection to data stored in `src/data/user.json` was successful.

I updated a few texts, and saved the changes. A commit was created automatically, pushed, and a Vercel deployment started. After couple of seconds, I refreshed my website and changes I made were live.
## Collaboration with Client
Since the main purpose of CMS is to provide the client with a simple interface to update content on their static site, I decided to try the full experience with Pages CMS.
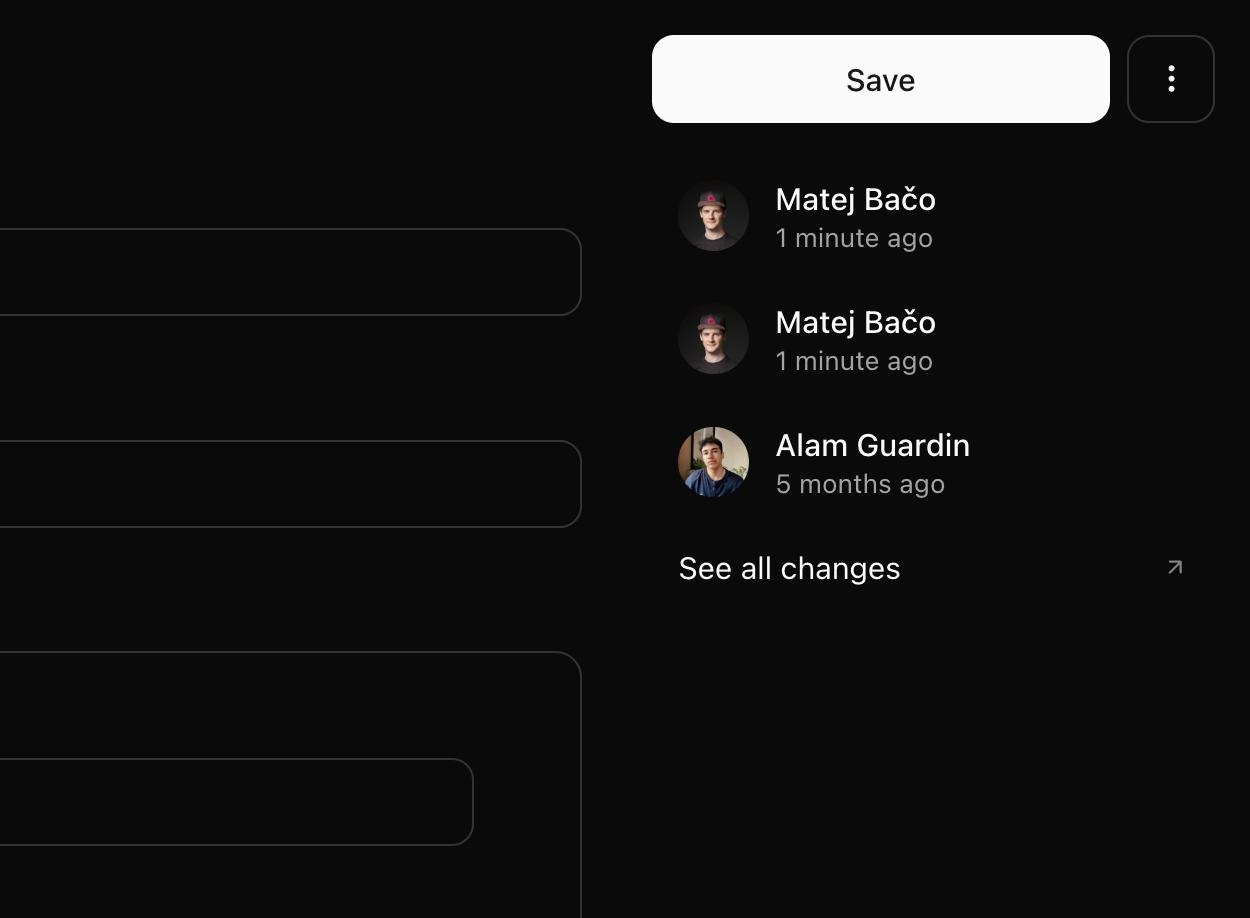
In collaboration settings, I added a friend of mine to the project through email invitation. They received the invitation in their inbox, and followed steps provided. An amazing feature presented itself when I noticed the sign-in page supports passwordless email login alongside GitHub OAuth. I can't stress enough how important this is since clients almost never have GitHub accounts.
After a passwordless login using Magic URL, my friend already saw the Astrolink project in their list, and started editing content. No setup was needed from his side.
Finally, yet another feature amazed me. When my friend started making changes, I saw it all on the right side of Pages CMS, which served as a history of changes. If a client **ever** does a change that breaks the website, as a developer I can easily see what the change was, when, and within a few clicks I can rollback the changes to make the website stable again. Moments like this make business relations more stable and lucrative.
Both website and CMS are now live! Within less than hour of finding out about Pages CMS, I was able to deploy my first site with CMS integrated. You can visit my [Astrolink website](https://matejbaco.vercel.app/), and I invite you to make yours to try out Pages CMS. Additionally, I recommend you to make picture URL on the website configurable, to gain further experience with Pages CMS. For those looking for challenge, Pages CMS supports media, so you can switch from picture URL to proper drag&drop file input.
## Pages CMS in Production
As mentioned above, Pages CMS requires read and write access to your repository, which can be scary for multiple reasons:
- Security: Pages CMS Cloud has full access to your repository, possibly deleting the entire project.
- Privacy: Pages CMS Cloud has permission to see the source code of your application.
- Billing: Pages CMS Cloud can become paid. They promised it won't, but it can.
While self-hosting doesn't fully address security, it surely makes it more secure. Bugs in code can still cause problems, but the risk is much more manageable.
Setting up self-hosted Pages CMS looks like complex task since it has many moving parts, but their docs are **amazing** and provide follow-along instructions to set everything up. The entire setup was made with developers in mind, as it recommends [Resend](https://resend.com/) and [Turso](https://turso.tech/), both Cloud applications that provide free tiers.
What caught me by surprise was how easy it is to add custom components. From my past experience building CMS for clients, I know simple component changes can make a big difference. _For example, simply coloring a date red or green depending on package shipping status can avoid delayed deliveries._ Not only was the process of adding custom components documented, it also linked to over a dozen existing components providing a starting point.
> If you are interested to gain confidence with custom components, I recommend to build component that stores latitude and longitude of location on a map, and provide interface using [Google Maps](https://developers.google.com/maps), [OpenStreetMap](https://www.openstreetmap.org/), or similar map provider.
If you use Pages CMS in production, and successfully self-hosted the application, it's the best time to consider [sponsoring Pages CMS](https://github.com/sponsors/hunvreus). Engineers behind this amazing open-source project are active, and providing them with financial support allows them to develop new features, which can benefit you in the long run.
## Conclusion
I am finally at peace. No more searching for a better CMS. Pages CMS is my go-to, if I ever need one for sites I build. It provides a nice-looking and simple interface that's quick and easy to setup. It's free, open-source, self-hostable, framework-agnostic, and doesn't lack collaboration features. What more should I ask for.
If you don't share my passion for Pages CMS, take inspiration from my criteria for the perfect CMS. Many of them make sense in every situation, and help you find a solution that is long-term, and sustainable. If it wasn't clear already, every static site deserves a CMS.
---
### Blog Post: Go, high-performance runtime and SDK
Published: 2024-08-22
Description: Go runtime is now supported, and we released a Go SDK.
Reading Time: 1 min read minutes
This is an external article. Visit [Appwrite blog](https://appwrite.io/blog/post/announcing-go-support) to read this article.
---
### Blog Post: Faster and safer Functions development in your local environment
Published: 2024-08-19
Description: You can now develop and test functions on your local machine.
Reading Time: 1 min read minutes
This is an external article. Visit [Appwrite blog](https://appwrite.io/blog/post/announcing-local-development) to read this article.
---
### Blog Post: Measuring Appwrite's Go runtime performance
Published: 2024-08-08
Description: Benchmark of our new Go runtime in comparison with other runtimes.
Reading Time: 1 min read minutes
This is an external article. Visit [Appwrite blog](https://appwrite.io/blog/post/go-function-benchmarks) to read this article.
---
### Blog Post: Integrate any database into your Appwrite project
Published: 2024-05-24
Description: With databases it's always "it depends", but we got the answers.
Reading Time: 1 min read minutes
This is an external article. Visit [Appwrite blog](https://appwrite.io/blog/post/integrate-sql-nosql-vector-graph-or-any-database-into-your-appwrite-project) to read this article.
---
### Blog Post: Biometric authentication with Passkeys
Published: 2024-03-09
Description: Authenticate users with their what they are.
Reading Time: 7 min read minutes
Password-based authentication is the most common form of authentication, but it is not the most secure. Ideally, everyone is using a password manager to have a unique and strong password on every website, and everyone protects their account with multi-factor authentication. That's not a reality, sadly. While the website can enforce some best practices for password security, password reusing - a leading problem of internet security - not all can be prevented by developers.
## Introduction and benefits
Passkeys provide an authentication method that does not require users to remember a password. Instead, to authenticate, a combination of owning a device with a private key and authorizing yourself with fingerprint, face, or voice is needed. Passkeys use public key cryptography technology, which provides security that is incomparable to password-based authentication. If a server or a database is ever compromised, the user's passkeys remain secure since there is no secret stored on the server. This makes server breaches ineffective to passkey authentication. The nature of implementation also makes phishing attacks impossible since a passkey can only be used on the website on which registration happened. Your users will no longer be tricked into signing in to an attacker's website.
Using passkeys instead of password-based authentication can lead to faster and more secure sign-ins, reduce the cost of multi-factor authentication such as SMS or e-mail, and provide a faster sign-up process. Passkeys can also be used to safely access your account on a friend's device or in a public library, thanks to passkey QR codes. This gives convenience that other sign-in methods, such as MagicURL or OAuth2, do not have.

## Step by step implementation
Implementing passkey involves multiple steps to keep the entire process secure and reliable. The following technologies will be used in this demo:
- [SimpleWebAuthn](https://simplewebauthn.dev/) for passkey implementation
- [Alpine.js](https://alpinejs.dev/) for reactive frontend
- [Node.js](https://nodejs.org/en) for custom backend endpoints
- [Appwrite](https://appwrite.io/) for user management, databases, and serverless functions

The entire source code can be found on [GitHub](https://github.com/Meldiron/authenticate-with-passkey). I recommend checking it out if you are planning on implementing passkey in your project. Code snippets in the article are simplified to showcase the basics of the implementation, while source code on GitHub covers all edge cases. Such edge cases are, for example, input validation, challenge cleanup, or improved logging.
### Registration with Passkey
The registration form consists of two very simple components, an e-mail and a submit button.
```html
```
Once the form is submitted, a client sends a request to start a registration challenge for a passkey.
```js
const responseStart = await fetch("/v1/challenges", {
method: "POST",
body: JSON.stringify({ email: this.email }),
headers: {
"Content-type": "application/json",
},
});
const body = await responseStart.json();
```
With a response from the server, a client can request a browser to register a new passkey. What happens next depends on the browser and operating system, and multiple modals can be shown to the user for them to decide which passkey manager they want to use.
```js
const registration = await SimpleWebAuthnBrowser.startRegistration(
body.options,
);
```
Earlier, a client sent a request to the `/v1/challenges` endpoint. This endpoint needs to generate a new challenge, store it in a database, and return challenge details back to the client.
```js
const user = await appwrite.prepareUser(req.body.email);
const options = await SimpleWebAuthnServer.generateRegistrationOptions({
rpName: "Passkeys Demo (Appwrite)",
rpID: process.env.ALLOWED_HOSTNAME,
userID: user.$id,
userName: req.body.email,
userDisplayName: req.body.email,
attestationType: "none",
authenticatorSelection: {
residentKey: "preferred",
userVerification: "preferred",
authenticatorAttachment: "platform",
},
});
const challenge = await appwrite.createChallenge(user.$id, options.challenge);
return res.json({ challengeId: challenge.$id, options });
```
With that, the client can successfully generate a new passkey. Once the passkey is generated, the client needs to inform the server with a public key so it can be stored on the backend for future authentication.
```js
const responseFinish = await fetch("/v1/challenges", {
method: "PUT",
body: JSON.stringify({
challengeId: body.challengeId,
registration,
}),
headers: {
"Content-type": "application/json",
},
});
```
Backend implements a new method on `/v1/challenges` to verify that public key corresponds to the original challenge, and stores credentials in the database.
```js
const { challengeId, registration } = req.body;
const challenge = await appwrite.getChallenge(challengeId);
const verification = await SimpleWebAuthnServer.verifyRegistrationResponse({
response: registration,
expectedChallenge: challenge.token,
expectedOrigin: "https://" + process.env.ALLOWED_HOSTNAME,
expectedRPID: process.env.ALLOWED_HOSTNAME,
});
const { verified, registrationInfo } = verification;
if (verified) {
await appwrite.createCredentials(challenge.userId, {
credentialID: SimpleWebAuthnServerHelpers.isoUint8Array.toHex(
registrationInfo.credentialID,
),
credentialPublicKey: SimpleWebAuthnServerHelpers.isoUint8Array.toHex(
registrationInfo.credentialPublicKey,
),
counter: registrationInfo.counter,
credentialDeviceType: registrationInfo.credentialDeviceType,
credentialBackedUp: registrationInfo.credentialBackedUp,
transports: registration.response.transports,
});
}
```
> This code snippet took a long time to figure out, as Unit8Array cannot be easily stored in a database, so it needs to be encoded to a hex value before being stored. Later, it can be decoded before authentication verification. Attempting to JSON stringify and parse Unit8Array managed to store _some_ data, but didn't with properly.
With all of that in place, the registration flow using passkey is finished.

### Login with Passkey
Similar to the sign-up process, it starts with a simple HTML form.
```html
```
Sign-in process also starts with a challenge. It's for the same public key cryptography secure reasons, but this time, the backend also takes advantage of having the public key in the database. When creating a challenge for the client, the server will also provide basic details about the allowed public key so the client device can suggest only relevant passkey.
First, a client sends a request to a new `/v1/tokens` endpoint, and starts the authentication process with challenge details from the server response:
```js
const responseStart = await fetch("/v1/tokens", {
method: "POST",
body: JSON.stringify({ email: this.email }),
headers: {
"Content-type": "application/json",
},
});
const body = await responseStart.json();
const authentication = await SimpleWebAuthnBrowser.startAuthentication(
body.options,
);
```
Next, a challenge is created on the server. This time, it's not a registration challenge, but instead, an authentication challenge.
```js
const user = await appwrite.prepareUser(req.body.email);
const credential = await appwrite.getCredential(user.$id);
const authenticator = JSON.parse(credential.credentials);
const options = await SimpleWebAuthnServer.generateAuthenticationOptions({
rpID: process.env.ALLOWED_HOSTNAME,
userVerification: "preferred",
allowCredentials: [
{
id: SimpleWebAuthnServerHelpers.isoUint8Array.fromHex(
authenticator.credentialID,
),
type: "public-key",
transports: authenticator.transports,
},
],
});
const challenge = await appwrite.createChallenge(user.$id, options.challenge);
return res.json({
challengeId: challenge.$id,
options,
});
```
With that implemented, the client is now prompted to select and authorize a passkey during the sign-in process. To finalize the authentication flow, the client sends one more request to the server with details about the selected passkey for final verification. Notice the server now responds with session details, which the client uses to authenticate into the Appwrite account.
```js
const responseFinish = await fetch("/v1/tokens", {
method: "PUT",
body: JSON.stringify({ challengeId: body.challengeId, authentication }),
headers: {
"Content-type": "application/json",
},
});
const token = await responseFinish.json();
await account.createSession(token.userId, token.secret);
```
Last but not least, we implement final authentication verification on the server and implement logic to generate an Appwrite session for the client.
```js
const { challengeId, authentication } = req.body;
const challenge = await appwrite.getChallenge(challengeId);
const credential = await appwrite.getCredential(challenge.userId);
const authenticator = JSON.parse(credential.credentials);
authenticator.credentialID = SimpleWebAuthnServerHelpers.isoUint8Array.fromHex(
authenticator.credentialID,
);
authenticator.credentialPublicKey =
SimpleWebAuthnServerHelpers.isoUint8Array.fromHex(
authenticator.credentialPublicKey,
);
let verification = await SimpleWebAuthnServer.verifyAuthenticationResponse({
response: authentication,
expectedChallenge: challenge.token,
expectedOrigin: "https://" + process.env.ALLOWED_HOSTNAME,
expectedRPID: process.env.ALLOWED_HOSTNAME,
authenticator,
});
const { verified } = verification;
if (!verified) {
return res.send("Incorrect passkey.", 400, corsHeaders);
}
const token = await appwrite.createSessionToken(challenge.userId);
return res.json({
secret: token.secret,
userId: challenge.userId,
});
```
Authentication flow is now finished and users can sign into the application using passkey.

As mentioned earlier, code snippets in the article are simplified. Please refer to the source code on [GitHub](https://github.com/Meldiron/authenticate-with-passkey) for a detailed implementation of the passkey authentication flow.
## Additional resources
When first learning about passkey, [passkeys.com](https://www.passkeys.com/guides) can be a great starting point to understand the basics.
For implementing passkey on a website and in a Node.js server, [SimpleWebAuthn docs](https://simplewebauthn.dev/docs/) has great descriptive examples.
If you prefer to have basics provided and plan to customize the flow yourself, I would recommend using the [Appwrite Function template](https://github.com/Meldiron/authenticate-with-passkey).
If you are looking for a Cloud solution that is easy to get up and running, you can use providers such as [Hanko](https://www.hanko.io/) or [Passkeys.io](https://www.passkeys.io/) or [Auth0](https://auth0.com/docs/authenticate/database-connections/passkeys).
---
### Blog Post: Why I chose to sponsor Offen
Published: 2022-09-17
Description: I fell in love with open source opt-in web analytics.
Reading Time: 4 min read minutes
Open-source is at the ❤️ of everything we do at Appwrite, and we want to enable and foster the open-source community that helped us grow to thrilling 24,000 stars on [GitHub](https://github.com/appwrite/appwrite). Open-source projects require a great deal of effort to maintain and grow. We use open-source tools every day to build Appwrite, and we want to help our community. To give back, each Appwrite engineer gets to pick an open-source project for Appwrite to sponsor for one year.
## 👁️ Fair analytics tool
Offen’s main product is [web analytics](https://www.offen.dev/), which is quite unique if you ask me. The analytics tool is a core requirement of any commercial website out there, as it provides many KPIs to define marketing success. Not only that, analytics can help you target your services to the right clients, increasing your overall income.
There are many (even self-hosted) analytics tools, but Offen is unique enough to beat them all in my eyes. While others focused on collecting valuable information and storing them lawfully, Offen’s core value is to create visitor-friendly analytics. At your first interaction with Offen, you will notice it only allows first-party cookies, which is a great example of how they focus on visitor security in exchange for making setup a bit more complex. Once you set it up, you notice a second important feature, you can’t really see visitors in your dashboard yet. Offen is opt-in only, which means, you don’t track visitor until he clicks ‘Allow’. Offen also comes with a dashboard for visitors to see what **exact** information you have about them, with an option to opt-out or delete all data with 1 click.
Alongside these product-defining features, you can see functionality that can easily compare with industry-leading competitors:
- Customizable consent banner
- Comply with GDPR
- End-to-end encryption
- Much more!
I am yet to use Offen analytics tool on a real project, but since day one I learned about it, I have been recommending it as a Plausible and Google Analytics alternative.
## 🧰 Developer tooling
Alongside the amazing analytics project Offen has to provide, their GitHub organization includes many different tools such as [schemaify](https://github.com/offen/schemaify), [analyticstxt](https://github.com/offen/analyticstxt) or [l10nify](https://github.com/offen/l10nify). The one tool I like the most is [docker-volume-backup](https://github.com/offen/docker-volume-backup).
Nowadays many self-hosted projects provide Docker support to ensure simple setup, upgrade, deployment and maintenance. Docker also often solves the legendary quote ‘It works on my machine’. Once you start using Docker on production (which you can and should), you will notice there is no backup&restore mechanism available by default.
Offen provides a Docker image that you can run alongside your Docker application to back up anything you might need. Under the hood, the Offen container mounts to the exact same volumes your application does, and backups files depending on your configuration.
What’s cool is Offen’s Docker Volume Backup can be as simple or as complex as your project needs. On my server, I started with a simple `backup.sh` script, but gradually improved it to a more mature solution with many features Offen has to provide:
- Recurring backups (daily/weekly/monthly)
- Upload backups to the cloud
- Mirrored backups to multiple storage providers
- Maintenance mode during backup to ensure data integrity
- Alerts about failed backups
- Backup encryption
- Backup rotation to remove old ones
With such advanced backup in place, all worries about data loss have been taken from my shoulder. I am so confident with Offen’s backup tool I have been recommending it to the Appwrite community to properly [backup their Appwrite instance](https://gist.github.com/Meldiron/47b5851663668102a676aff43c6341f7)!
## ☢️ Open-source Software (OSS) Is Hard
Since Appwrite is open-source, we understand the challenges that OSS projects face. If you fall in love ❤️ with an open-source project (like we have), consider checking out ways to contribute. Most OSS projects happily accept contributions in their own way, whether they be in the form of commits, bug 🐛 reports, advocacy, or even monetary 💰 support. If you love `Offen`, consider joining us as a sponsor. Or, if you're interested in contributing to Appwrite, check out our [contribution guide](https://github.com/appwrite/appwrite/blob/master/CONTRIBUTING.md).
## 🔗 Learn more about Appwrite
Check out Appwrite as the backend for your next [Web](https://appwrite.io/docs/getting-started-for-web), [Flutter](https://appwrite.io/docs/getting-started-for-flutter), or [Server](https://appwrite.io/docs/getting-started-for-server) application. Here are some handy links for more information:
- [Appwrite Contribution Guide](https://github.com/appwrite/appwrite/blob/master/CONTRIBUTING.md)
- [Appwrite Discord](https://appwrite.io/discord)
- [Appwrite Github](https://github.com/appwrite)
- [Appwrite Documentation](https://appwrite.io/docs)
---
### Blog Post: Why Discord is a must-have for OSS
Published: 2022-05-03
Description: Setting up Discord server is low effort high value improvement.
Reading Time: 7 min read minutes
[Appwrite](https://appwrite.io/) is an OSS company, and we share as much as possible with our community. Since transparency is both a value and a mindset for us, we share articles like these to provide knowledge that might help developers all around the world.
Today we will focus on the topic of handling community around your open-source project outside of GitHub.
Don’t get me wrong, the GitHub issue and discussion section is a great place for keeping track of topics, but we noticed people consider these too “official”. From our experience, we see questions about failing installations more often on Discord than on GitHub. The reason behind that is that people think they must have done something wrong, and don’t want to “spam” GitHub with issues that will be resolved with 1 comment. Instead, they visit Discord and freely chat about the problem they encountered.
Before looking at the advantages of the Discord community for an open-source project, let’s quickly talk about Discord!
## 🤖 What Is Discord?
[Discord](https://discord.com/) is a place for any kind of community to chat or talk. Many different communities use Discord nowadays, such as school classes, gaming communities, companies, or even your group of close friends. You can be a member of one or many communities, and set up a different profile for each of them.
Open-source projects love Discord, because of its nature of being interactive. With Discord live chat, people tend to expect answers within a few hours or minutes, which gives them a great opportunity to ask questions about a bug, specific feature, or approach to a problem using your project. Without Discord, many developers might leave your project frustrated from a mistake they made instead of asking for help on GitHub.
With a clear picture of what Discord is, let’s jump into the reasons why developers and maintainers tend to use the Discord server.
## 💭 Collect Feedback
Feedback is an important, if not the most important tool for an open-source project. This comes down to the reason you decided to make a project open-source! OSS allows others to not only use it but also help you improve the quality of the project by requesting or adding features they are interested in.
As mentioned earlier, GitHub discussions would be the best place for keeping track of feedback about a project, but developers find these channels too formal for pitching a feature they need for their project. With Discord, the maintainer can set up a dedicated room called `#ideas` and let developers freely chat about any idea they have. Some will be already implemented, and some will be out of the scope of your project... There will also be some ideas that don’t receive a lot of attention, meaning the rest of the community doesn't find them too useful. On the other hand, if an idea receives dozens of reactions, you can easily assume this feature would be appreciated by many developers. A lot of the tiny features in Appwrite come from our Discord ideas channel, and they make the project way more interesting.
## 🙌 Provide Support
With every new attempt to use your tool, developers can face a new issue, an undocumented edge case, or even an issue with their specific hardware. All of these are close to impossible for developers to debug on their own, as they are not familiar with your source code.
What happens next? Developer hops into your Discord server, look for a `#support` room and ask the question. You can get an enormous amount of positive feedback (and GitHub stars 😈) if you provide quick support to a developer. You also prevent a new developer from losing interest in your project without actually trying it, because some bug didn't let them. Last but not least, reading “Thank you” or “You are great” from time to time feels amazing!
As your community grows, you will notice that some community members that were asking questions a few weeks ago are now answering the questions of newcomers. These are usually people that really enjoyed using your project, and want to stick with it. There are so many reasons why people do this, and why you should value those, it deserves its own article! The most common reason to provide such support is to improve their own skill with your project, as providing support forces you to think about problems you likely never encountered before. On Appwrite Discord, we have a few of these, and if I see them having any questions, I instantly jump in to help them. In the end, that is the least I can do to show appreciation for their hard work.
## 👨💻 Hire New Maintainers
People who actively chat on your Discord should already be considered contributors! They know (and use) your project, they see many use-cases, they hear a bunch of feedback, and they perhaps even created a PR or two for you. If at any point your budget allows you to hire a maintainer, your active community members should be the first developers you consider. They not only share the same passion for the project as you, but they are also more likely to quickly get familiar with the source code. Fun fact, all of the early Appwrite hires were active contributors 🤯
## 📃 Share Development Updates
Again, going back to the roots of the mindset behind an open-source project, you want to be as transparent as possible, to get feedback for features you are working on. With no interest shown by the community in the feature you are developing, you might as well consider delaying it for another release.
Discord is a great channel for sharing those updates, as it automatically sends a notification to members. These development notes show that you actively work on a project, allow you to get feedback even before a feature is implemented, and help with building interest in your next release. At Appwrite, we started doing weekly community updates some time ago, and we already received a lot of positive feedback for doing it.
## 🧪 Find Alpha Testers
Developers **love** new features! By preparing an alpha build and sharing it with your community, you can easily get testers for your next release. This helps you prevent bugs before releasing a big feature and keep your application stable for production use. It also helps you fine-tune the feature, while still having the option to do breaking changes. We at Appwrite hosted many alpha tests for big features, such as Database refactor and Cloud Functions Gen-2.
## 📈 New KPIs
In an open-source project that wants to get funds for growth, the main strategy is to find an investor. Having a Discord community can provide a lot of insightful metrics to share with a potential investor for evaluation of your project. Of course, it’s not as simple as showing cool numbers, but having a gradually increasing amount of new members, active members or messages can all be key performance indicators for the investor to make a decision. Having an active Discord community can also help you fill in a slide or two with some heart-warming feedback messages to show proper validation of your project in the real world.
## 👨🎓 Conclusion
A Discord server can be a really powerful communication channel for any open-source project if used wisely. Discord server can help with collecting feedback, providing quick support, building new contributor relationships, getting releases tested, and building a community in general. With all advantages, the Discord server can provide, keep in mind that some new problems can arise. For us, the biggest challenge was to actively engage with our GitHub issues alongside Discord. We had to start requesting people to open GitHub issues for problems they report on Discord, otherwise, we would forget about them.
## 📚 Learn More
[Appwrite](https://appwrite.io/) is an open-source Backend-as-a-Service (BaaS), packaged as a set of Docker microservices, to give developers of any background the tools necessary to build modern apps quickly and securely. Chat with us on [Discord](https://appwrite.io/discord), or learn more about Appwrite:
- 🚀 [Appwrite Github](https://github.com/appwrite)
- 📜 [Appwrite Docs](https://appwrite.io/docs)
- 💬 [Discord Community](https://appwrite.io/discord)
---
### Blog Post: Best database pagination technique
Published: 2022-01-06
Description: Learn difference between offset and cursor pagination.
Reading Time: 1 min read minutes
This is an external article. Visit [Appwrite blog](https://appwrite.io/blog/post/best-pagination-technique) to read this article.
---
### Blog Post: Speed-up your web with Blurhash
Published: 2021-08-01
Description: Optimize website performance with visual image placeholders.
Reading Time: 6 min read minutes
> Alongside this article, I wrote a demo project made with Angular, TailwindCSS and Blurhash. You can check it out on [Github](https://github.com/Meldiron/blurhash-angular-demo).
## Table Of Contents
- [Introduction](#introduction)
- [What is Blurhash?](#what-is-blurhash)
- [Preparing a project](#preparing-a-project)
- [Encoding an image](#encoding-an-image)
- [Decoding an image](#decoding-an-image)
---
## Introduction
Since I started working on e-shops with hundreds of products on the website, I have been looking for strategies to optimise the UX.
I started by adding **loading animations**, but seeing the same rolling animation on ten places of a website is **surely** not the solution:

Then I found out you can use **skeleton loaders** to fill empty spaces with nice-looking elements that represent actual data but are blank at the moment. You can see this approach on dev.to:

This is all you need for most websites, but sadly, this wasn't enough for me. There was still a few seconds of loading time between when my data was loaded and when the images were rendered. I could already see the name and price of a product, but I didn't have pictures loaded yet. Due to this, whenever a new image got loaded, the content jumped. I tried to solve this by defining the size of an image and showing white space while the image was loading, but that made the website feel really boring.
Finally, I met **Blurhash** 🎉
## What is Blurhash?
Blurhash is a tool that takes our 500kb image and generates a 30B hash that can be used to generate a blurred version of an image. You can easily store this hash as a text into your database and load it with every other text content such as article title or author name.
This comes really handy when working with any images because you don't have to be creative about `What will I do while images are loading?`. Instead of creating empty space, you simply take Blurhash of an image and show the blurred version while the image is loading.

## Preparing a project
I started by creating an empty Angular project with TailwindCSS and Blurhash library installed.
First, I defined my array of images. This simulated data that I would receive from an API so I can start working on the blurring algorithm:
```typescript
images = [
{
name: "Fastest car ever 💪",
url: "https://images.unsplash.com/photo-1627392689954-0a4d150687a7?ixid=MnwxMjA3fDB8MHxwaG90by1wYWdlfHx8fGVufDB8fHx8&ixlib=rb-1.2.1&auto=format&fit=crop&w=700&q=80",
},
{
name: "Let's eat 🍉",
url: "https://images.unsplash.com/photo-1627308595127-d9acf19107ce?ixid=MnwxMjA3fDB8MHxwaG90by1wYWdlfHx8fGVufDB8fHx8&ixlib=rb-1.2.1&auto=format&fit=crop&w=675&q=80",
},
{
name: "Who doesn't love dogs 🐶",
url: "https://images.unsplash.com/photo-1627366247844-b4b5df8854d8?ixid=MnwxMjA3fDB8MHxwaG90by1wYWdlfHx8fGVufDB8fHx8&ixlib=rb-1.2.1&auto=format&fit=crop&w=634&q=80",
},
{
name: "We love cats too 😻",
url: "https://images.unsplash.com/photo-1543852786-1cf6624b9987?ixid=MnwxMjA3fDB8MHxwaG90by1wYWdlfHx8fGVufDB8fHx8&ixlib=rb-1.2.1&auto=format&fit=crop&w=634&q=80",
},
];
```
After adding some basic HTML with Angular data binding, I was able to get the images rendered:

To confirm what Blurhash can do in numbers, I decided to write a tiny script that loads the file size of our images and presented it in the HTML:
```typescript
// Calculate original image size
for (const image of this.images) {
const fileSize = await new Promise((resolve, _reject) => {
var http = new XMLHttpRequest();
http.open("HEAD", image.url, true);
http.onreadystatechange = function () {
if (this.readyState == this.DONE) {
if (this.status === 200) {
const fileSize = this.getResponseHeader("content-length");
resolve(fileSize ? +fileSize : 0);
}
}
};
http.send();
});
image.originalSize = fileSize;
}
```

Looks good to me; let's start using Blurhash! When working with Blurhash, you split the job into two parts: **ENCODE** and **DECODE**.
## Encoding an image
Before using the blur **hash**, I need to have the **hash**, right? Encode function of Blurhash library takes an array of pixels with their colour ([Uint8ClampedArray](https://developer.mozilla.org/en-US/docs/Web/API/Canvas_API/Tutorial/Pixel_manipulation_with_canvas)) and returns a simple string that represents newly-created hash for our image. To provide the correct input to the function, I need to render our image inside a virtual canvas and extract data about the pixels in the canvas:
```typescript
private async generateBlurhash(imageUrl: string): Promise<{
hash: string;
width: number;
height: number;
}> {
const loadedImageObject = await new Promise(
(resolve, reject) => {
const img = new Image();
img.setAttribute('crossOrigin', '');
img.onload = () => resolve(img);
img.onerror = (...args) => reject(args);
img.src = imageUrl;
}
);
const canvas = document.createElement('canvas');
canvas.width = loadedImageObject.width;
canvas.height = loadedImageObject.height;
const context = canvas.getContext('2d');
context?.drawImage(loadedImageObject, 0, 0);
const imageData = context?.getImageData(
0,
0,
loadedImageObject.width,
loadedImageObject.height
);
if (!imageData) {
throw Error('Could not render an image.');
}
return {
hash: encode(imageData.data, imageData.width, imageData.height, 4, 4),
width: loadedImageObject.width,
height: loadedImageObject.height,
};
}
```
Now I used this function to add `hash` attribute to our array of images:
```typescript
for (const image of this.images) {
const blurhashData = await this.generateBlurhash(image.url);
image.hash = blurhashData.hash;
image.height = blurhashData.height;
image.width = blurhashData.width;
}
```
Hmm, that wasn't too bad. Few lines of code and the hashing function is ready 💪 When preparing this project, I noticed that hashing is a pretty CPU-heavy method and takes almost 1 second to finish. It is up to you to decide whether you want to use the client's CPU or do the hashing on the server. Anyway, keep in mind, this only needs to be done when uploading an image, so you don't need to worry about extreme load on the backend.
## Decoding an image
Once I had the hash of an image, I needed to do the exact opposite. I needed to convert our string input into image output.
I started with a simple `decode` function provided by Blurhash library. Alongside the image hash, I provided the expected width and height of hashed image:
```typescript
const blurhashPixels = decode(image.hash, image.width, image.height);
```
This function returns a loooooooong array in which every four items represents the RGBA (red, green, blue, alpha) value of a pixel. You can imagine this as a 2D definition of our image.
Although our 2D array od pixels is pretty useless to us, the canvas can easily convert it into an actual image if we tell it the width and height of our 2D array:
```typescript
const blurhashCanvas: HTMLCanvasElement = (
document.getElementById(`blurhash_canvas_${imageLoopIndex}`)
);
const ctx = blurhashCanvas?.getContext("2d");
const imageData = ctx?.createImageData(image.width, image.height);
imageData.data.set(blurhashPixels);
ctx?.putImageData(imageData, 0, 0);
```
Finally, I put everything together, hook it to an HTML template and add some delays so I can see what is going on. The result is stunning; check it out!

If you are lost and unsure how some parts work together, please check out my [Github project](https://github.com/Meldiron/blurhash-angular-demo) that contains the whole application I built alongside this article. Snippets in the article were taken from the project to quickly showcase the specific logic of Blurhash.
---
That's it, for now ✨ If you are interested in cool new technologies, feel free to follow me, and you will be notified whenever a new post is published.
---
## SEO Information
### Home Page
Title: Matej Bačo
Description: I am impact-driven software engineer from Czech Republic in love with everything open source.
Image: /logo.webp
### About Page
Title: About | Matej Bačo
Description: How I grew into who I am today.
Image: /logo.webp
### Projects Page
Title: Projects | Matej Bačo
Description: Check out what I've been working on.
Image: /logo.webp
### Blog Page
Title: Blog | Matej Bačo
Description: Articles I write in free time, and for employers.
Image: /logo.webp